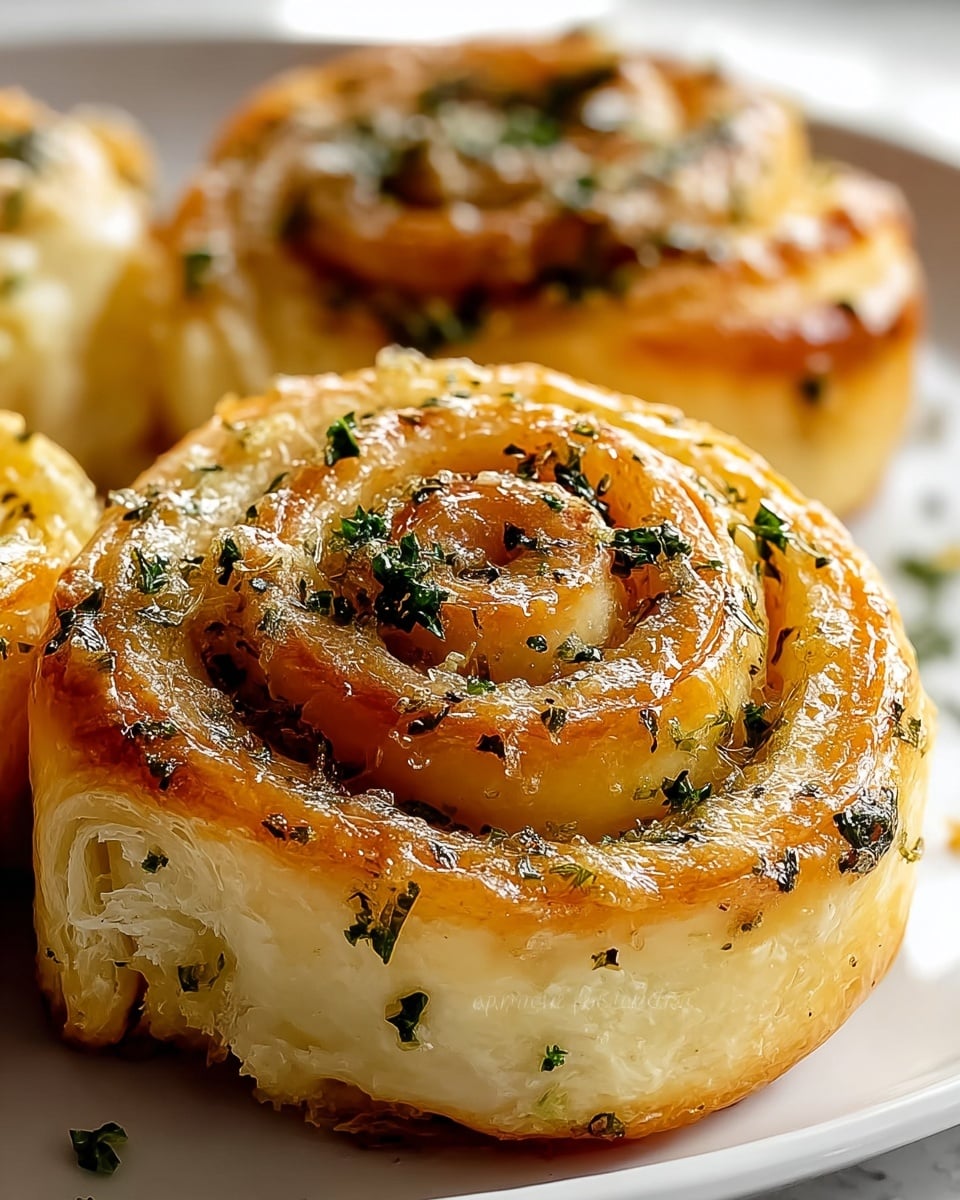
Garlic Swirl Rolls: A Flavorful Delight Recipe
Picture this: warm, golden rolls fresh from the oven, their soft, pillowy texture inviting you in with every glance. The tantalizing aroma of garlic and melted butter swirls playfully in the air, promising a flavor-packed bite that’s both comforting and unforgettable. These Garlic Swirl Rolls are more than just bread—they’re the kind of homemade goodness that effortlessly elevates any meal, impresses family and friends, and comes together surprisingly quickly. Trust me, once you make these, your kitchen will be filled with joy and irresistible cravings!
Why You’ll Love This Garlic Swirl Rolls: A Flavorful Delight Recipe
- Ready in under an hour: From start to finish, you’ll have fresh, warm rolls on your table in about 45 minutes—perfect for last-minute gatherings or cozy dinners.
- Uses simple, pantry-friendly ingredients: Most of what you need is probably already in your kitchen, so you can dive right in without any extra trips to the store.
- Perfect for beginners: The straightforward steps and forgiving dough make this recipe accessible, no matter your experience level in baking.
- Impressive presentation: Those beautiful garlic swirls aren’t just delicious—they look stunning, too, making these rolls a centerpiece-worthy addition.
- Customizable to your tastes: Add cheese, herbs, or spices to make it your own; this recipe welcomes your creativity with open arms.
Why This Garlic Swirl Rolls: A Flavorful Delight Recipe Works
This recipe succeeds by combining fundamental baking techniques with vibrant flavors that dance together perfectly. The yeast-infused dough rises to a perfect fluffiness because of the warm milk and gentle kneading. The garlic butter filling, softened to a luscious spread, injects irresistible aroma and savory richness right into the spiraled layers of dough. Rolling the dough tightly ensures each bite is loaded with that garlicky goodness, while the second rise creates lightness and fluff. Altogether, these steps bring you a roll that’s soft, tender, and bursting with flavor.
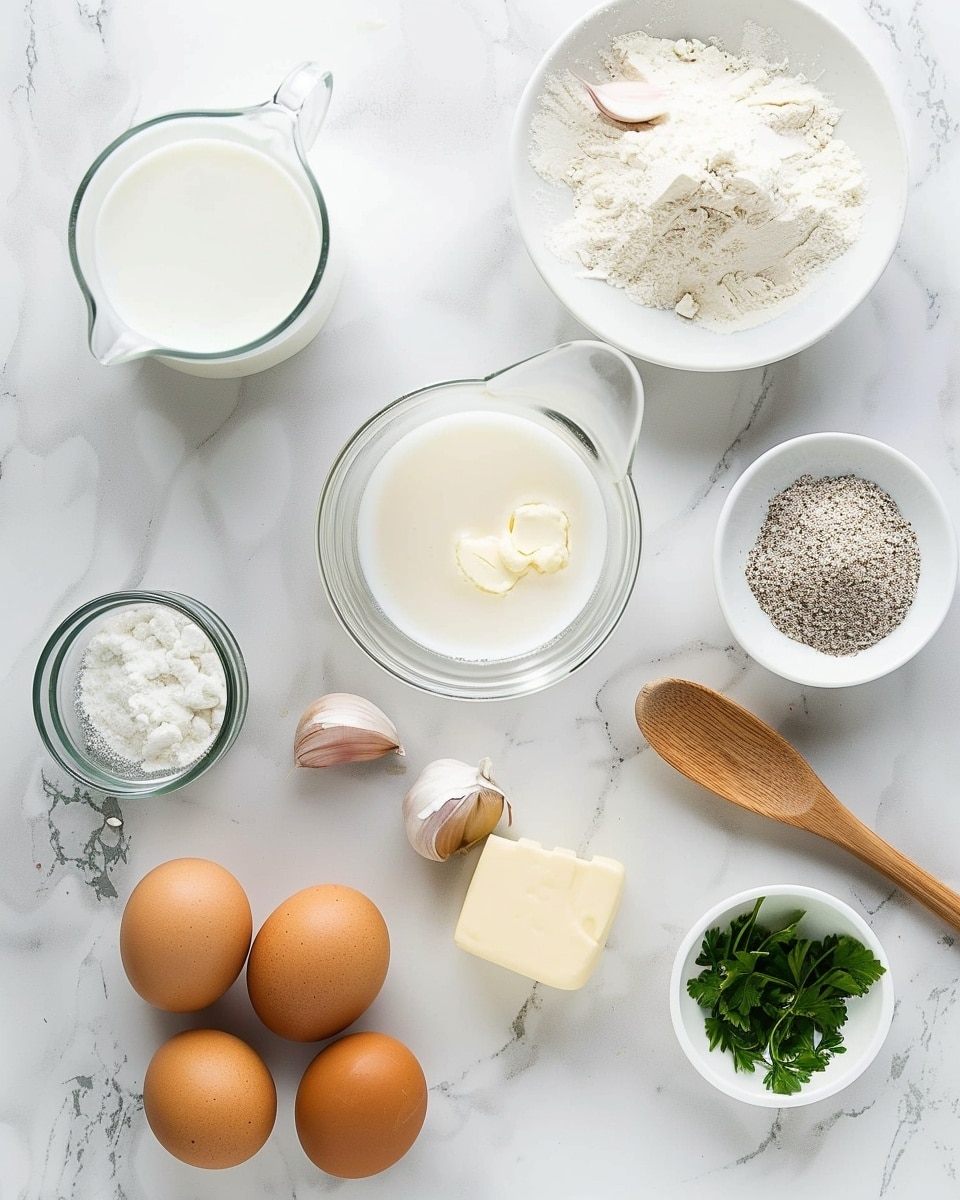
Ingredients You’ll Need
Gathering these simple, quality ingredients means your Garlic Swirl Rolls will turn out perfectly tender and packed with garlicky goodness.
- Warm milk (110°F): Activates the yeast gently to help the dough rise beautifully and create that soft texture.
- Sugar: Feeds the yeast for a perfect, airy rise and adds subtle sweetness to balance the savory flavors.
- Active dry yeast: The magic behind the fluffy dough that makes these rolls light and airy.
- Unsalted butter (melted + softened): Adds richness to the dough and creamy garlic flavor to the filling.
- Large eggs: Bind the dough and contribute to its tender crumb.
- Salt: Enhances all the flavors without overpowering the garlic.
- All-purpose flour: Provides structure and chew to the dough, making it perfect for rolling and shaping.
- Minced garlic: The star of the filling that brings a bold, aromatic punch you’ll fall in love with.
- Fresh parsley: Adds a fresh, vibrant touch and balances the richness of the butter.
- Salt and pepper to taste: Season the filling right to your liking for that perfect savory pop.
Ingredient Substitutions & Tips
- Milk: Substitute with almond milk or oat milk for a dairy-free option, keeping the temperature warm to activate the yeast.
- Butter: Use olive oil for a lighter, slightly fruity taste in the dough and filling, though it will change the texture slightly.
- Fresh parsley: Swap with fresh basil or cilantro to experiment with different herbal profiles.
- All-purpose flour: Bread flour can be used for a chewier texture, or whole wheat flour for a nuttier flavor, but reduce liquid slightly.
👨🍳 Pro Tips for Perfect Results
- Warm your ingredients: Ensuring your milk is around 110°F helps activate the yeast perfectly without killing it.
- Knead with care: Knead until the dough feels elastic and smooth—it should spring back gently when poked.
- Don’t rush the rises: Let the dough double in size and then rise again after shaping for maximum fluffiness.
- Even spreading: Spread the garlic butter filling evenly to guarantee each swirl of the roll is bursting with flavor.
- Bake until golden: Keep an eye for a deep golden crust, which signals that perfect crunch on the outside while keeping the inside soft.
How to Make Garlic Swirl Rolls: A Flavorful Delight Recipe
Step 1: Prepare the Dough
Begin by mixing warm milk and sugar in a large bowl, then sprinkle the yeast on top. Let it sit for 5 to 10 minutes until it becomes frothy and alive with bubbles. This signals that the yeast is activated and ready to work its magic. Next, stir in the melted butter, eggs, and salt. Gradually add your flour, mixing until a soft, slightly sticky dough forms.
💡 Pro Tip: Use a stand mixer with a dough hook if you have one—it makes kneading much easier and more consistent.
Step 2: Knead and Let Rise
Turn the dough onto a floured surface and knead for about 5 to 7 minutes. You want it smooth and elastic, almost silky to the touch. Grease a large bowl, place your dough inside, and cover it with a damp cloth or plastic wrap. Set it in a warm spot for 1 to 1 ½ hours, or until it doubles in size like a fluffy cloud ready to delight.
💡 Pro Tip: If your kitchen is cool, try preheating your oven for a minute, then turning it off before placing the dough inside to rise.
Step 3: Prepare the Garlic Butter Filling
While the dough rises, mix together the softened butter, minced garlic, chopped parsley, and seasoning. Stir until smooth and spreadable. This luscious garlic butter is what turns simple rolls into a flavorful experience.
💡 Pro Tip: Use fresh garlic for the brightest, most pungent flavor. Roasted garlic works beautifully, too, if you want a sweeter, mellow twist.
Step 4: Shape the Rolls
Once risen, punch down the dough gently to release excess air. Roll it out onto a floured surface into a 12×18 inch rectangle. Evenly spread the garlic butter mixture all over, savoring the burst of aromas filling your kitchen. Roll the dough tightly from the long edge into a log, then slice it into 12 even pieces for perfectly sized rolls.
💡 Pro Tip: Use a sharp knife or dental floss to get clean, beautiful cuts, helping the rolls retain their lovely spiral shapes.
Step 5: Second Rise
Place the rolls cut-side up in a greased baking dish, leaving a little space between them. Cover and let them rise again for 30 to 45 minutes until puffy and inviting. This second rise is essential for creating light, fluffy layers in each roll.
💡 Pro Tip: Don’t rush this step; patience means softness and an airy crumb you’ll swoon over.
Step 6: Bake to Perfection
Preheat your oven to 350°F (175°C). Bake the rolls for 20 to 25 minutes, or until the tops are a gorgeous golden brown and the kitchen is filled with that irresistible garlic scent. Allow them to cool just slightly before serving to enjoy the perfect warm, buttery bite.
💡 Pro Tip: Brush extra melted butter over the tops right after baking for an irresistible sheen and added richness.
Common Mistakes to Avoid
Learn from these common pitfalls:
- Too hot milk: Killing the yeast by using milk that’s too hot will prevent your dough from rising properly.
- Under-kneading: Not kneading enough results in dense rolls lacking the signature fluffiness.
- Skipping the second rise: This step is crucial for light rolls; skipping it leads to dense, heavy bread.
- Uneven filling spread: If the garlic butter isn’t spread evenly, some rolls will lack flavor and moisture.
- Baking at the wrong temperature: Too hot and the rolls burn on the outside while staying raw inside; too low and they won’t brown well.
- Cutting rolls unevenly: Unequal sizes will cause uneven baking, leaving some undercooked.
Delicious Variations to Try
Once you’ve mastered the classic version:
Cheesy Garlic Swirl Rolls
Add a generous layer of shredded mozzarella or cheddar cheese to the garlic butter filling before rolling the dough. You’ll get melty, gooey pockets of cheesy delight with every bite.
Herb-Infused Rolls
Mix fresh rosemary, thyme, or oregano into the garlic butter for a fragrant, Mediterranean twist that adds an elegant depth of flavor.
Spicy Garlic Rolls
Stir in a pinch of crushed red pepper flakes or chopped jalapeños into the filling for those who love their rolls with a hint of heat and excitement.
Sweet & Savory Twist
Incorporate a touch of honey into the butter and top the rolls with coarse sea salt right before baking for an addictive sweet and salty combo.
Vegan Garlic Rolls
Replace dairy butter with vegan margarine or olive oil and swap milk for plant-based alternatives, while using flax eggs or a suitable egg substitute. The result? Delicious rolls everyone can enjoy!
How to Serve Garlic Swirl Rolls: A Flavorful Delight Recipe
Garnishes
Sprinkle freshly chopped parsley or chives over the rolls for a fresh, colorful pop. Drizzle with a little garlic-infused olive oil or melted herb butter for an extra glossy finish.
Side Dishes
These rolls shine alongside comforting soups like creamy tomato basil or hearty chicken noodle. Pair with a fresh garden salad or roasted veggies for a balanced meal that feels like a warm hug.
Creative Ways to Present
Arrange your rolls on a rustic wooden board lined with parchment for casual gatherings or serve in a beautiful ceramic dish brushed with garlic butter to keep them warm. Adding a small bowl of flavored dipping oil or marinara sauce invites fun, interactive nibbling.
Make Ahead and Storage
Storing Leftovers
Store any extra rolls in an airtight container or tightly wrapped with plastic wrap at room temperature for up to two days. This keeps them soft and ready to enjoy.
Freezing
Wrap the rolls individually or as a batch in aluminum foil, then place in a freezer-safe bag. Freeze for up to 3 months. Thaw overnight in the fridge, then warm in the oven before serving to refresh their softness.
Reheating
Warm leftover rolls in a 350°F oven for 5 to 10 minutes, wrapped loosely in foil to keep them moist or uncovered for a crispy crust—either way, deliciously fresh!
FAQs
Can I make the dough ahead of time?
Yes! You can prepare the dough, cover it tightly, and refrigerate overnight. Just bring it to room temperature before shaping and rising again for the best results.
Can I use garlic powder instead of fresh garlic?
While fresh garlic delivers the brightest flavor, garlic powder can be used in a pinch. Use about 1 teaspoon, but expect a slightly less vibrant garlic aroma.
What if my dough doesn’t rise?
Check your yeast’s expiration date and that your milk wasn’t too hot or cold. Yeast needs warmth and sugar to activate properly.
Can I add cheese to the filling?
Absolutely! Adding grated Parmesan, mozzarella, or cheddar elevates the flavor and creates gooey, cheesy bites.
Are these rolls suitable for freezing?
Yes, they freeze beautifully. Just make sure to wrap tightly to prevent freezer burn and reheat gently to maintain softness.
Can I substitute eggs with something else?
For an egg-free version, try flax eggs or chia seeds soaked in water as a binder, though the texture may vary slightly.
What’s the best flour to use?
All-purpose flour works perfectly, but bread flour can create a chewier texture. Whole wheat flour adds nuttiness but might make rolls denser.
How do I keep the rolls soft after baking?
Brush them with melted butter as soon as they come out of the oven and store in an airtight container to lock in moisture.
Final Thoughts
Making these Garlic Swirl Rolls is like crafting a warm, garlicky hug you can share with those you love. The way the butter melts and mingles with fresh herbs in tender, fluffy spirals never fails to bring a smile and requests for seconds. Every step feels rewarding, from kneading the soft dough to pulling the golden rolls from the oven, filling your home with irresistible scents that welcome family and friends.
Have you tried this Garlic Swirl Rolls: A Flavorful Delight Recipe? I’d love to hear how it turned out! Leave a comment below. If you loved this recipe, please share it with friends and family. Happy cooking! 🧄🍞😊
PrintGarlic Swirl Rolls: A Flavorful Delight Recipe

Garlic Swirl Rolls are soft, fluffy yeast rolls swirled with a flavorful garlic butter and parsley filling. These delicious homemade rolls are perfect as a side for any meal or as a tasty snack, delighting your family and guests with every bite.
- Prep Time: 20 minutes
- Cook Time: 25 minutes
- Total Time: 45 minutes
- Yield: 12 rolls 1x
- Category: Bread
- Method: Baking
- Cuisine: American
Ingredients
For the Dough:
- 2 cups warm milk (110°F)
- 2 tablespoons sugar
- 2 ¼ teaspoons active dry yeast (1 packet)
- ½ cup unsalted butter, melted
- 2 large eggs
- 1 teaspoon salt
- 4–5 cups all-purpose flour
For the Filling:
- ½ cup unsalted butter, softened
- 4 cloves garlic, minced
- ¼ cup fresh parsley, chopped
- Salt and pepper to taste
Instructions
- Prepare the Dough: In a large bowl, combine warm milk and sugar, then sprinkle the yeast over the top. Let it sit for 5-10 minutes until frothy, indicating the yeast is activated. Add melted butter, eggs, and salt to the mixture. Gradually incorporate flour until a soft dough forms.
- Knead the Dough: Turn the dough onto a floured surface and knead for 5-7 minutes until smooth and elastic. Place it in a greased bowl, cover with a cloth or plastic wrap, and allow it to rise in a warm location for 1 to 1.5 hours until doubled in size.
- Prepare the Filling: In a small bowl, combine the softened butter, minced garlic, chopped parsley, salt, and pepper. Mix thoroughly to create a flavorful garlic butter spread.
- Shape the Rolls: Punch down the risen dough to release air. Roll it out on a floured surface into a 12×18 inch rectangle. Spread the garlic butter filling evenly over the surface. Starting from the long edge, roll the dough tightly into a log, then cut it into 12 equal pieces.
- Second Rise: Place the rolls cut-side up in a greased baking dish, spacing them slightly apart. Cover and let them rise again for 30-45 minutes until they become puffy.
- Bake the Rolls: Preheat the oven to 350°F (175°C). Bake the rolls for 20-25 minutes until they turn golden brown on top. Remove from the oven and allow them to cool slightly before serving warm.
Notes
- For an extra burst of flavor, add grated cheese such as Parmesan or mozzarella to the garlic butter filling before rolling.
- These rolls are best enjoyed fresh and warm, but they can be stored at room temperature for up to two days, kept in an airtight container.
Keywords: garlic rolls, yeast bread, homemade rolls, garlic butter rolls, soft rolls, dinner rolls