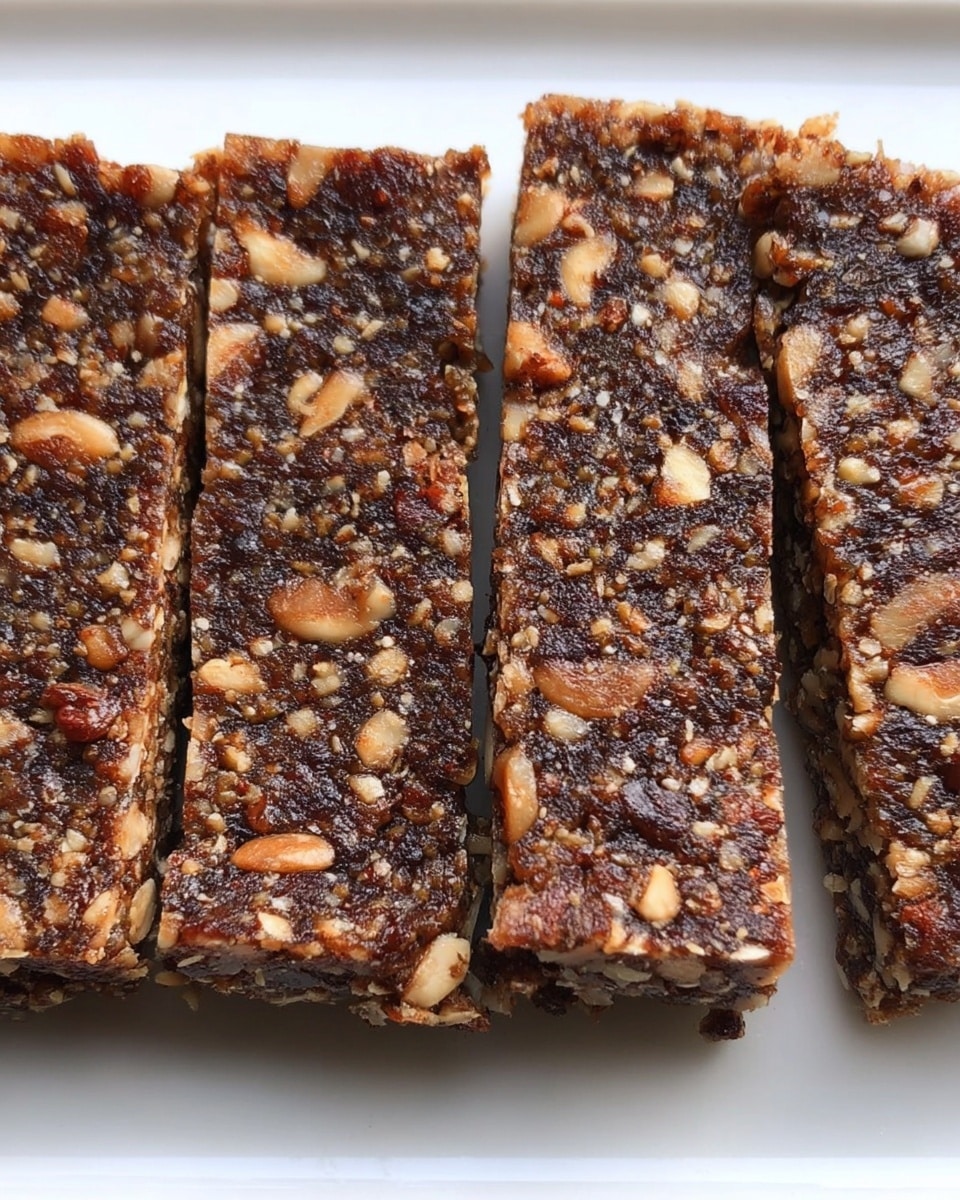
Chocolate Chip Date Nut Bars Recipe
Picture this: the moment you press the rich, fragrant date and nut mixture into the pan, the sweet aroma of cocoa mingles with toasted nuts and the hint of vanilla, wrapping your kitchen in an irresistible hug. As you lift a piece of these Chocolate Chip Date Nut Bars, the chewy, melt-in-your-mouth texture paired with bursts of chocolate chips feels like a secret reward for your day. Quick to assemble yet luxurious enough to impress, these bars are my treasured go-to whenever I want a treat that feels special but doesn’t take all afternoon.
Why You’ll Love This Chocolate Chip Date Nut Bars Recipe
- Ready in under 1.5 hours: From soaking to chilling, these bars come together quickly without complicated steps.
- Uses simple ingredients: Just nuts, dates, cocoa, and chocolate chips—nothing fancy, all wholesome and natural.
- Perfect for beginners: No baking required! It’s mostly mixing and pressing, so anyone can make it with confidence.
- Impressive presentation: These bars cut cleanly and look like you spent hours crafting them—ideal for sharing!
- Customizable: Swap nuts or add spices to make it your own. Endless possibilities for flavor twists.
Why This Chocolate Chip Date Nut Bars Recipe Works
This recipe shines because it balances textures and flavors with a few thoughtful techniques. Soaking the dates softens them perfectly, creating a natural, sticky paste that binds the nuts and cocoa together. Processing the nuts finely ensures even distribution and a delightful crunch without being overwhelming. Adding reserved soaking liquid just enough helps the mixture stick while keeping the bars chewy, never dry. The gentle chilling step sets everything beautifully, giving you bars with firm edges and a tender, flavorful bite every time.
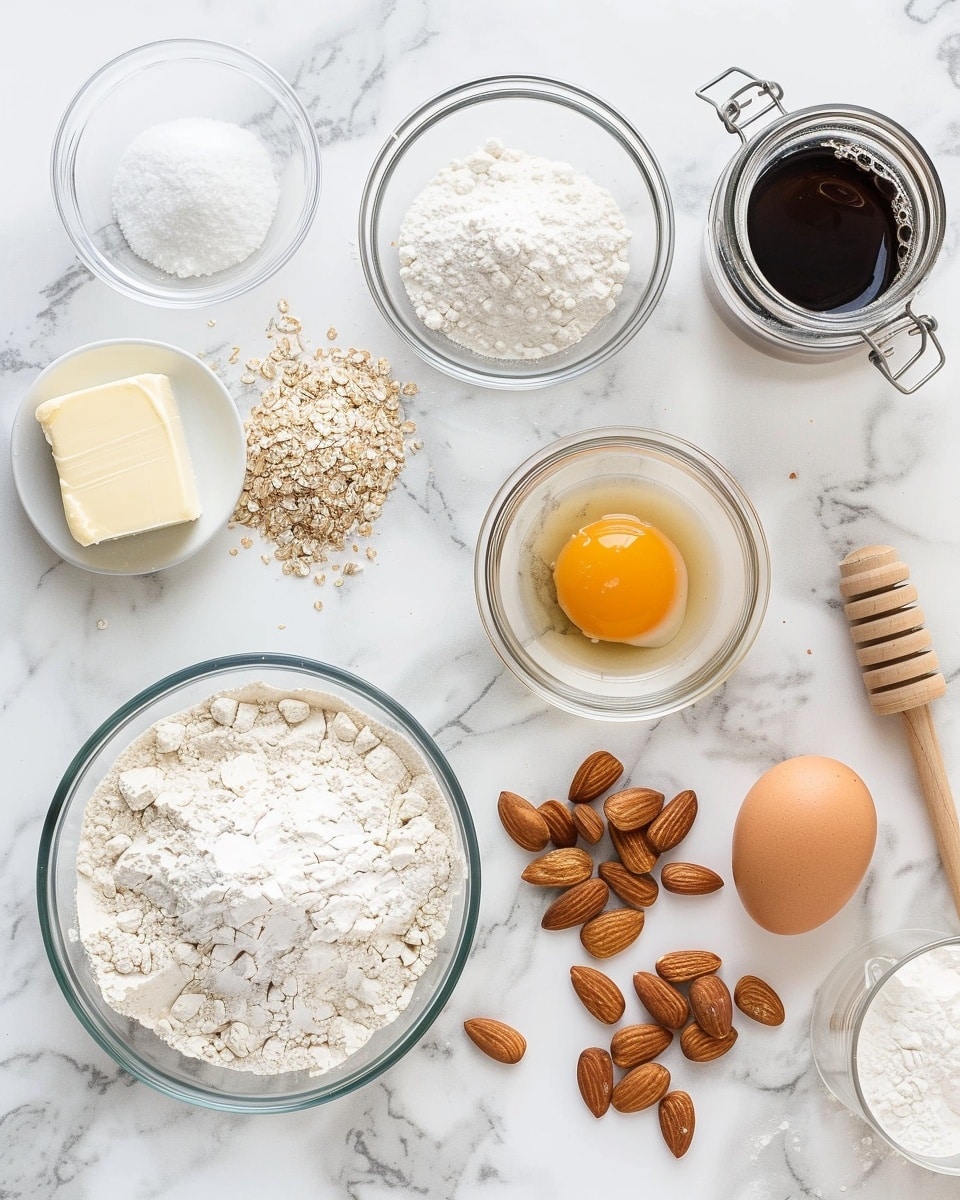
Ingredients You’ll Need
These simple, pantry-friendly ingredients transform into a mouthwatering snack that tastes far more decadent than it really is. Each ingredient plays a crucial role in the flavor and texture harmony you will adore.
- Chopped nuts (cashews and almonds): Provide crunch and a rich, buttery base.
- Pitted dates: Naturally sweet and sticky, they hold everything together.
- Pure vanilla extract: Adds warm, inviting aroma and depth.
- Cocoa powder: Gives a luscious, chocolatey foundation.
- Chocolate chips: Little bursts of melty chocolate magic.
- Salt: Enhances all the flavors, balancing sweetness perfectly.
Ingredient Substitutions & Tips
- Nuts: Swap cashews and almonds for walnuts, pecans, or pistachios for a different flavor crunch.
- Dates: Medjool dates are ideal for their softness and sweetness, but Deglet Noor can work if soaked longer.
- Cocoa powder: Feel free to use Dutch-processed cocoa for a milder, richer taste.
- Chocolate chips: Dark, semi-sweet, or even white chocolate chips can be used based on your preference.
👨🍳 Pro Tips for Perfect Results
- Soak those dates: Don’t skip soaking; it softens them so your bars aren’t dry or crumbly.
- Pulse, don’t pulverize: When processing nuts, keep some texture for that satisfying bite.
- Use parchment paper: Line your pan for easy removal and clean edges.
- Add liquid slowly: Just a teaspoon at a time ensures perfect stickiness without sogginess.
- Chill well: Patience pays off; chilling sets the bars to hold their shape and flavor better.
How to Make Chocolate Chip Date Nut Bars Recipe
Step 1: Soak the Dates
Start by soaking your pitted dates in warm water for at least 10 minutes to soften them up. This step transforms the dates into a pliable paste when processed and ensures your bars come out wonderfully moist and sticky.
💡 Pro Tip: If your dates seem dry or old, soak them even longer to guarantee smooth blending.
Step 2: Chop the Nuts
Next, toss your nuts into a food processor and pulse until you get small, bite-sized pieces. This texture gives the bars a satisfying crunch without overpowering the chewiness.
💡 Pro Tip: Be careful not to over-process the nuts into a fine meal; a little chunk goes a long way.
Step 3: Mix Dry Ingredients
In a bowl, combine the chopped nuts with cocoa powder, salt, and chocolate chips. Stir these flavorful components together to create a chocolate-nutty base ready for the date paste.
💡 Pro Tip: Toast the nuts lightly beforehand for an extra depth of flavor if you have a few minutes.
Step 4: Make the Date Paste
Drain the soaked dates, saving the soaking liquid for later use. Process the softened dates until they form a smooth, sticky paste. This natural binder keeps your bars together and adds a lovely caramel-like sweetness.
💡 Pro Tip: If needed, add a teaspoon of the reserved soaking liquid to help the dates blend smoothly.
Step 5: Combine and Adjust Consistency
Mix the date paste into your nut and cocoa mixture thoroughly. If the mixture feels too dry to hold together when pressed, gradually add the reserved date soaking liquid by the teaspoon until just sticky enough.
💡 Pro Tip: Go slow with the liquid—too much can make the mixture soggy and hard to set.
Step 6: Press Into Pan and Chill
Line an 8×8 pan with parchment paper, then press the mixture firmly and evenly into the pan using the back of a spoon. The even pressure locks everything in place and creates those neat edges.
💡 Pro Tip: Press firmly but don’t compact the mixture too much; you want chewiness, not rock-hard bars.
Pop the pan into the refrigerator for at least one hour to let the bars firm up perfectly.
Common Mistakes to Avoid
Learn from these common pitfalls:
- Spoiling the texture by skipping soak: Using dry dates without soaking results in crumbly bars that fall apart.
- Overprocessing nuts: Blending nuts into a fine powder makes the bars mushy and lacking crunch.
- Adding too much liquid: Excess date water can make bars too wet, preventing them from setting.
- Not pressing firmly: Loose mixture leads to crumbly bars that don’t hold shape.
- Rushing the chill: Cutting bars before they’ve fully chilled can cause crumbling and mess.
- Using old ingredients: Stale nuts or dry dates dull the flavors and alter texture negatively.
Delicious Variations to Try
Once you’ve mastered this classic Chocolate Chip Date Nut Bars Recipe, why not play with flavors to keep things exciting?
Spiced Cinnamon Date Nut Bars
Add a teaspoon of ground cinnamon and a pinch of nutmeg into the nut and cocoa mix for a cozy, warm twist perfect for chilly afternoons.
Tropical Coconut & Macadamia
Swap out half the nuts for macadamia nuts and sprinkle shredded unsweetened coconut into the mix for a lush, tropical feel.
Orange Zest & Dark Chocolate
Mix in a tablespoon of fresh orange zest and use dark chocolate chips to add a citrusy brightness alongside rich chocolate notes.
Peanut Butter Date Bars
Swirl in two tablespoons of creamy peanut butter to the date paste before mixing for an extra layer of nutty indulgence.
Seeded Superfood Bars
Add a quarter cup of chia seeds, flaxseeds, or pumpkin seeds for a nutritional boost and extra texture crunch.
How to Serve Chocolate Chip Date Nut Bars Recipe
Garnishes
Sprinkle a little sea salt on top before chilling to enhance flavors, or add a drizzle of melted chocolate for an elegant finish. A few whole nuts or a dusting of cocoa powder also make beautiful garnishes.
Side Dishes
Pair these bars with a cup of herbal tea or fresh brewed coffee for a delightful afternoon snack. They also complement a simple glass of milk or yogurt for breakfast on the go.
Creative Ways to Present
Cut into bite-sized squares for a party platter, placed on a pretty serving board with fresh fruit. Wrap individual bars in parchment paper tied with rustic twine for thoughtful gifts or lunchbox surprises.
Make Ahead and Storage
Storing Leftovers
Keep your bars in an airtight container refrigerated for up to one week. The cool temperature helps them maintain their chewy texture and rich flavor.
Freezing
You can freeze these bars for up to 3 months. Wrap them tightly in plastic wrap and then foil or place in a freezer-safe container. Thaw in the refrigerator overnight before enjoying.
Reheating
These bars are best served chilled or at room temperature. If you like them softer, pop a few pieces in the microwave for 10-15 seconds to warm gently—just enough to soften the chocolate chips slightly.
FAQs
Can I make this recipe nut-free?
Absolutely! Replace nuts with seeds like sunflower or pumpkin seeds, and you’ll still have fantastic texture and flavor.
Do I have to use chocolate chips?
While chocolate chips add delightful bursts of melty sweetness, you can skip them or substitute with dried cranberries or chopped dried apricots.
How long do these bars last?
Stored airtight in the refrigerator, they’ll keep fresh for about one week, or freeze for longer storage.
Can I use other dried fruits instead of dates?
Dates work best because of their sticky texture, but raisins or figs can be used if soaked well though the texture will differ slightly.
Is this recipe vegan?
Yes! All ingredients are plant-based, making it a perfect vegan snack.
Can I double the recipe?
Definitely! Just double all ingredients and use a larger pan. Increase chilling time if needed.
What type of cocoa powder should I use?
Natural or Dutch-processed cocoa both work well, but Dutch-processed offers a smoother, less acidic chocolate flavor.
Can I make these bars gluten-free?
They naturally are gluten-free, but always check your chocolate chips and cocoa powder labels to ensure no cross-contamination.
Final Thoughts
Making these Chocolate Chip Date Nut Bars Recipe feels like weaving together simple, wholesome ingredients into a truly magical treat. Every chewy bite sings with the warmth of vanilla and the bittersweet notes of cocoa, while the nuts add that perfect snap you crave. This recipe is such a joy to share, whether for an afternoon pick-me-up or a homemade gift from the heart.
Have you tried this Chocolate Chip Date Nut Bars Recipe? I’d love to hear how it turned out! Leave a comment below. If you loved this recipe, please share it with friends and family. Happy cooking! 😊
PrintChocolate Chip Date Nut Bars Recipe
Delicious and wholesome Chocolate Chip Date Nut Bars made with a blend of chopped nuts, naturally sweetened pitted dates, cocoa powder, and chocolate chips. These no-bake bars are perfect as a healthy snack or dessert, combining rich chocolate flavor with the natural sweetness and chewiness of dates, all held together with a hint of vanilla and a pinch of salt.
- Prep Time: 15 minutes
- Cook Time: 0 minutes
- Total Time: 1 hour 30 minutes
- Yield: 8 servings 1x
- Category: Snack
- Method: No-Cook
- Cuisine: American
- Diet: Gluten Free
Ingredients
Dry Ingredients
- 1 cup nuts, chopped (cashews and almonds recommended)
- 3–4 tablespoons cocoa powder
- 3 tablespoons chocolate chips
- 1/8 teaspoon salt
Wet Ingredients
- 1 1/3 cups pitted dates, packed
- 1 teaspoon pure vanilla extract
Instructions
- Soak Dates: Soak the pitted dates in warm water for 10 minutes to soften them; soak longer if the dates seem dry. After soaking, remove the dates from the water, reserving the soaking liquid for later use.
- Chop Nuts: Place the nuts in a food processor and pulse until they are chopped into small pieces but not fully ground.
- Mix Dry Ingredients: Transfer the chopped nuts to a bowl and stir in the cocoa powder, salt, and chocolate chips; set this mixture aside.
- Make Date Paste: Return the soaked dates to the food processor and blend until they form a smooth, sticky paste.
- Combine Mixtures: Add the date paste to the bowl containing the nut and cocoa mixture, then mix everything thoroughly until evenly combined.
- Adjust Consistency: If the mixture is too dry and crumbly, gradually add the reserved date soaking liquid one teaspoon at a time, mixing well after each addition, until the mixture just begins to stick together.
- Press into Pan: Line an 8×8-inch or loaf pan with parchment paper. Using the back of a spoon, firmly press the date nut mixture evenly into the pan, spreading to cover the edges and creating a compact layer.
- Refrigerate: Place the pan in the refrigerator and chill for at least 1 hour to firm up the bars.
- Serve and Store: After chilling, cut into 8 bars. Store the bars in the refrigerator to maintain freshness and firmness.
Notes
- Note 1: Soaking the dates softens them making it easier to blend into a paste, particularly if your dates are dry or older.
- Note 2: Adding the reserved soaking liquid a little at a time helps achieve the perfect sticky texture so the bars hold together without being too wet.
- Note 3: Storing the bars in the fridge prevents them from becoming too soft or sticky and extends their shelf life up to one week.
Keywords: chocolate chip bars, date nut bars, no bake bars, healthy snacks, gluten free bars, chocolate date bars