Mini Egg Cheesecake Recipe
Picture this: the sweet scent of melting butter mingling with the crumbly, nutty aroma of crushed digestive biscuits fills your kitchen. As you press the buttery base into the tin, tiny bursts of colorful Cadbury’s Mini Eggs peek through, promising a festive surprise with every bite. This Mini Egg Cheesecake Recipe is a feast for the senses, from the creamy tang of the filling to the crunchy pop of Mini Eggs decorating the top. It’s quick enough to whip up for last-minute guests yet impressive enough to steal the show at any gathering.
Why You’ll Love This Mini Egg Cheesecake Recipe
- Ready in just a few hours: While chilling requires patience, the hands-on prep takes under 30 minutes—perfect for fitting baking into a busy day.
- Uses simple ingredients: Pantry staples like digestive biscuits and cream cheese come alive with the magic of Mini Eggs and a splash of lemon for zing.
- Perfect for beginners: No complex baking techniques here—just whipped cream, folding, and chilling, making it approachable and fun.
- Impressive presentation: Those jewel-like Mini Eggs piled on top deliver a vibrant, inviting look that’s sure to wow everyone.
- Customizable and festive: Swap in other candy eggs or add flavors like vanilla or orange zest to make it uniquely yours.
Why This Mini Egg Cheesecake Recipe Works
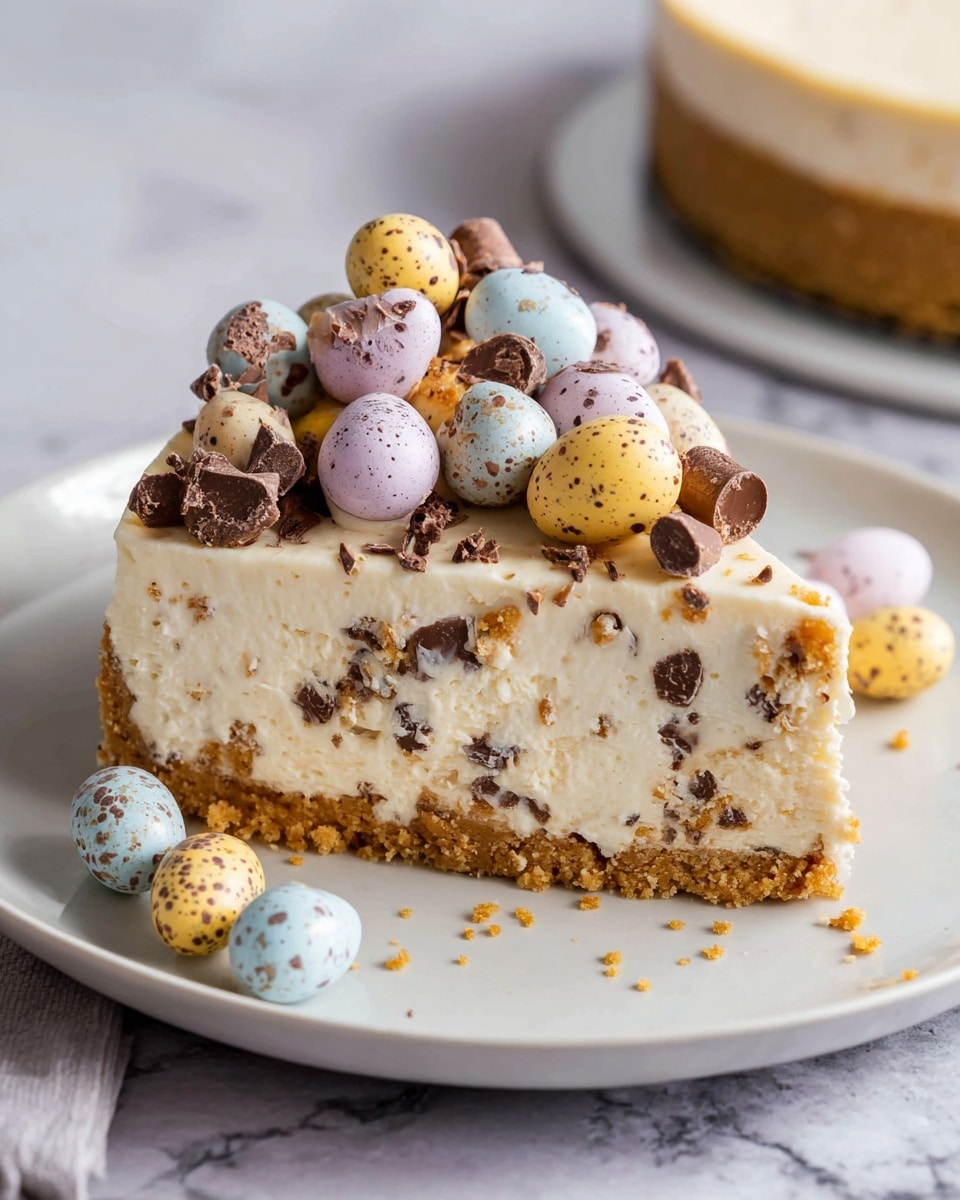
The magic begins with the buttery biscuit base that gives a sturdy yet crumbly foundation for the luscious filling. Whipping the double cream just right creates soft peaks that fold effortlessly into the smooth, tangy cream cheese mixture, ensuring a light and airy texture. Adding the chopped Mini Eggs inside the filling adds delightful bursts of color and crunch, while decorating the top with whole and halved Mini Eggs offers irresistible visual appeal and texture contrast. The gentle fold method preserves the cream’s fluffiness, making this cheesecake melt in your mouth without being heavy or dense.
Ingredients You’ll Need
This recipe shines because it keeps things beautifully simple but packed with flavor and texture.
- Digestive biscuits: The classic crumbly base that provides a buttery, slightly sweet foundation.
- Unsalted butter (melted): Binds the biscuit crumbs into a delicious crust with a rich, buttery flavor.
- Cadbury’s Mini Eggs: The star ingredient, adding sweet, crunchy surprises throughout and on top.
- Double cream: Whipped to soft peaks to create a light, luscious filling.
- Icing sugar (sifted): For gentle sweetness that melts seamlessly into the cream.
- Philadelphia cream cheese (full fat): Delivers that smooth, velvety cheesecake texture and tang.
- Juice of half a lemon: Adds a bright, fresh zing that balances the richness perfectly.
Ingredient Substitutions & Tips
- Digestive biscuits: Graham crackers or plain tea biscuits can stand in (just ensure they’re not overly sweet).
- Unsalted butter: Salted butter can be used, but reduce any additional salt or choose a low-salt variety.
- Cadbury’s Mini Eggs: Other candy-coated chocolates or chopped chocolate bars add a fun twist if you want to mix it up.
- Double cream: Heavy cream or whipping cream are perfect alternatives for the creamy base.
👨🍳 Pro Tips for Perfect Results
- Use room temperature cream cheese: It blends more easily with the cream, preventing lumps.
- Don’t over-whip the cream: Stop once soft peaks form to keep it airy and smooth.
- Chill for at least 3 hours: Longer chilling helps the flavors marry and the cheesecake set beautifully.
- Press base firmly: A tightly packed biscuit crust prevents crumbling when slicing.
- Use a palette knife to smooth: It makes the filling even and neat, perfect for decorating.
How to Make Mini Egg Cheesecake Recipe
Step 1: Prepare the Biscuit Base
Begin by crushing 280 grams of digestive biscuits until they resemble coarse sand. If you’re like me and love to make life easier, pop them in a food processor for a quick blitz. Then, mix in 140 grams of melted unsalted butter until every crumb is coated and sticky. Press this mixture firmly into the bottom of a 7-inch springform tin, creating an even layer that will support your creamy filling.
💡 Pro Tip: Use the bottom of a glass to really press the base flat and compact—this step helps hold the cheesecake together when serving.
Step 2: Chop the Mini Eggs
Take 360 grams of Cadbury’s Mini Eggs and carefully chop them in half. This prepares them to mix into the filling, giving delightful pops of chocolate and color in every bite. Set them aside for now.
💡 Pro Tip: Chopping rather than crushing keeps the surprises crunchy instead of melted.
Step 3: Whip the Cream
Pour 600 ml of double cream into a large bowl and whisk it using an electric mixer until soft peaks form—this means when you lift the whisk, the cream holds its shape but softly folds over. Scoop out about 3 dessert spoonfuls of whipped cream into a small bowl and pop it in the fridge for decorating later.
💡 Pro Tip: Chill your bowl and whisk for 15 minutes before whipping for quicker, more stable peaks.
Step 4: Combine the Filling Ingredients
In another large bowl, gently fold together the cream cheese (two 280g tubs, full fat), sifted icing sugar (140g), fresh lemon juice (from half a lemon), and the chopped Mini Eggs. Then, delicately fold in the whipped cream, being careful not to deflate the airy texture. This results in a fluffy, tangy filling with sweet bursts of chocolatey crunch.
💡 Pro Tip: Folding gently with a spatula preserves the creamy fluffiness essential for that perfect cheesecake mouthfeel.
Step 5: Assemble and Chill
Spoon the cheesecake filling over your prepared base, smoothing the surface with the back of a spoon or a palette knife. Cover with cling film and place in the fridge to chill for at least 3 hours, though overnight is best for maximum flavor and firmness.
💡 Pro Tip: Chill longer if possible; it helps the cheesecake slice cleanly and enhances the flavors.
Step 6: Decorate and Serve
Once set, carefully release the cheesecake from the tin using a warm knife—run the knife around the edge to loosen it for perfect slices. Spoon the reserved whipped cream on top and lavishly pile the remaining 270 grams of Mini Eggs, some halved for interest, on the cheesecake’s surface to create an irresistible, jewel-like crown.
💡 Pro Tip: Use a warm, dry knife between slices for neat, clean cuts that keep your Mini Egg topping intact.
Common Mistakes to Avoid
Learn from these common pitfalls:
- Over-whipping cream: Leads to grainy texture and can turn buttery, ruining the smooth filling.
- Not chilling long enough: Causes the cheesecake to be too soft and difficult to slice.
- Failing to press the biscuit base firmly: Results in a crumbly, unstable crust that falls apart.
- Adding lemon juice without balancing sweetness: Too much lemon can overpower the recipe.
- Mixing Mini Eggs too roughly: Crushing instead of chopping makes the filling messy and melts the candy coating.
- Skipping sifting icing sugar: May cause lumpy sweetness in the cream.
Delicious Variations to Try
Once you’ve mastered this classic Mini Egg Cheesecake Recipe, these creative twists are waiting for you:
Orange Zest Infusion
Add a teaspoon of fresh orange zest to the filling for a zesty citrus kick that complements the creamy base beautifully.
Chocolate Cookie Base
Swap digestive biscuits for crushed chocolate Oreos to create a rich, chocolatey crust that pairs perfectly with the Mini Eggs.
Berry Swirl Delight
Gently fold in fresh raspberry puree or blueberry compote to the filling before chilling for a vibrant color contrast and fruity burst.
Nutty Crunch Twist
Sprinkle chopped toasted hazelnuts or almonds into the filling or on top for a delicious crunch that balances the smooth creaminess.
Salted Caramel Drizzle
Once chilled and decorated, drizzle homemade or store-bought salted caramel over the top for that irresistible sweet-salty combo.
How to Serve Mini Egg Cheesecake Recipe

Garnishes
Fresh mint leaves, a dusting of cocoa powder, or additional Mini Eggs artfully broken apart can make your cheesecake look bakery-perfect.
Side Dishes
Pair slices with a bright berry compote or a scoop of vanilla ice cream to enhance the flavor experience.
Creative Ways to Present
Serve individual mini Easter-themed cheesecakes in clear jars layered with crushed biscuits, or use colorful cake stands to offset the pastel tones of the Mini Eggs for a stunning table display.
Make Ahead and Storage
Storing Leftovers
Keep any leftover cheesecake covered in the fridge in an airtight container for up to 3 days. This prevents the cream from drying out and keeps the Mini Eggs crunchy.
Freezing
This cheesecake freezes well for up to one month. Wrap tightly in plastic wrap and foil, then thaw overnight in the fridge before serving.
Reheating
Reheat isn’t recommended as cheesecake is best enjoyed chilled, but if desired, let the cheesecake sit at room temperature for 15-20 minutes before serving for softer slices.
FAQs
Can I use low-fat cream cheese in this Mini Egg Cheesecake Recipe?
While you can, full-fat cream cheese gives the best creamy texture and richer flavor, so it’s highly recommended for optimal results.
Do I have to use Cadbury’s Mini Eggs?
Not at all! You can substitute with other candy-coated chocolates, chopped chocolate bars, or even jelly beans for a colorful twist.
Can I prepare the cheesecake base a day ahead?
Absolutely! Making the base in advance helps it set well and cuts down on prep time on assembly day.
Is it necessary to chill for 3 hours? What if I’m short on time?
Chilling is essential for the cheesecake to set properly. If short on time, aim for at least 2 hours, but overnight chilling yields the best texture.
Can I make this Mini Egg Cheesecake Recipe gluten-free?
Yes! Simply substitute gluten-free biscuits for the digestive base and ensure any additives are gluten-free.
How do I prevent the Mini Eggs from melting inside the filling?
Fold the chopped Mini Eggs in gently and use chilled cream and fillings to keep the candy coating intact.
Is there a way to make individual servings?
Yes, use small jars or mini tart pans to create single-serve cheesecakes that are perfect for parties or gifts.
Can I add flavor extracts to this recipe?
Definitely! Vanilla, almond, or even orange extract can complement the filling—just add about a teaspoon when mixing the cream cheese and sugar.
Final Thoughts
This Mini Egg Cheesecake Recipe is pure joy on a plate—its creamy texture, sweetly crunchy gems, and a bright lemony tang make it a seasonal treat that everyone will ask for again and again. Whether it’s a special Easter celebration, a family gathering, or a weekend indulgence, this dessert brings smiles and cozy moments all around.
Have you tried this Mini Egg Cheesecake Recipe? I’d love to hear how it turned out! Leave a comment below. If you loved this recipe, please share it with friends and family. Happy cooking! 😊
PrintMini Egg Cheesecake Recipe

This Mini Egg Cheesecake is a delightful no-bake dessert featuring a crunchy digestive biscuit base topped with a creamy filling packed with Cadbury’s Mini Eggs. Perfectly smooth and decorated with vibrant mini eggs, this cheesecake is a festive treat ideal for sharing at celebrations or as a special indulgence.
- Prep Time: 30 minutes
- Cook Time: 0 minutes
- Total Time: 3 hours 30 minutes (including chilling time)
- Yield: 12 servings 1x
- Category: Dessert
- Method: No-Cook
- Cuisine: British
Ingredients
Base
- 280 g Digestive biscuits
- 140 g Unsalted butter, melted
Filling
- 360 g Cadbury’s Mini Eggs (plus an additional 270 g for decorating, about 7 small bags in total)
- 600 ml Double cream
- 140 g Icing sugar, sifted
- 560 g Philadelphia Cream Cheese (full fat, 2 x 280 g tubs)
- Juice of half a lemon
Instructions
- Make the base: Crush the digestive biscuits until they resemble lumpy sand. Using a food processor is recommended for ease. Mix the crushed biscuits with melted butter until combined, then press firmly into the bottom of a 7-inch tin to form an even base.
- Prepare the Mini Eggs: Chop 360 g of the Mini Eggs in half carefully to distribute evenly throughout the filling.
- Make the cream filling: Whip the double cream using an electric whisk until soft peaks form. Remove about 3 tablespoons of the whipped cream and set it aside in the fridge; this will be used later for decorating.
- Combine ingredients: In a large bowl, gently fold together the whipped cream, icing sugar, full-fat cream cheese, lemon juice, and the chopped Mini Eggs until the mixture is smooth and well combined.
- Assemble the cheesecake: Pour the cream mixture over the biscuit base and smooth the surface using the back of a spoon or a palette knife to ensure an even top.
- Chill: Place the assembled cheesecake in the refrigerator and chill for at least 3 hours, or ideally overnight, to allow it to set firmly.
- Remove from tin: Carefully use a knife to loosen the cheesecake from the edges of the tin before removing the sides to keep the cake intact.
- Decorate: Spread the reserved whipped cream over the top of the cheesecake. Decorate generously with the remaining Mini Eggs, some chopped in half to add texture and visual appeal.
Notes
- Using a food processor to crush biscuits makes the base preparation easier and quicker.
- Removing the cheesecake from the tin carefully with a knife helps maintain its shape and presentation.
- Chilling the cheesecake overnight improves firmness and flavor blending.
- The reserved whipped cream topping adds a smooth finish and helps the mini eggs stick better.
- This cheesecake is best kept refrigerated and consumed within 2-3 days for optimal freshness.
Keywords: Mini Egg Cheesecake, no bake cheesecake, Cadbury Mini Eggs dessert, Easter dessert, creamy cheesecake, biscuit base cheesecake