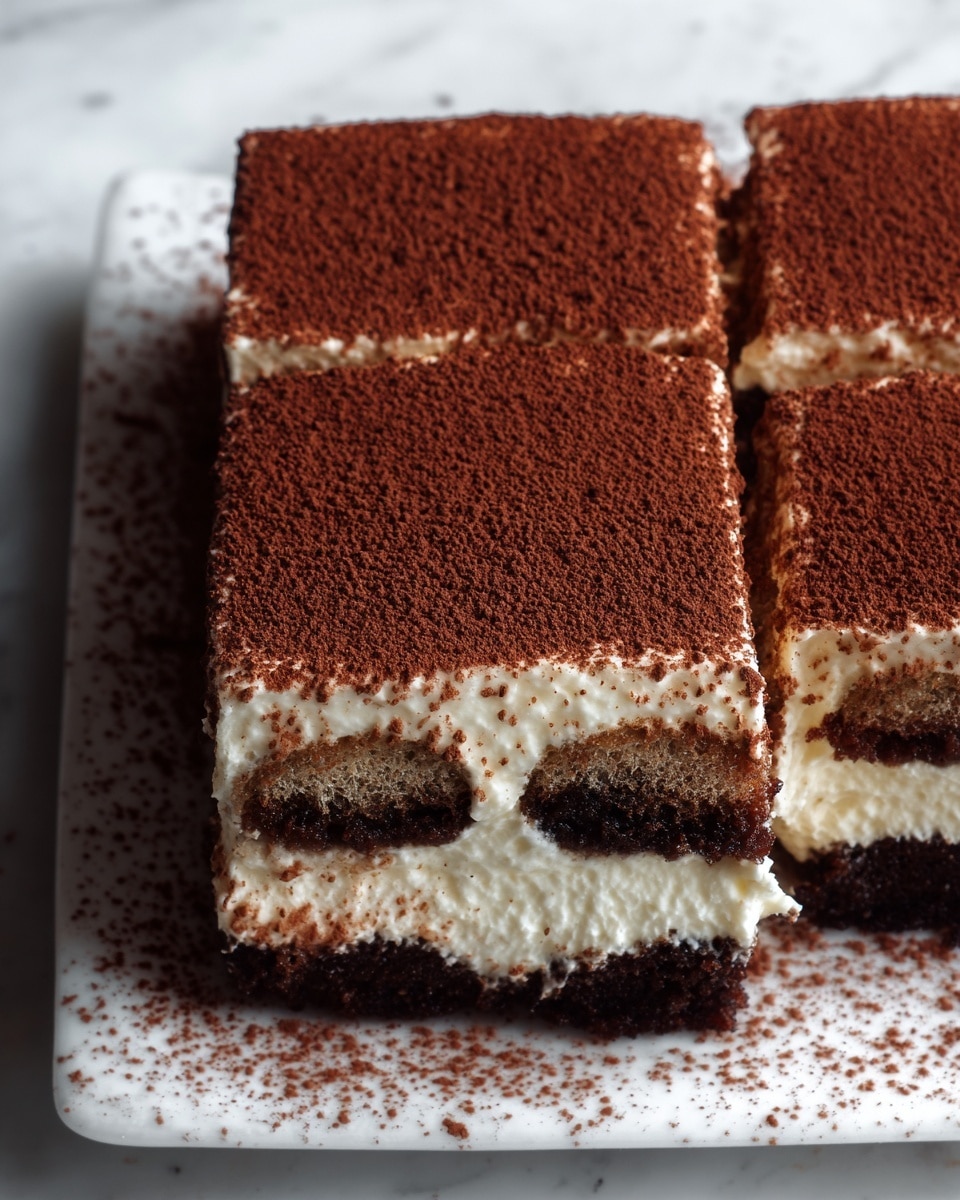
Gluten Free Tiramisu Brownies Recipe
Picture this: the rich aroma of freshly brewed espresso swirling through your kitchen, mingling with the deep, chocolaty scent of warm brownies baking in the oven. Then, the moment you taste the first bite of these luscious, creamy layers melting together—a delicate dance between the earthy bitterness of coffee and the sweet decadence of mascarpone. This Gluten Free Tiramisu Brownies Recipe is not just a dessert; it’s an experience that wraps you in comfort, elegance, and a touch of Italian magic, all without any gluten! Whether you’re craving a quick treat or want to impress guests with something extraordinary, this recipe is your new secret weapon.
Why You’ll Love This Gluten Free Tiramisu Brownies Recipe
- Ready in just over two hours: Despite the rich layers, you’ll have this showstopper ready to chill and serve before you know it!
- Uses simple ingredients: Most pantry staples and basic baking essentials combine for a gourmet outcome.
- Perfect for beginners: No complicated techniques—just straightforward steps that anyone can follow and nail.
- Impressive presentation: The luscious tiramisu topping on fudgy brownies creates a stunning dessert that looks like you spent hours crafting it.
- Customizable: Swap espresso for decaf, try different dairy-free mascarpone alternatives, or add a splash of your favorite liqueur to personalize your treat.
Why This Gluten Free Tiramisu Brownies Recipe Works
The magic behind this recipe starts with balancing flavors and textures perfectly. The gluten free all-purpose flour blend ensures your brownies are fudgy yet sturdy enough to hold the luscious tiramisu cream. Using espresso powder within the batter intensifies the coffee flavor subtly without adding bitterness. The mascarpone and whipped cream mixture is whipped to fluffy perfection, creating a silky layer that contrasts beautifully with the dense brownies below. Lastly, chilling the dessert allows the flavors to meld, ensuring each bite delivers a harmonious blend of coffee, chocolate, and creamy sweetness. Simple techniques, quality ingredients, and patience make this recipe shine!
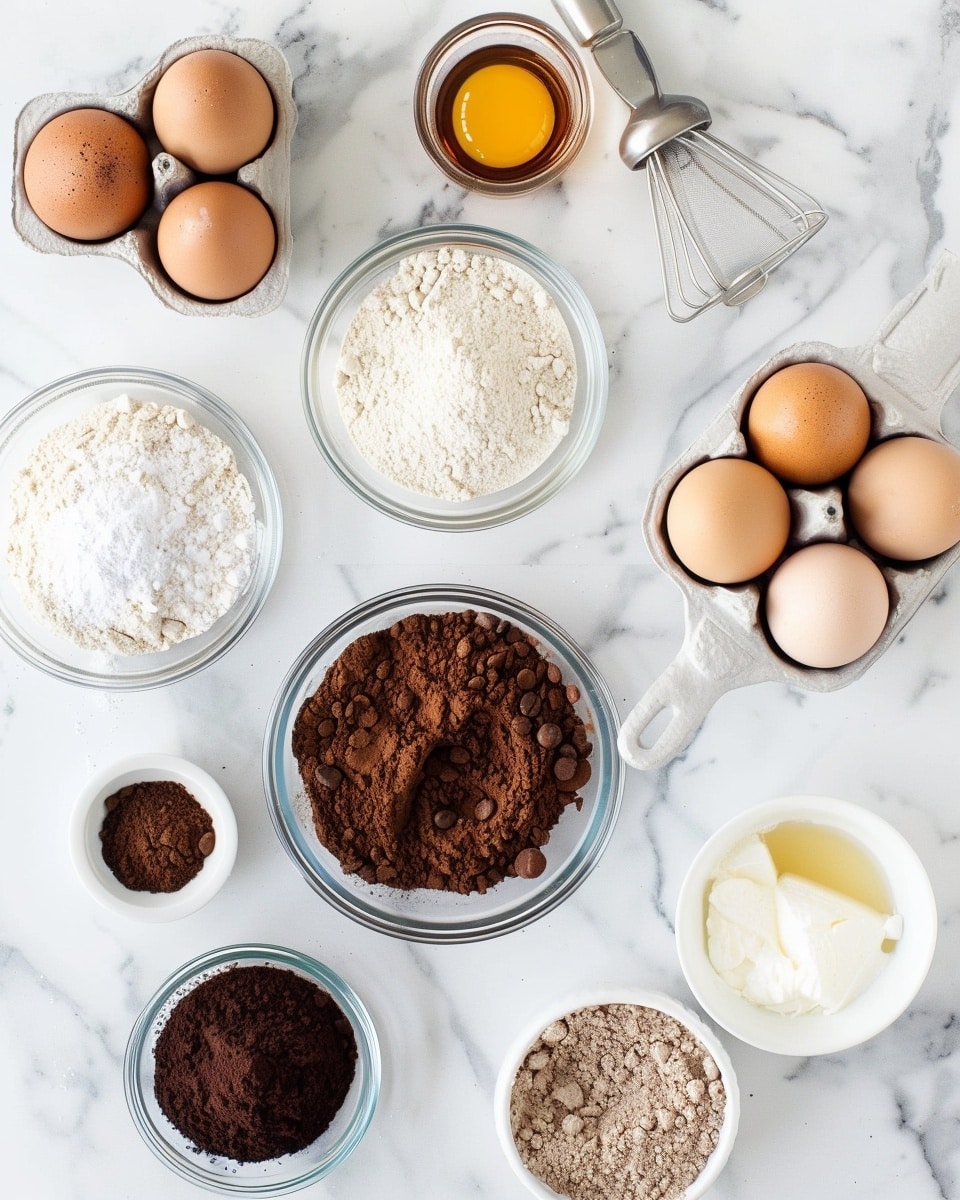
Ingredients You’ll Need
Gathering these essentials will set you up for an unforgettable baking adventure. Each ingredient plays a crucial role in building layers of texture and flavor.
- Gluten free all-purpose flour: The base that keeps this recipe welcoming to gluten intolerants while providing structure.
- Cocoa powder: Adds deep, rich chocolate flavor that makes the brownies irresistibly decadent.
- Espresso powder: Boosts that classic coffee note, elevating the tiramisu character.
- Sugar: Sweetens the batter and balances the bitterness of cocoa and coffee.
- Eggs: Bind ingredients and give the brownies a lovely fudgy texture.
- Melted butter: Infuses richness and moisture throughout.
- Vanilla extract: Adds warmth and depth in flavor.
- Mascarpone cheese: The star ingredient for that luscious, creamy tiramisu topping.
- Heavy whipping cream: Whipped to fluffy peaks to lighten the mascarpone mixture.
- Powdered sugar: Sweetens and stabilizes the creamy frosting.
- Brewed espresso or strong coffee: Infuses the tiramisu layer with authentic coffee flavor.
- Unsweetened cocoa powder (for dusting): Adds a classic finishing touch of bitterness and elegance.
Ingredient Substitutions & Tips
- Gluten free all-purpose flour: Substitute with almond flour for a nuttier taste, keeping in mind it may affect texture slightly.
- Espresso powder: Use instant coffee granules as a mild alternative if espresso isn’t available.
- Mascarpone cheese: Cream cheese mixed with a bit of heavy cream can work in a pinch, though mascarpone’s creaminess is unmatched.
- Heavy whipping cream: Coconut cream makes a fantastic dairy-free substitute for a vegan twist.
👨🍳 Pro Tips for Perfect Results
- Measure your gluten free flour carefully: Scoop and level for accuracy to avoid dense brownies.
- Don’t overbake: The brownies should be moist; pull them from the oven as soon as a toothpick shows a few crumbs.
- Chill the tiramisu layer thoroughly: This lets flavors meld and the cream firm up for clean slicing.
- Use room temperature eggs: They mix more evenly, creating a smooth batter and even rise.
- Whip heavy cream to stiff peaks: This prevents the tiramisu topping from being too runny.
How to Make Gluten Free Tiramisu Brownies Recipe
Step 1: Prepare Your Baking Pan and Oven
Preheat your oven to 350°F (175°C) to ensure it reaches the perfect temperature for even baking. Line an 8×8 inch baking pan with parchment paper, letting some overhang for easy removal later.
💡 Pro Tip: Parchment paper not only prevents sticking but also helps lift the brownies out without mess.
Step 2: Mix the Wet Ingredients
In a large bowl, combine the melted butter, sugar, eggs, and vanilla extract. Whisk them together until the mixture is smooth and velvety, creating the luscious base for your brownie batter.
💡 Pro Tip: Use fresh eggs at room temperature for the best texture and binding power.
Step 3: Combine the Dry Ingredients
In a separate bowl, whisk the gluten free flour, cocoa powder, and espresso powder together. This ensures the powders blend evenly, preventing any unwanted lumps and creating a balanced coffee-chocolate flavor.
💡 Pro Tip: Sifting dry ingredients can boost the lightness of your batter.
Step 4: Bring It All Together
Gradually fold the dry mixture into the wet ingredients, stirring gently until a thick, glossy batter forms. Make sure everything is fully combined but avoid overmixing to keep your brownies soft and fudgy.
💡 Pro Tip: Stop mixing once no streaks remain for the best texture.
Step 5: Bake to Perfection
Pour the batter into your prepared pan, smoothing the top with a spatula. Bake for 20 to 25 minutes, or until a toothpick inserted in the center comes out with a few moist crumbs. Allow the brownies to cool completely before adding the tiramisu layer.
💡 Pro Tip: Cool on a wire rack to prevent soggy bottoms.
Step 6: Prepare the Tiramisu Cream
In a clean bowl, beat the mascarpone cheese with powdered sugar and vanilla extract until creamy and smooth. In a separate bowl, whip the heavy cream to stiff peaks, then gently fold it into the mascarpone mixture to create a light, airy topping.
💡 Pro Tip: Use chilled bowls and beaters for the best whipping results.
Step 7: Add the Final Coffee Touch
Slowly fold in the cooled brewed espresso or strong coffee, blending gently to infuse that classic tiramisu flavor throughout the cream without turning it runny.
💡 Pro Tip: Taste your cream at this stage; add more espresso if you desire a bolder coffee kick.
Step 8: Assemble and Chill
Spread the tiramisu cream evenly over the cooled brownies. Cover the pan and chill for at least 2 hours to allow the layers to set beautifully and the flavors to marry.
💡 Pro Tip: The longer you chill, the more decadent the flavors become.
Step 9: Serve with a Classic Dusting
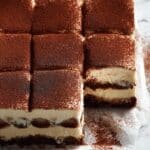
Just before serving, dust the top with unsweetened cocoa powder for a perfect bitter-sweet finish. Slice into squares and serve chilled.
💡 Pro Tip: Use a sharp knife wiped between cuts for clean edges.
Common Mistakes to Avoid
Learn from these common pitfalls:
- Overbaking brownies: This leads to dry, crumbly texture instead of fudgy indulgence.
- Skipping espresso powder: Missing this ingredient dulls the coffee-chocolate harmony essential to tiramisu brownies.
- Whipping heavy cream insufficiently: Results in a runny tiramisu topping that won’t set properly.
- Not chilling long enough: Cutting too soon makes layers messy and flavors less developed.
- Using cold eggs straight from the fridge: Can cause uneven mixing and affect batter texture.
- Not lining the baking pan: Makes removing brownies a sticky hassle and can cause breakage.
Delicious Variations to Try
Once you’ve mastered the classic version, these twists will keep your taste buds intrigued and delighted:
Chocolate Orange Tiramisu Brownies
Add a teaspoon of orange zest to the brownie batter and a splash of orange liqueur to the mascarpone cream for a citrusy twist that complements the espresso beautifully.
Peanut Butter Swirl
Drop dollops of creamy peanut butter onto the brownie batter before baking and swirl gently with a knife. The salty sweetness creates a perfect contrast to the coffee flavors.
Dark Chocolate Ganache Topping
Replace the tiramisu cream layer with a rich dark chocolate ganache for an ultra-decadent finish that satisfies any chocoholic’s dream.
Berry Infused Tiramisu
Fold fresh raspberries or strawberries into the mascarpone mixture for a fruity freshness that brightens the richness of the dessert.
Vegan & Dairy-Free Version
Use coconut cream whipped to stiff peaks and dairy-free mascarpone substitute, plus flax eggs instead of regular eggs, to make a vegan-friendly gluten free tiramisu brownies delight.
How to Serve Gluten Free Tiramisu Brownies Recipe
Garnishes
Lightly dust with cocoa powder before serving or sprinkle with dark chocolate shavings or finely chopped toasted hazelnuts for texture and extra flavor pop.
Side Dishes
Serve alongside a scoop of vanilla bean ice cream or a fresh berry compote to balance the richness and add a refreshing contrast.
Creative Ways to Present
Serve in individual glass jars layered with crushed gluten free cookies at the bottom, or cut into petite squares and arrange on a decorative platter with espresso-soaked ladyfingers for a tiramisu-themed dessert board.
Make Ahead and Storage
Storing Leftovers
Keep leftovers covered tightly in the refrigerator for up to 4 days. The flavors continue to intensify as it rests, making it even more delightful.
Freezing
Freeze uncut brownies wrapped well in plastic and foil for up to 2 months. Thaw overnight in the refrigerator. Add fresh tiramisu cream and dust before serving to maintain freshness.
Reheating
This dessert is best enjoyed chilled, but if you prefer warm brownies without the cream, reheat individual brownie pieces in the microwave for 10-15 seconds before topping with tiramisu cream freshly prepared or chilled.
FAQs
Can I make this recipe dairy-free?
Yes! Substitute mascarpone with a dairy-free cream cheese alternative and use coconut cream in place of heavy whipping cream. The texture will be slightly different but still delicious.
What gluten free flour blend works best?
A well-balanced gluten free all-purpose flour blend with xanthan gum produces the best results, ensuring structure and fudginess.
Can I use decaf coffee instead of espresso?
Absolutely! Decaf espresso or strong decaf coffee works well to retain the coffee flavor without caffeine.
How long do the brownies need to chill?
At least 2 hours to allow the tiramisu cream to set and flavors to develop fully.
Can I prepare this recipe ahead of time for a party?
Yes, prepare the brownies and tiramisu layering a day before your event for effortless entertaining.
Is mascarpone cheese necessary?
Mascarpone is key for authentic tiramisu flavor and texture, but cream cheese mixed with heavy cream can be a substitute in a pinch.
How do I get clean slices?
Use a very sharp knife wiped clean between cuts, and chill the dessert thoroughly before slicing for neat squares.
Can I double the recipe?
Yes, simply double ingredients and bake in a larger 9×13 pan, adjusting baking time to 30–35 minutes.
Final Thoughts
This Gluten Free Tiramisu Brownies Recipe is a heartfelt fusion of two beloved classics, crafted to bring joy to your kitchen and smiles to your table. Each bite melts creamy, coffee-soaked bliss with fudgy chocolate goodness—healthy indulgence without gluten worries. I love how approachable yet decadent this dessert feels, making special occasions or cozy nights extra memorable.
Have you tried this Gluten Free Tiramisu Brownies Recipe? I’d love to hear how it turned out! Leave a comment below. If you loved this recipe, please share it with friends and family. Happy cooking! 🍫☕
PrintGluten Free Tiramisu Brownies Recipe
These Gluten Free Tiramisu Brownies combine the rich, chocolatey goodness of classic brownies with the creamy, coffee-infused flavors of tiramisu. Perfectly moist and topped with a luscious mascarpone cream, this dessert is ideal for those craving an elegant, gluten-free treat.
- Prep Time: 25 minutes
- Cook Time: 25 minutes
- Total Time: 2 hours 50 minutes
- Yield: 9 servings 1x
- Category: Dessert
- Method: Baking
- Cuisine: Italian-American
- Diet: Gluten Free
Ingredients
Brownie Base
- 1/2 cup gluten free all-purpose flour
- 1/3 cup cocoa powder
- 1 tablespoon espresso powder
- 1 cup sugar
- 2 large eggs
- 1/2 cup melted butter
- 1 teaspoon vanilla extract
Tiramisu Cream
- 1 cup mascarpone cheese
- 3/4 cup heavy whipping cream
- 1/3 cup powdered sugar
- 1/4 cup brewed espresso or strong coffee, cooled
For Garnish
- Unsweetened cocoa powder (for dusting)
Instructions
- Preheat and Prepare Pan: Preheat your oven to 350°F (175°C) and line an 8×8 inch baking pan with parchment paper to prevent sticking and ensure easy removal.
- Mix Wet Ingredients: In a large bowl, whisk together the melted butter, sugar, eggs, and vanilla extract until the mixture is smooth and well combined, which will give your brownies a rich texture.
- Mix Dry Ingredients: In a separate bowl, sift together the gluten free flour, cocoa powder, and espresso powder, ensuring even distribution of flavors.
- Combine Batter: Gradually mix the dry ingredients into the wet ingredients until a thick, uniform batter forms, taking care not to overmix which might affect the brownie texture.
- Bake Brownies: Pour the batter into the prepared pan and smooth the top evenly. Bake for 20–25 minutes or until a toothpick inserted in the center comes out with a few moist crumbs. Remove from the oven and let the brownies cool completely in the pan.
- Prepare Mascarpone Cream: In a bowl, beat the mascarpone cheese with powdered sugar and vanilla extract until smooth and creamy, creating the base for the tiramisu topping.
- Whip Cream: In a separate chilled bowl, whip the heavy cream to stiff peaks, which will give your topping a light and fluffy texture.
- Fold Cream into Mascarpone: Gently fold the whipped cream into the mascarpone mixture, taking care to maintain the airy texture.
- Add Espresso: Stir in the cooled brewed espresso to the cream mixture and gently fold until evenly combined, infusing the tiramisu cream with classic coffee flavor.
- Assemble and Chill: Spread the tiramisu cream evenly over the cooled brownies and refrigerate for at least 2 hours to allow the flavors to meld and the cream to set.
- Serve: Just before serving, dust the top with unsweetened cocoa powder. Slice into 9 squares and serve chilled for a decadent dessert experience.
Notes
- Make sure the brewed espresso is completely cooled before adding to prevent curdling the mascarpone cream.
- For best results, chill the whipping cream and the mixing bowl prior to whipping.
- You can use any gluten free all-purpose flour blend suitable for baking.
- If mascarpone cheese is unavailable, substitute with cream cheese for a slightly different but delicious flavor.
- Store leftovers covered in the refrigerator for up to 3 days to maintain freshness.
Keywords: gluten free brownies, tiramisu brownies, gluten free dessert, coffee flavored dessert, mascarpone topping, easy tiramisu recipe