Easy Overnight Dinner Rolls Recipe
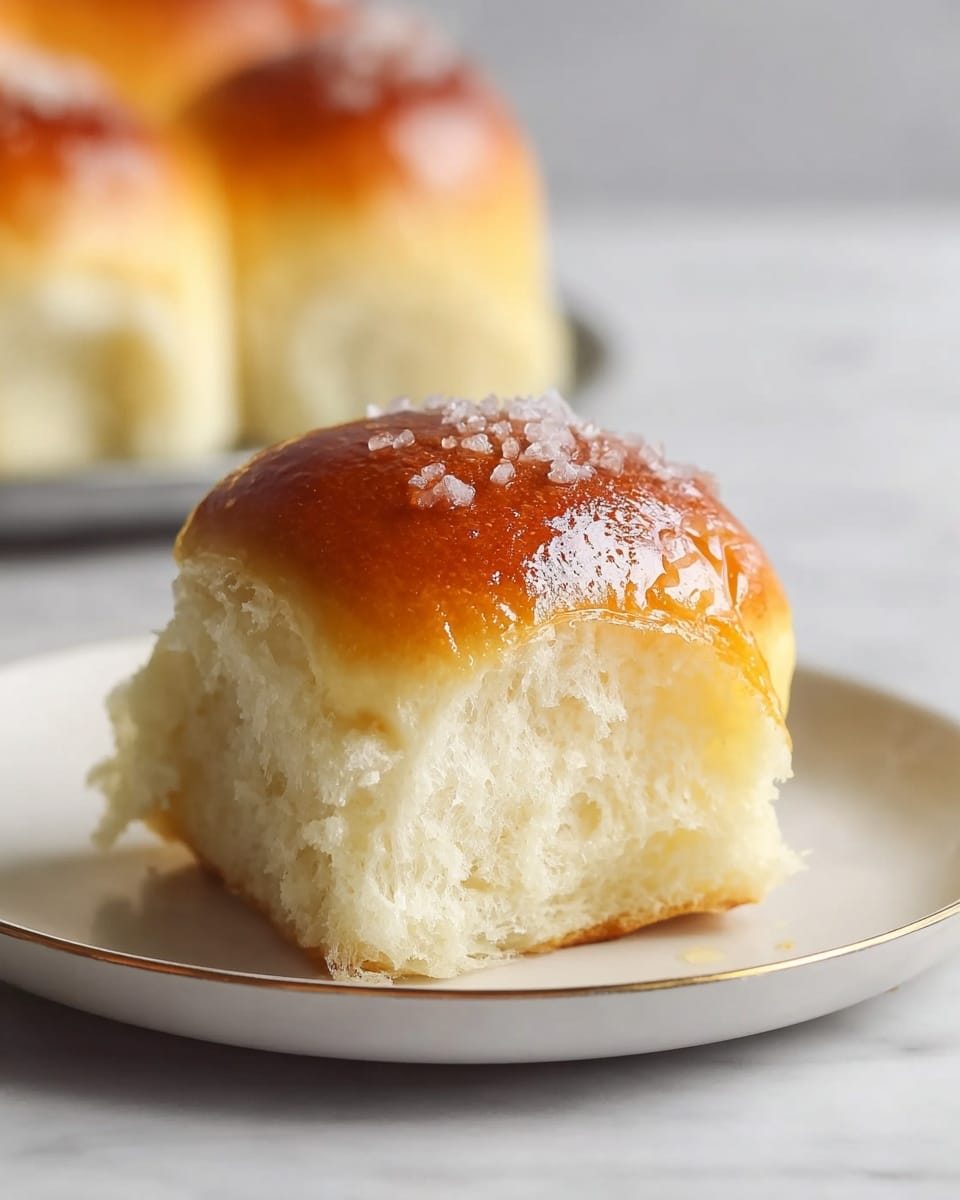
Picture this: a warm kitchen filled with the intoxicating aroma of freshly baked bread, golden crusts peeking out from the oven, soft rolls still steaming as they cool. The gentle pull-apart texture, the tender crumb melting in your mouth, and that perfect whisper of buttery salt on top create a magical experience that feels like a comforting hug. This Easy Overnight Dinner Rolls Recipe is more than just bread—it’s a promise of effortless delight, the kind that turns everyday moments into cherished memories.
Why You’ll Love This Easy Overnight Dinner Rolls Recipe
- Slow-rise convenience: Let your dough relax overnight while you sleep, so baking feels easy and stress-free the next day.
- Simple ingredients: With pantry staples like bread flour, milk, and butter, there’s no need for fancy or hard-to-find items.
- Perfect for beginner bakers: The stand mixer does most of the heavy kneading work, making the process approachable and fun.
- Beautiful golden rolls: Impressive enough to serve at any family dinner or special occasion with that irresistible sheen and flaky salt finish.
- Customizable dough: Adaptable for flavors or toppings to suit your mood—think garlic herb butter or a sprinkle of sesame seeds!
Why This Easy Overnight Dinner Rolls Recipe Works
This recipe shines because of its long, slow refrigerated fermentation, which deepens flavor and enhances texture without rushing. The gradual overnight rise allows the yeast to develop complexity, resulting in irresistibly tender rolls with an airy crumb. Incorporating softened butter during kneading adds a richness and softness that lingers beautifully after baking. Plus, the dough’s hydration adjusts with milk quantity, ensuring perfect elasticity. Together, these details create the kind of rolls that feel homemade but look worthy of a bakery display.
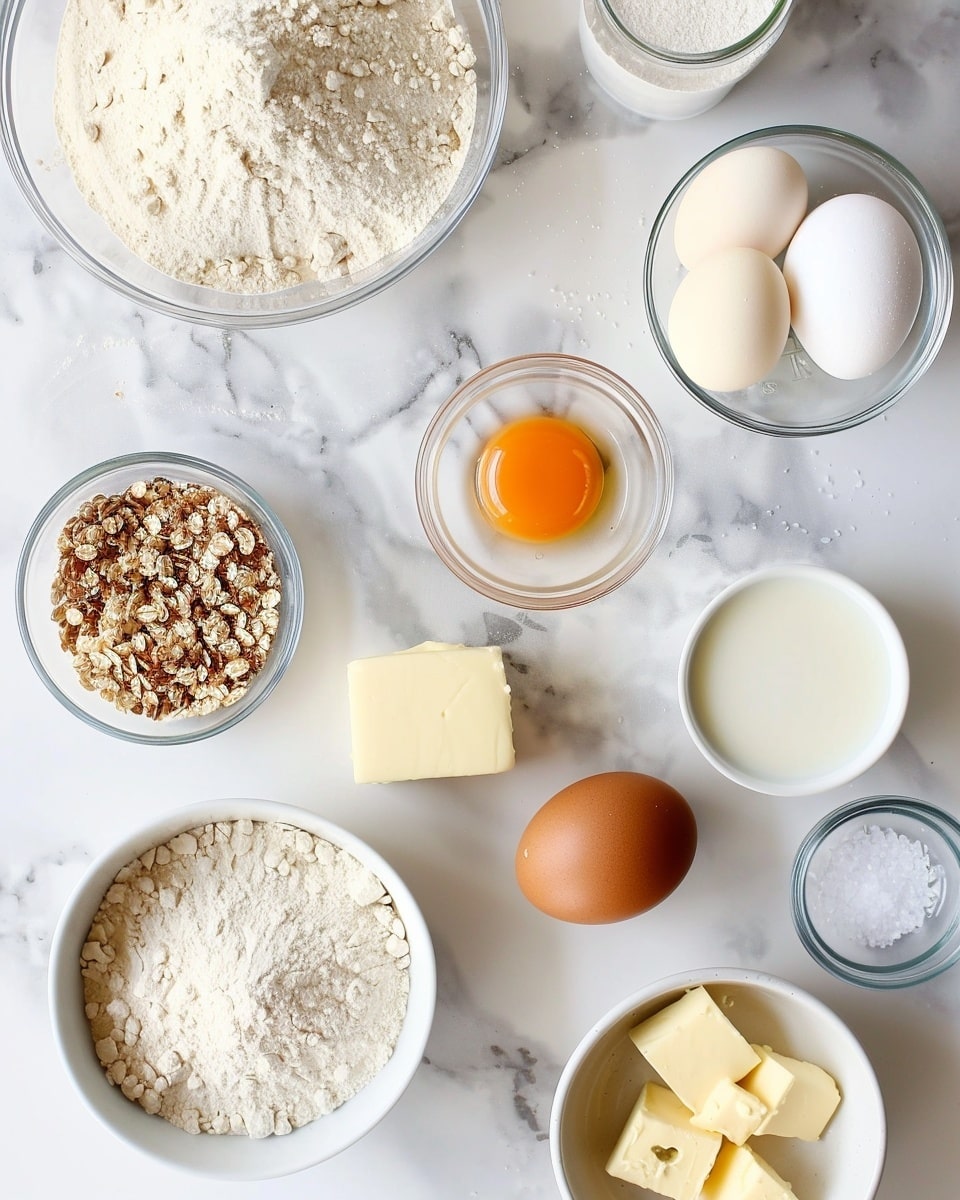
Ingredients You’ll Need
It’s amazing how just a handful of straightforward ingredients can transform into heavenly rolls. Each component brings its magic to the final loaf.
- Bread flour: Provides the perfect protein content for strong gluten and chewy texture.
- Sugar: Feeds the yeast and adds a touch of sweetness for well-rounded flavor.
- Instant dry yeast: Makes rising easy and reliable without proofing.
- Salt: Balances sweetness and enhances the dough’s overall flavor.
- Whole milk: Adds moisture and tenderness to the dough.
- Eggs (one whole + one yolk): Enrich the dough, giving it a lovely golden color and a soft crumb.
- Unsalted butter (softened): Tenderizes and enriches the dough for that melt-in-your-mouth feel.
- Melted butter: For brushing after baking to create a shiny finish and added richness.
- Flaky salt: The final touch that heightens flavor with a delightful crunch.
Ingredient Substitutions & Tips
- Bread flour: You can substitute with all-purpose flour, but the rolls might be slightly less chewy and rise a bit differently.
- Whole milk: Use any milk you have on hand, including 2% or even plant-based milk like oat or almond (unsweetened) for a dairy-free option.
- Unsalted butter: If you only have salted butter, reduce the salt in the dough slightly to avoid over-seasoning.
- Yeast: Active dry yeast can be used but will require activation in warm water before adding to the dough.
👨🍳 Pro Tips for Perfect Results
- Tip 1: Use a kitchen scale for precise measurements—this makes a world of difference in bread baking.
- Tip 2: Don’t rush the kneading; develop the gluten well until the dough passes the windowpane test for soft, airy rolls.
- Tip 3: Cold ferment the dough overnight to deepen flavor and improve texture.
- Tip 4: Proof the shaped rolls in a warm, humid spot to encourage a perfect rise.
- Tip 5: Brush the rolls with melted butter as soon as they come out of the oven for irresistible shine and flavor.
How to Make Easy Overnight Dinner Rolls Recipe
Step 1: Mix the Dough
Begin by adding all ingredients—except butter—into the bowl of your stand mixer fitted with a dough hook. Start with the minimum milk quantity and add more only if the dough feels too dry. Knead on medium speed for 10 to 15 minutes until the dough begins to pull away from the sides, forming a sticky but elastic ball.
💡 Pro Tip: If you don’t have a stand mixer, knead by hand on a floured surface—expect it to take a bit longer but just as rewarding.
Step 2: Add Butter Cubes
Now add softened butter one cube at a time, continuing to knead for another 10 to 15 minutes. This slow incorporation is key for rich, tender rolls. Check that your dough passes the windowpane test—gently stretching a small piece until it becomes translucent without tearing.
💡 Pro Tip: If the dough gets too sticky, add flour very sparingly to avoid dense rolls.
Step 3: Shape and Refrigerate Overnight
Carefully shape the dough into a smooth round ball and place it in a lightly greased bowl. Cover with plastic wrap or a damp towel and refrigerate for 10 to 18 hours. This slow ferment works magic, developing complex flavors and a soft crumb.
💡 Pro Tip: Don’t skip the cold ferment—it transforms an ordinary dough into something truly special.
Step 4: Divide and Proof
The next day, gently dump the dough onto a floured surface. Divide it into 9 or 12 equal pieces using a kitchen scale for accuracy. Roll each portion into a tight, seamless ball and place them in a greased or lined 9-by-9 inch baking dish. Cover and set in a warm spot (around 78°F or 26°C) to proof for about 2 hours, until doubled and irresistibly puffy.
💡 Pro Tip: Proofing time can vary—look for doubling in size rather than the clock.
Step 5: Bake and Finish
Preheat your oven to 355°F (180°C). Bake the rolls for 15 to 20 minutes until they turn a gorgeous golden brown on top. Liberally brush with melted butter straight from the oven and sprinkle flaky salt for a savory contrast.
💡 Pro Tip: Serve the rolls warm for the best texture and flavor experience.
Common Mistakes to Avoid
Learn from these common pitfalls:
- Rushing the rise: Not giving the dough enough time to ferment results in dense, flavorless rolls.
- Adding too much flour: Over-flouring can make the dough tough and dry.
- Not using softened butter: Cold butter won’t incorporate properly, affecting texture.
- Uneven shaping: Rolls with seams can bake unevenly and lose their soft shape.
- Skipping the windowpane test: Underdeveloped gluten means rolls won’t be light and airy.
- Removing rolls too soon: Underbaked rolls can be gummy inside, so wait for a nice golden crust before pulling them out.
Delicious Variations to Try
Once you’ve mastered the classic version of this Easy Overnight Dinner Rolls Recipe, why not switch things up for fun?
Garlic Herb Rolls
Add minced garlic and finely chopped fresh herbs like rosemary or thyme to the dough for a fragrant, savory twist that pairs well with dinners.
Cinnamon Sugar Rolls
Roll each dough piece flat and sprinkle cinnamon sugar before shaping. Brush with butter and drizzle icing after baking for a sweet treat.
Cheese-Stuffed Rolls
Place a small cube of your favorite cheese (cheddar, mozzarella) inside each roll before proofing. They bake up melty and gooey.
Whole Wheat Twist
Replace half the bread flour with whole wheat flour to add nuttiness and extra fiber without sacrificing softness.
Seeded Toppings
Before baking, brush rolls with egg wash and sprinkle sesame, poppy, or sunflower seeds for extra crunch and personality.
How to Serve Easy Overnight Dinner Rolls Recipe
Garnishes
Fresh herbs like chopped parsley or chives scatter beautifully atop brushed melted butter, adding a pop of color and herbaceous aroma.
Side Dishes
These rolls pair wonderfully with rich gravies, creamy soups, or as a side to roasted chicken and vegetables, enhancing every meal.
Creative Ways to Present
Arrange warm rolls in a basket lined with a checkered cloth for a cozy, country feel. Or serve on a wooden board with small bowls of compound butters and jams for a touch of elegance.
Make Ahead and Storage
Storing Leftovers
Keep leftover rolls in an airtight container at room temperature for up to 3 days. To refresh, warm them briefly in the oven wrapped in foil.
Freezing
These rolls freeze beautifully. Cool completely, then wrap tightly in plastic wrap and place in a freezer bag. Freeze up to 3 months.
Reheating
Thaw frozen rolls overnight in the fridge, then warm in a 350°F (175°C) oven for 5-7 minutes wrapped in foil to restore softness without drying.
FAQs
Can I make this recipe without a stand mixer?
Absolutely! You can knead the dough by hand on a lightly floured surface. It will just require a bit more elbow grease and time, but nothing complicated.
Why do I need to refrigerate the dough overnight?
The cold fermentation slows yeast activity, allowing flavors to develop more fully and the texture to improve, giving you tender, flavorful rolls.
What if my rolls don’t rise during proofing?
This could mean the yeast was old or the proofing environment is too cold. Try proofing in a warmer spot and ensure your yeast is fresh next time.
Can I use less sugar or omit it?
You can reduce sugar slightly but it helps feed the yeast and balances flavor, so a small amount is recommended.
How do I know when the rolls are fully baked?
They should be golden brown on top, spring back when lightly pressed, and sound hollow if tapped on the bottom.
Can I add herbs or spices to the dough?
Yes! Fresh or dried herbs like rosemary or garlic powder can be kneaded in for extra flavor.
What’s the best way to shape the rolls?
Pull the edges towards the bottom to create a smooth, tight ball with no seams on top. This helps with an even rise and soft outside.
Do I have to use flaky salt on top?
It’s optional but highly recommended. The salty crunch perfectly complements the buttery softness of the rolls.
Final Thoughts
There’s something wonderfully satisfying about pulling warm, golden rolls from the oven that you knew were rising overnight while you slept! This Easy Overnight Dinner Rolls Recipe is a kitchen game changer—offering simplicity, flavor, and that magical freshly baked feeling without the hassle. Whether it’s a regular weeknight or a holiday feast, these rolls will steal the spotlight and win hearts.
Have you tried this Easy Overnight Dinner Rolls Recipe? I’d love to hear how it turned out! Leave a comment below. If you loved this recipe, please share it with friends and family. Happy cooking! 🥖✨
PrintEasy Overnight Dinner Rolls Recipe

These easy overnight dinner rolls are soft, fluffy, and golden brown, perfect for any meal. The dough proofed overnight in the fridge develops great flavor and texture with minimal active prep time. With simple ingredients like bread flour, milk, eggs, and butter, this recipe yields delicious, buttery rolls topped with flaky salt, ideal for family dinners or special occasions.
- Prep Time: 20 minutes
- Cook Time: 20 minutes
- Total Time: 12 hours 45 minutes
- Yield: 9–12 dinner rolls 1x
- Category: Baking
- Method: Baking
- Cuisine: American
Ingredients
Dry Ingredients
- 370 g bread flour
- 20 g sugar
- 8 g instant dry yeast
- 8 g salt
Wet Ingredients
- 185–210 g whole milk
- 70 g eggs (1 whole egg + 1 egg yolk)
- 65 g unsalted butter, softened
Finishing
- Melted butter (for brushing)
- Flaky salt (for sprinkling)
Instructions
- Prepare dough: Add all ingredients except the softened butter to the bowl of a stand mixer fitted with a dough hook. Start with the minimum amount of milk (185 g), adding more if needed. Knead on medium speed for 10-15 minutes until the dough pulls away from the sides of the bowl.
- Add butter: Incorporate the softened butter in cubes, one at a time, continuing to knead for an additional 10-15 minutes until the dough passes the window-pane test, indicating good gluten development.
- Shape and chill dough: Shape the dough into a round ball and place it in a lightly oiled bowl. Cover and refrigerate for 10-18 hours or overnight to develop flavor and texture.
- Divide dough: Remove the dough from the fridge and turn it onto a lightly floured surface. Divide into either 12 pieces of approximately 60 grams each or 9 pieces of 80 grams each, using a scale for accuracy.
- Shape rolls: Shape each piece into a seamless round ball and place them in a greased or lined 9×9 inch baking tray.
- Proof rolls: Cover the tray and proof the rolls in a warm spot at about 78°F/26°C for around two hours, or until they double in size and become puffy.
- Bake rolls: Preheat the oven to 355°F/180°C. Bake the rolls for 15-20 minutes until golden brown on top.
- Finish rolls: Immediately brush the hot rolls with melted butter and sprinkle with flaky salt. Serve warm for best texture and flavor.
Notes
- Using a scale to weigh the dough portions ensures even-sized rolls and consistent baking.
- The overnight refrigeration helps develop complex flavors and creates a soft crumb.
- The window-pane test checks the dough’s gluten development – the dough should stretch thin without tearing.
- Proofing temperature is ideal around 78°F/26°C; if your kitchen is cooler, proof near a warm spot or inside a turned-off oven with the light on.
- Brush rolls with melted butter right after baking for a shiny crust and added richness.
Keywords: overnight dinner rolls, soft dinner rolls, yeast bread, homemade rolls, fluffy rolls, baked bread