Easter No-Bake Mini Egg Cheesecake Recipe
Picture this: the sweet, buttery scent of crushed digestive biscuits mingling with the creamy whisper of vanilla and rich cream cheese. You’re scooping velvety cheesecake filling sprinkled with bursts of pastel Cadbury Mini Eggs, all nestled in a crumbly, golden base. It’s delightfully creamy, a perfect balance of textures and flavors that practically melts in your mouth. Quick to whip up yet spectacular to share, this Easter No-Bake Mini Egg Cheesecake Recipe is the ultimate festive treat that’ll have everyone asking for seconds!
Why You’ll Love This Easter No-Bake Mini Egg Cheesecake Recipe
- Ready in just a fraction of the time: This cheesecake sets without an oven, so it’s ready after just a few hours chilling — perfect if you’re short on time but want big impact.
- Uses simple, accessible ingredients: Digestive biscuits, cream cheese, double cream, and your favorite Mini Eggs come together effortlessly.
- Perfect for beginners: No complicated baking techniques needed, just gentle mixing and a little patience for chilling.
- Impressive presentation: Miniature cheesecakes topped with colorful chocolate eggs add an irresistible charm to any Easter gathering.
- Customizable and fun: Swap out flavors, add toppings, or even make them in different shapes for a personal twist every time.
Why This Easter No-Bake Mini Egg Cheesecake Recipe Works
The magic of this Easter No-Bake Mini Egg Cheesecake Recipe lies in three key elements: the buttery biscuit base, the airy cream cheese filling, and the delightful crunch of crushed Mini Eggs folded right in. The biscuit base is carefully compacted to create a firm yet crumbly crust that holds the creamy center perfectly. Whipping the cream to stiff peaks and folding it gently into the cream cheese ensures a light, fluffy texture that feels indulgently smooth without being heavy. Finally, adding crushed Mini Eggs introduces just the right amount of sweet crunch and festive color, transforming a classic cheesecake into a joyful Easter celebration on a plate.
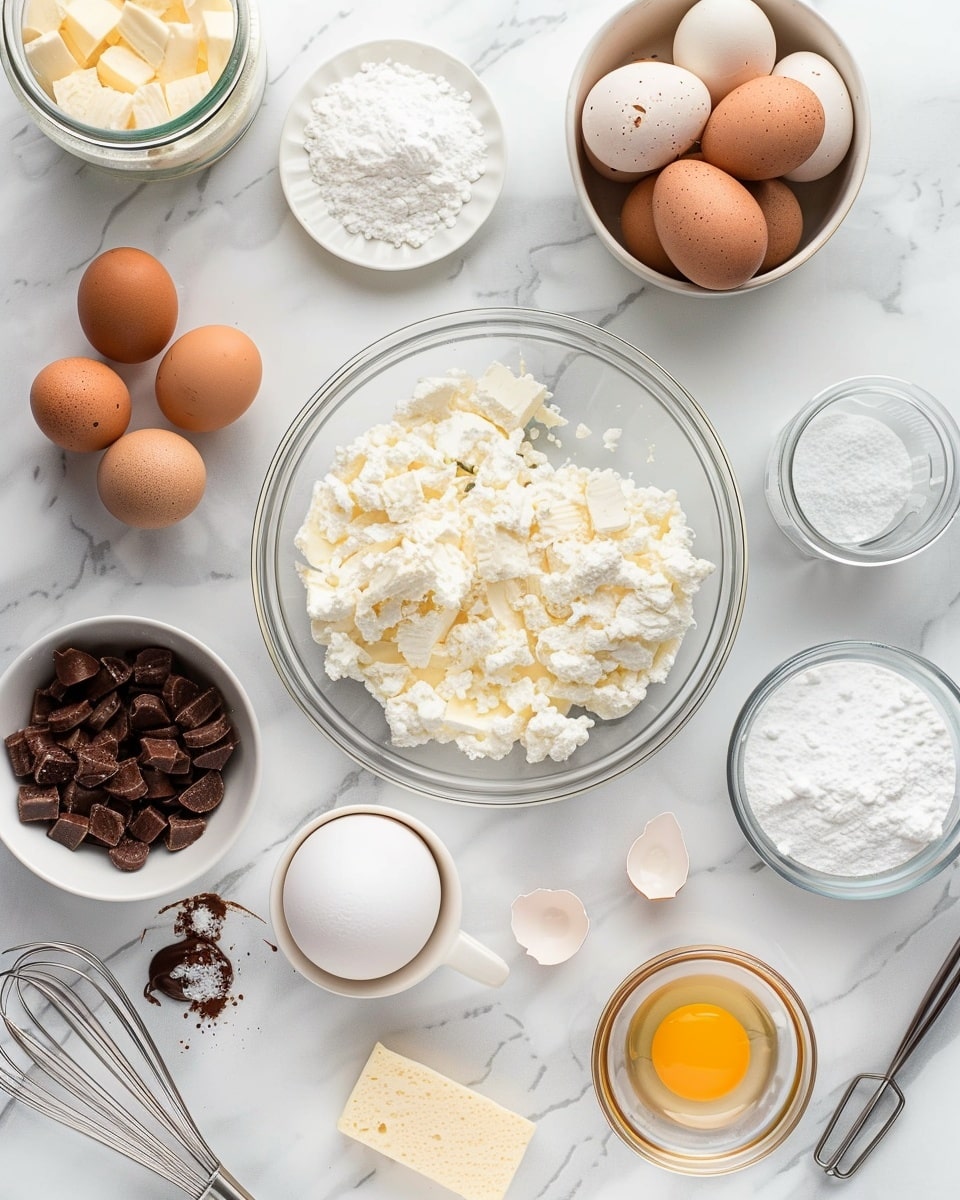
Ingredients You’ll Need
These simple yet essential ingredients combine to create a rich, creamy cheesecake that’s bursting with flavor and color.
- Digestive biscuits: The crisp base that adds a buttery crunch and perfectly holds the filling.
- Unsalted butter: Melted to bind the biscuit crumbs into a solid crust.
- Philadelphia cream cheese: The creamy heart of the cheesecake, providing smooth richness.
- Double cream: Whipped to soft peaks to give the cheesecake a light, airy texture.
- Powdered icing sugar: Sweetens the filling evenly without graininess.
- Vanilla bean paste: Adds a natural, fragrant vanilla flavor that elevates the cheesecake.
- Fine salt: Balances sweetness and intensifies flavors.
- Cadbury Mini Eggs: Crushed into the filling and scattered on top for festive color and crisp chocolate bursts.
Ingredient Substitutions & Tips
- Digestive biscuits: You can substitute with graham crackers, shortbread, or any plain sweet biscuits you prefer.
- Unsalted butter: Salted butter works too—just reduce the added pinch of salt in the recipe accordingly.
- Double cream: Heavy whipping cream or whipping cream can be used but make sure it whips up stiffly.
- Cadbury Mini Eggs: Swap for any small colorful chocolate candies or chopped chocolate bars for different textures or flavors.
👨🍳 Pro Tips for Perfect Results
- Tip 1: Use room temperature cream cheese for the smoothest filling without lumps.
- Tip 2: Chill your mixing bowls and beaters before whipping the cream—it whips more easily and holds shape better.
- Tip 3: Pack the biscuit base firmly into the pan to avoid crumbling when slicing later.
- Tip 4: Crush the Mini Eggs gently to keep some texture—avoid pulverizing them into powder.
- Tip 5: Cover tightly with plastic wrap when chilling to prevent fridge odors from affecting the delicate flavors.
How to Make Easter No-Bake Mini Egg Cheesecake Recipe
Step 1: Make the biscuit base
Line the base of a 23cm (9-inch) springform pan with parchment paper. Blitz your digestive biscuits in a food processor until finely crumbled. Pour the melted butter over the crumbs and pulse until the texture resembles wet sand.
💡 Pro Tip: If you don’t have a processor, place biscuits in a zip-lock bag and crush them with a rolling pin.
Step 2: Press the base and chill
Pour the biscuit mixture into the prepared pan. Use a small measuring cup or the back of a spoon to firmly press the crumbs into an even layer covering the base and slightly up the sides. Refrigerate for at least 30 minutes or freeze for 15 minutes to help it set.
💡 Pro Tip: Compacting the crumbs tightly is key to a sturdy base that won’t crumble when serving.
Step 3: Whip the cream cheese
In a medium bowl, beat the cream cheese until silky and smooth, scraping the sides frequently.
💡 Pro Tip: Softened cream cheese whips better and yields a creamier texture.
Step 4: Whip the double cream
In a separate chilled bowl, whip the double cream on high speed until stiff peaks form. Be careful not to overbeat.
💡 Pro Tip: Cold cream whips up faster and holds air, giving the cheesecake its light, fluffy texture.
Step 5: Combine sugar, vanilla, and salt with cream cheese
Sift the powdered icing sugar into the cream cheese mixture, add vanilla bean paste and salt, then beat until smooth and combined.
💡 Pro Tip: Sifting prevents lumps and distributes sweetness evenly.
Step 6: Fold in the whipped cream
Gently fold the whipped cream into the cream cheese mixture using a spatula to keep the airiness intact.
💡 Pro Tip: Use a light folding motion to avoid deflating the whipped cream.
Step 7: Add crushed Mini Eggs
Crush around two-thirds of the Mini Eggs lightly and fold them into the filling evenly.
💡 Pro Tip: Crushing them by placing them in a bag and tapping lightly keeps crunchy bits without powdering.
Step 8: Assemble and chill the cheesecake
Pour the creamy filling over the biscuit base, smooth the top with an offset spatula, cover tightly with plastic wrap, and refrigerate for at least 6 hours or overnight for the best set and flavor.
💡 Pro Tip: Longer chilling enhances firmness and melds flavors beautifully.
Step 9: De-mould and decorate
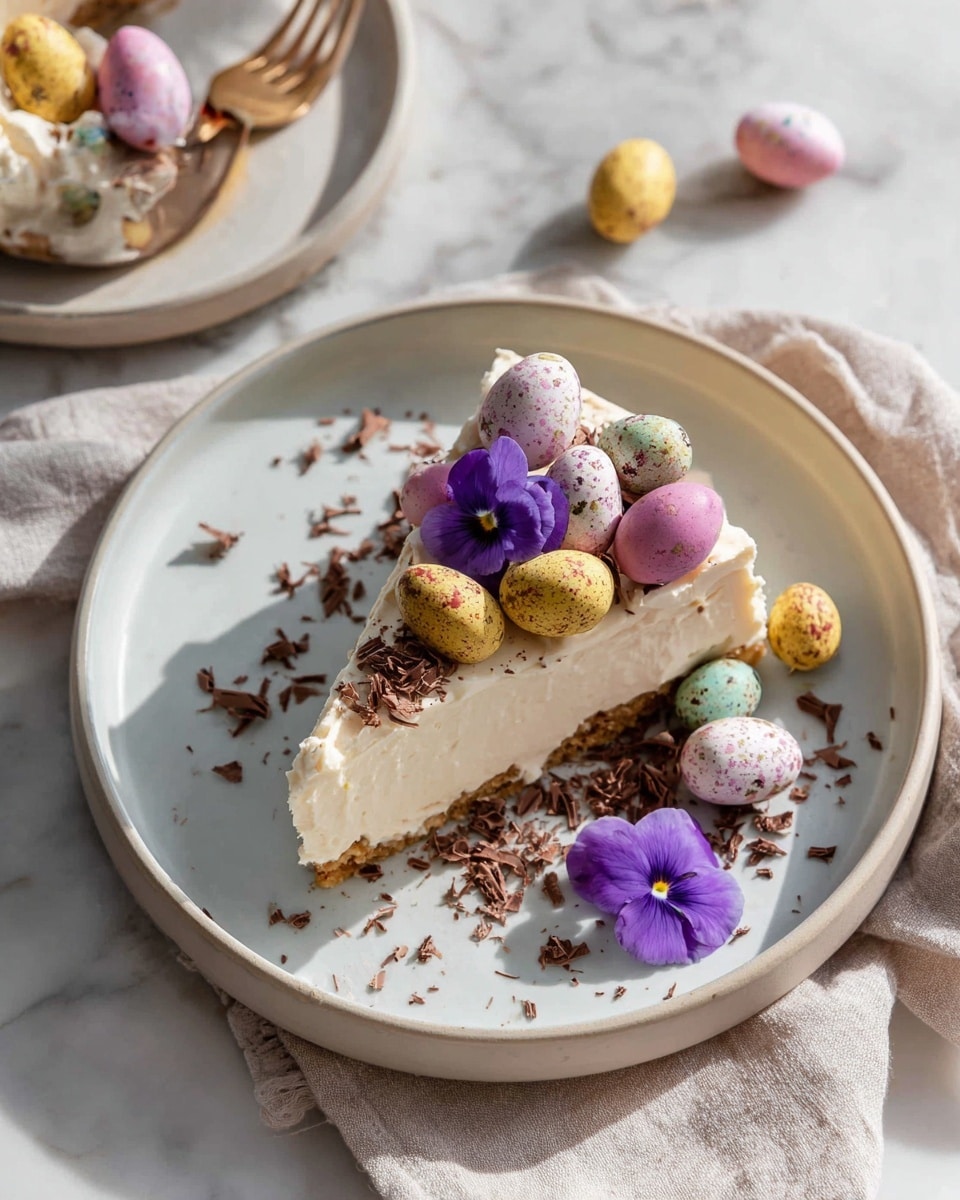
Run a knife gently around the edge to loosen the cheesecake, then release the springform pan rim. Transfer to a serving plate and decorate with the remaining Mini Eggs, optional chocolate shavings, and fresh spring flowers for a stunning finish.
💡 Pro Tip: Keep the decoration fresh and festive—it’s the cherry on top of this delicious dessert!
Common Mistakes to Avoid
Learn from these common pitfalls:
- Using cold cream cheese: Results in lumps and uneven filling. Always soften it first.
- Over-whipping the cream: Turns it grainy or buttery, ruining the light texture.
- Not packing the biscuit base firmly: Leads to a crumbly crust that falls apart.
- Mixing the whipped cream too vigorously: Deflates the air bubbles, making the cheesecake dense.
- Skipping sufficient chilling time: The cheesecake won’t set properly and will be too soft to slice.
- Crushing Mini Eggs too finely: Loses the fun crunch and color spotting inside the cheesecake.
Delicious Variations to Try
Once you’ve mastered the classic Easter No-Bake Mini Egg Cheesecake Recipe, have fun experimenting with these exciting twists:
White Chocolate & Raspberry
Fold in melted white chocolate and fresh raspberries for a silky, fruity surprise that complements the creamy base wonderfully.
Peanut Butter & Chocolate
Add a swirl of peanut butter into the cream cheese filling and sprinkle chopped peanut butter cups along with Mini Eggs for a rich, nutty flavor.
Mint Chocolate Madness
Incorporate peppermint extract and crushed mint chocolate candies for a refreshing, holiday-inspired treat with a cool aftertaste.
Lemon & Blueberry
Stir in lemon zest and fold in fresh blueberries for a zesty twist that brightens the creamy sweetness beautifully.
Salted Caramel Delight
Drizzle homemade salted caramel sauce throughout the filling and layer extra caramel candies on top for that perfect sweet-salty balance.
Vegan Version
Swap cream cheese and cream with coconut-based alternatives and use vegan cookies in the base for a plant-powered, equally indulgent cheesecake.
How to Serve Easter No-Bake Mini Egg Cheesecake Recipe
Garnishes
Decorate with whole Mini Eggs, edible flowers, colorful sprinkles, or chocolate shavings to elevate the visual appeal and add a final burst of flavor and texture.
Side Dishes
Serve with fresh berries, a dollop of whipped cream, or a drizzle of fruit coulis to add a bright contrast to the creamy richness.
Creative Ways to Present
Make individual mini cheesecakes in ramekins or muffin tins for personalized servings. Alternatively, create a cheesecake parfait by layering the filling with crushed cookies and Mini Eggs in clear glasses.
Make Ahead and Storage
Storing Leftovers
Cover the cheesecake tightly with plastic wrap and refrigerate for up to 3 days. Keep it chilled to maintain firmness and freshness.
Freezing
Freeze the cheesecake (covered tightly) for up to 1 month. Thaw overnight in the refrigerator before serving to preserve texture and flavor.
Reheating
No reheating needed! This cheesecake is best enjoyed chilled. If slightly firm from the fridge, let it sit at room temperature for 10-15 minutes before serving for the perfect creamy bite.
FAQs
Can I use regular eggs instead of Mini Eggs?
This recipe is designed around Mini Eggs for texture and color, but you can substitute with chopped chocolate or candy of your choice. Regular eggs aren’t suitable in this no-bake cheesecake filling.
How can I make this cheesecake gluten-free?
Simply use gluten-free biscuits for the base, ensuring all other ingredients are gluten-free. The recipe is naturally adaptable!
Can I make this cheesecake vegan?
Yes! Use vegan cream cheese and coconut cream or another plant-based thickener. Replace biscuits with your favorite vegan options and skip the dairy-based Mini Eggs.
Why is my cheesecake not setting?
Most likely it needs more chilling time or the cream wasn’t whipped stiffly enough. Make sure you refrigerate it for at least 6 hours, preferably overnight.
Can I prepare this recipe a day ahead?
Absolutely! In fact, allowing the cheesecake to chill overnight enhances flavor and texture beautifully.
What’s the best way to crush Mini Eggs?
Place them in a sealable bag and tap gently with a rolling pin or heavy object to break into small chunks without turning to dust.
How should I store leftover cheesecake?
Keep it wrapped tightly in plastic wrap or in an airtight container in the fridge for up to 3 days for peak freshness.
Can this recipe be doubled easily?
Yes, just double all ingredients and use a larger pan or make two smaller cheesecakes. Be mindful of chilling times with bigger quantities.
Final Thoughts
This Easter No-Bake Mini Egg Cheesecake Recipe is a joyful celebration of creamy textures, buttery crunch, and colorful chocolate pops that capture the spirit of spring and family togetherness. It’s simple to make, full of festive fun, and guaranteed to delight both kids and adults alike.
Have you tried this Easter No-Bake Mini Egg Cheesecake Recipe? I’d love to hear how it turned out! Leave a comment below. If you loved this recipe, please share it with friends and family. Happy cooking! 🐰
PrintEaster No-Bake Mini Egg Cheesecake Recipe
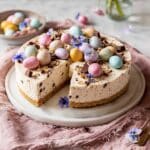
This Easter No-Bake Mini Egg Cheesecake is a delightful and festive dessert featuring a crunchy digestive biscuit base, a creamy vanilla-infused cream cheese filling, and crushed Cadbury Mini Eggs mixed throughout and garnished on top. Perfectly chilled for at least 6 hours, this no-bake recipe offers a smooth, rich texture and colorful, fun decorations ideal for celebrating spring and Easter.
- Prep Time: 40 minutes
- Cook Time: 0 minutes
- Total Time: 6 hours 40 minutes
- Yield: 16 servings 1x
- Category: Dessert
- Method: No-Cook
- Cuisine: British
- Diet: Vegetarian
Ingredients
Biscuit Base
- 300 g digestive biscuits
- 115 g unsalted butter, melted
Cheesecake Filling
- 680 g Philadelphia cream cheese
- 480 ml double cream (cold)
- 180 g powdered icing sugar (confectioners’ sugar)
- 2 teaspoons vanilla bean paste
- ½ teaspoon fine salt
- 400 g Cadbury Mini Eggs (about 2/3 crushed for filling, 1/3 for decoration)
Instructions
- Prepare the pan: Line the base of a 23cm (9-inch) springform pan with parchment paper, ensuring the sides remain unlined.
- Make the biscuit base: Pulse digestive biscuits in a food processor until finely crumbed. Add melted butter and pulse again until the mixture resembles wet sand. Alternatively, crush biscuits in a zip lock bag with a rolling pin, then combine with melted butter in a bowl.
- Form and chill the base: Press the biscuit mixture firmly and evenly into the base and slightly up the sides of the prepared pan using a ⅓ measuring cup for compacting. Refrigerate for at least 30 minutes or freeze for 15 minutes while preparing the filling.
- Beat the cream cheese: Using hand-held electric beaters with paddle attachments, beat cream cheese in a medium bowl on medium speed until smooth and creamy. Scrape sides and base as needed.
- Whip the cream: In a separate cold medium bowl, whip the cold double cream using hand-held electric beaters fitted with whisk attachment on medium-high speed until stiff peaks form. Set aside.
- Add flavorings to cream cheese: Sift powdered icing sugar into the cream cheese, then add vanilla bean paste and fine salt. Beat the mixture on medium speed until smooth and combined.
- Combine whipped cream with cream cheese: Gently fold whipped cream into the cream cheese mixture using a rubber spatula to retain airiness and creaminess.
- Add crushed Mini Eggs: Crush approximately 2/3 of the Cadbury Mini Eggs and gently fold them evenly through the filling.
- Fill the biscuit base: Pour the cream cheese mixture over the chilled biscuit base in the pan. Smooth the top with an offset spatula for an even layer.
- Chill the cheesecake: Cover the cheesecake tightly with plastic wrap and refrigerate for a minimum of 6 hours, preferably overnight, to allow the filling to set firmly.
- De-mould and decorate: Run a knife around the pan edges to loosen. Carefully remove the rim of the springform pan and slide the cheesecake base onto a serving plate. Decorate the top with the remaining whole Mini Eggs, optional chocolate shavings, and spring flowers for a festive touch.
Notes
- To crush Mini Eggs easily, place them in a zip lock bag, remove excess air, and gently crush with a rolling pin.
- Ensure the cream is cold before whipping to achieve better stiff peaks.
- Compact the biscuit base firmly to avoid crumbling when cutting the cheesecake.
- Over mixing the whipped cream with the cream cheese filling can deflate the mixture; fold gently.
- Refrigerating overnight yields the best texture and firmness for slicing.
Keywords: Easter cheesecake, no-bake cheesecake, mini egg cheesecake, festive cheesecake, spring dessert, creamy cheesecake, easy cheesecake recipe