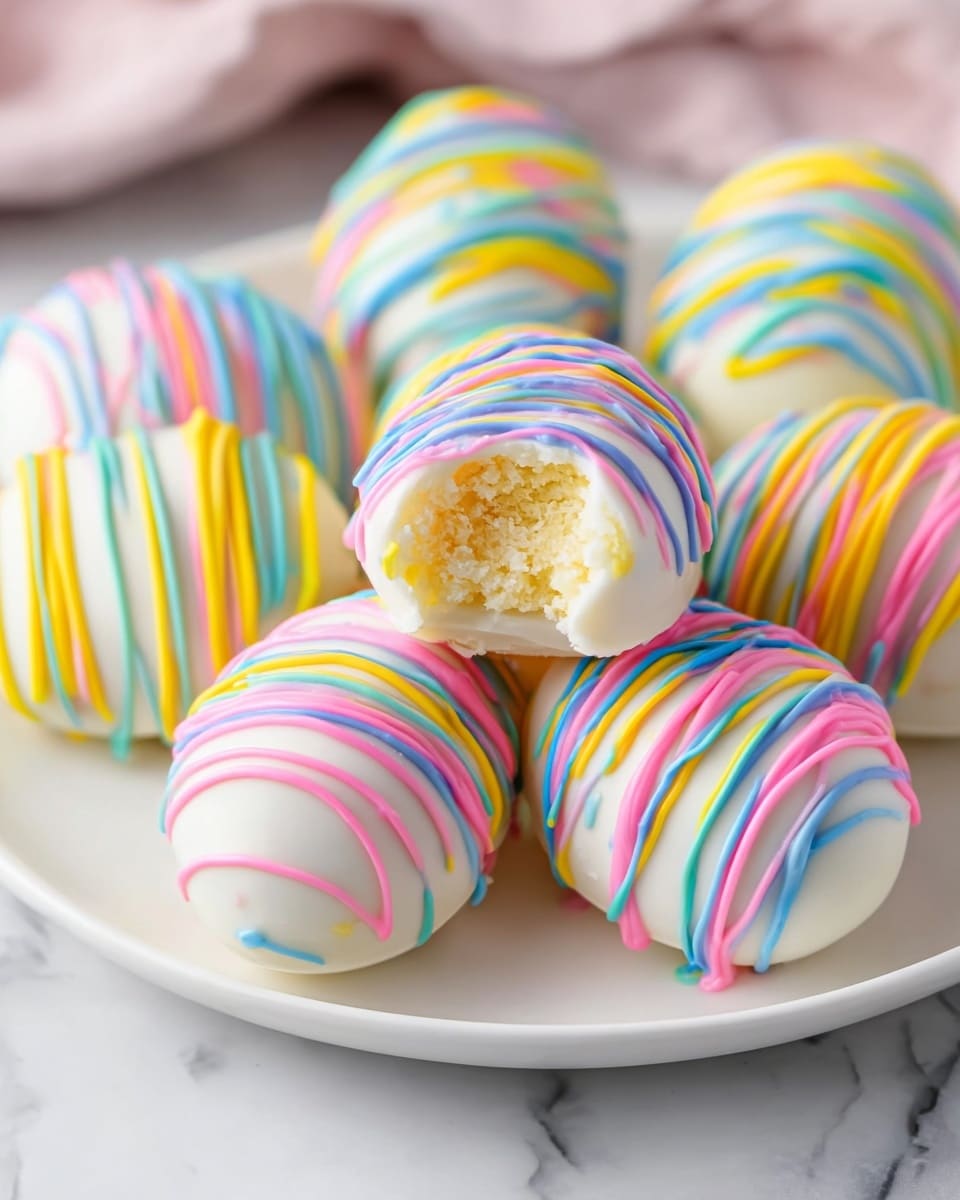
Easter Egg Oreo Cookie Balls Recipe
Picture this: the sweet, buttery aroma of melted white candy coating mingling with the subtle vanilla-kissed scent of Golden Oreos fills your kitchen, while vibrant pastel drizzles dance over perfectly shaped Easter eggs that practically sparkle with festive charm. As you pop one of these Easter Egg Oreo Cookie Balls into your mouth, your taste buds celebrate a symphony of creamy, crunchy, melt-in-your-mouth bliss that feels like a joyful party in every bite. Quick to make, delightfully easy, and visually stunning, this recipe is your secret weapon to impress family and friends with festive treats that everyone will adore.
Why You’ll Love This Easter Egg Oreo Cookie Balls Recipe
- Ready in 3 hours (including chilling): From start to finish, the process is simple and mostly hands-off, perfect for busy days when you want a festive treat without the fuss.
- Uses simple ingredients: Golden Oreos, cream cheese, and candy coating come together to create irresistible flavors with ingredients you likely already have or can easily find.
- Perfect for beginners: No fancy equipment or baking skills required—just follow a few easy steps to get professional-looking, delicious results.
- Impressive presentation: These Easter egg-shaped cookie balls decorated with colorful drizzles scream celebration and will brighten any dessert table.
- Customizable: Whether you want to change the colors, add sprinkles, or tweak sweetness, this recipe is a perfect canvas for your creativity.
Why This Easter Egg Oreo Cookie Balls Recipe Works
This recipe is a winner because of its clever combination of creamy and crunchy textures and simple techniques that anyone can master. The key is using Golden Oreos crushed into fine crumbs, which mix flawlessly with softened cream cheese to create a dough that’s flavorful yet moldable. Chilling the formed eggs before dipping helps them hold their shape in the warm melted candy coating, which hardens quickly for that satisfying snap. Lastly, using gel-based icing colors mixed into white candy melts ensures vibrant, glossy decorations that won’t fade. Together, these steps make this Easter Egg Oreo Cookie Balls Recipe a dependable crowd-pleaser every time.
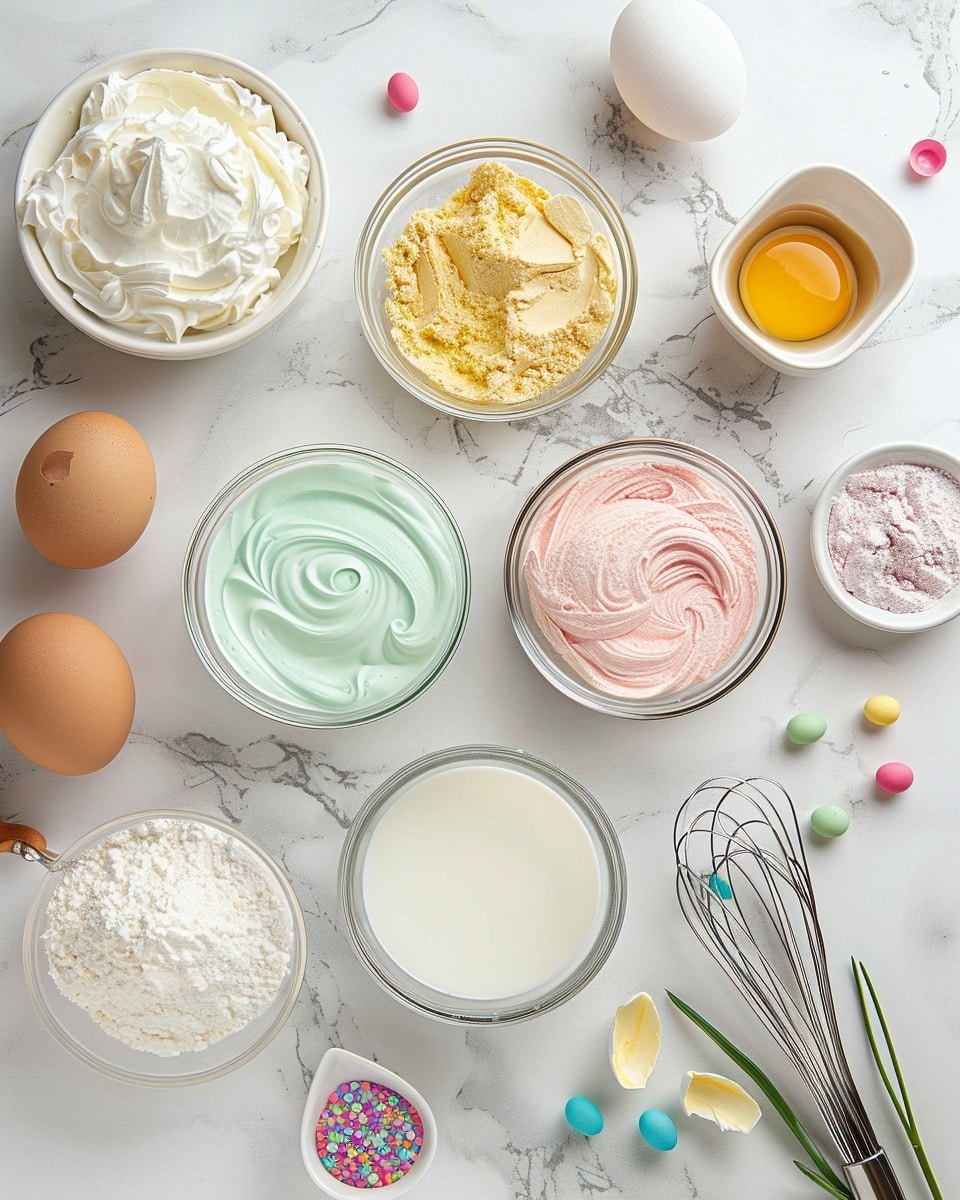
Ingredients You’ll Need
Don’t be fooled by just a few ingredients—each one plays an essential role in creating those delightfully rich and creamy cookie balls that are irresistible to both kids and adults.
- Golden Oreo cookies: Provides the buttery-sweet cookie base with just the right hint of vanilla.
- Cream cheese: Adds creaminess and binds the crushed cookies into a pliable dough.
- White candy coating: Melts smoothly to enrobe the cookie balls in a glossy, sweet shell.
- Gel icing colors: Used to tint the candy coating for those festive Easter designs.
- Parchment paper: Essential for laying out dipped eggs to dry without sticking.
Ingredient Substitutions & Tips
- Golden Oreo cookies: Swap for classic chocolate Oreos if you prefer a richer chocolatey treat.
- Cream cheese: Use Neufchâtel cheese for a lower-fat option, or mascarpone for extra decadence.
- White candy coating: Good quality white chocolate can be used but be mindful it’s trickier to melt without seizing.
- Gel icing colors: If unavailable, use colored candy melts directly for decorating.
👨🍳 Pro Tips for Perfect Results
- Use room temperature cream cheese: It blends so much easier with the cookie crumbs, avoiding lumps in your dough.
- Don’t over-mix the dough: Mix just until combined to keep the texture tender.
- Chill the eggs thoroughly: At least an hour in the fridge means less messy dipping and shapelier eggs.
- Use toothpicks for dipping: Gives you control to coat evenly and neatly.
- Let the candy coating set at room temperature: Avoid refrigeration after dipping to keep that beautiful glossy finish and prevent condensation.
How to Make Easter Egg Oreo Cookie Balls Recipe
Step 1: Crush the Golden Oreos
Start by dumping the entire package of Golden Oreo cookies into a food processor or blender. Pulse until you get fine, sandy crumbs that almost feel like wet sand. This texture is crucial to get a smooth dough when mixed with cream cheese.
💡 Pro Tip: If you don’t have a processor, place cookies in a sealed bag and crush with a rolling pin.
Step 2: Mix Cream Cheese and Oreo Crumbs
In a large bowl, combine the softened cream cheese with your Oreo crumbs. Stir gently until every crumb is coated and the mixture sticks together nicely like dough. Don’t overwork or it may become too dense.
💡 Pro Tip: Use a sturdy spatula or your hands to get an even blend.
Step 3: Form Easter Egg Shapes
Using about 1 1/2 tablespoons of dough, shape the mixture into little egg forms, smoothing with your fingers for that classic oval Easter egg look. Lay them neatly on a parchment-lined tray.
💡 Pro Tip: Lightly dampen your fingers if the dough is sticky for easier shaping.
Step 4: Chill the Eggs
Pop the egg shapes into your refrigerator for around an hour. This step firms up the dough so they hold together better when dipped.
💡 Pro Tip: Use this time to prepare your dipping station for smooth workflow.
Step 5: Dip Eggs in Melted White Candy
Melt the 10 ounces of white candy coating gently in a microwave, stirring every 20 seconds until silky. Using toothpicks inserted into the base of each egg, dip them into the candy coating one at a time, shaking gently to remove excess. Place eggs on parchment paper to dry, twisting the toothpick as you pull it out to keep the coating neat. Use a dab of coating to fill any holes left by the toothpicks.
💡 Pro Tip: Keep the melted candy warm and smooth by reheating briefly if it starts to thicken.
Step 6: Decorate with Colored Candy Drizzles
Divide the extra white candy coating into small bowls and tint each with gel icing colors one by one. Use a piping bag or a spoon to drizzle festive stripes, polka dots, or swirls over each egg. Have fun with colors and designs to make your Easter eggs truly unique!
💡 Pro Tip: Work quickly before the candy hardens to get smooth lines.
Step 7: Store and Enjoy
Once decorated and fully set, store the Easter Egg Oreo Cookie Balls in the fridge in an airtight container. They keep fresh for about a week — if they last that long!
💡 Pro Tip: Allow them to come to room temperature a few minutes before enjoying for the best flavor and texture.
Common Mistakes to Avoid
Learn from these common pitfalls:
- Using cold cream cheese: Leads to clumpy, hard-to-mix dough.
- Skipping chilling: Makes the eggs soft and difficult to coat evenly.
- Overheating candy coating: Causes it to seize or become grainy.
- Dipping without a toothpick: Increases mess and can break the delicate eggs.
- Applying too much decoration before coating sets: Results in smudgy, messy patterns.
- Storing in warm places: Makes coating melt and lose that crisp snap.
Delicious Variations to Try
Once you’ve mastered the classic version:
Chocolate Oreo Egg Balls
Replace Golden Oreos with classic chocolate ones and dip in milk chocolate candy melts for a deep, rich twist.
Peanut Butter Easter Eggs
Add 2 tablespoons of peanut butter to the cream cheese and cookie crumb mixture for a salty-sweet surprise.
Sprinkle-Topped Eggs
After dipping but before coating dries, sprinkle colorful nonpareils or edible glitter on top for extra sparkle.
Coconut-Covered Eggs
Roll the dipped eggs in shredded coconut before the coating sets for added texture and tropical flair.
Mini Oreo Egg Bites
Make tiny bite-sized balls and decorate with pastel candy melts for cute party favors or kid-friendly snacks.
How to Serve Easter Egg Oreo Cookie Balls Recipe
Garnishes
Fresh mint leaves, edible flowers, or tiny chocolate chips add a charming finishing touch to your cookie balls.
Side Dishes
Pair these treats with light, fruity dishes like a berry salad or citrus sorbet to balance the richness.
Creative Ways to Present
Display your Easter Egg Oreo Cookie Balls in pastel-colored paper liners, nestle them in edible candy grass, or arrange them on a tiered dessert tray for a festive holiday centerpiece.
Make Ahead and Storage
Storing Leftovers
Keep leftover cookie balls refrigerated in an airtight container to maintain freshness and prevent the candy coating from sweating.
Freezing
Wrap each cookie ball individually in plastic wrap and freeze in a container for up to 2 months. Thaw in the fridge before serving.
Reheating
Bring frozen cookie balls to room temperature naturally; avoid microwaving, which can melt the candy coating unevenly.
FAQs
Can I use regular Oreos instead of Golden Oreos?
Absolutely! Classic Oreos will work wonderfully and give a chocolate flavor twist to this Easter Egg Oreo Cookie Balls Recipe.
What if I don’t have a food processor?
No worries—place the Oreos in a sealed plastic bag and crush them with a rolling pin or heavy pan until you have fine crumbs.
Can I make the cookie balls ahead of time?
Yes, you can prepare and shape them a day in advance. Keep them chilled tightly wrapped in the fridge until ready to dip and decorate.
Why is my candy coating thickening?
White candy coating can harden if it sits too long without stirring or gets overheated. Warm it gently in short bursts and stir frequently to maintain smoothness.
How do I store decorated cookie balls without smudging the colors?
Allow the candy coating to set completely at room temperature and then store the cookie balls in a single layer inside an airtight container in the refrigerator.
Can I use melt-and-pour candy melts instead of white candy coating?
Definitely! Melt-and-pour candy melts work even better since they’re designed specifically for dipping and molding.
How do I fix holes from the toothpicks?
Simply dab a small amount of melted candy coating on the holes after removing the toothpicks and let it harden to create a smooth finish.
Is it okay to use gel icing colors directly in the cookie dough?
I don’t recommend it—gel colors are best used to tint melted candy coatings for decorations, not mixed into the dough where they might affect texture.
Final Thoughts
There’s something magical about unwrapping an Easter Egg Oreo Cookie Ball that’s been crafted with love and simple ingredients. Each bite melts with creamy sweetness, playful crunch, and a burst of festive color that brings smiles to any gathering. Whether you’re making these for a holiday party, classroom treat, or a cozy family dessert, they’re guaranteed to be a crowd-pleaser.
Have you tried this Easter Egg Oreo Cookie Balls Recipe? I’d love to hear how it turned out! Leave a comment below. If you loved this recipe, please share it with friends and family. Happy cooking! 🐰🍪🌷
PrintEaster Egg Oreo Cookie Balls Recipe

These Easter Egg Oreo Cookie Balls are a festive and delicious treat perfect for spring celebrations. Made from crushed Golden Oreos and cream cheese, then coated in a smooth white candy shell and decorated with vibrant gel icing colors, these bite-sized eggs are sure to impress at any gathering. Easy to prepare and delightful to eat, they combine creamy, crunchy, and colorful elements for a fun dessert experience.
- Prep Time: 10 minutes
- Cook Time: 10 minutes (for melting candy coating and dipping)
- Total Time: 3 hours (including chilling time)
- Yield: 20 servings 1x
- Category: Dessert
- Method: No-Cook
- Cuisine: American
Ingredients
Base Ingredients
- 14.3 oz package (36 cookies) Golden Oreos, crushed into crumbs
- 8 oz cream cheese, room temperature
Coating and Decoration
- 10 oz white candy coating
- Additional 1 oz white candy coating per color, for decorating
- Gel icing colors (various colors as desired)
Instructions
- Crush the Cookies: Add the Golden Oreo cookies to a food processor or blender and crush them into fine crumbs to create the base for your cookie balls.
- Mix with Cream Cheese: In a bowl, combine the crushed Oreo crumbs with room temperature cream cheese. Mix until well incorporated and the mixture is moldable enough to form balls.
- Shape the Easter Eggs: Using about 1 1/2 tablespoons of mixture per egg, form the mixture into Easter egg shapes with your hands.
- Chill the Eggs: Place the shaped eggs in the refrigerator for approximately 1 hour to allow them to firm up so they hold their shape during coating.
- Coat with White Candy: Melt the 10 ounces of white candy coating. Dip the chilled eggs into the melted candy coating using a toothpick inserted into the bottom of each egg, shaking off excess coating gently. Place the coated eggs on parchment paper to dry. Use a dab of candy coating to fill any holes left by the toothpicks once dry.
- Decorate: Melt additional 1 ounce portions of white candy coating per color you want to use. Add gel icing colors to create your desired hues. Pipe or drizzle the colored candy coatings over the dried white-coated eggs to decorate.
- Store: Store the finished Oreo eggs in the refrigerator. They will keep fresh for up to 1 week.
Notes
- Room temperature cream cheese helps achieve a smooth and well-combined mixture.
- Use toothpicks carefully for dipping and remove gently to avoid breaking the candy coating.
- Use parchment paper to prevent sticking while the candy coating dries.
- Experiment with different gel icing colors for personalized decoration.
- These treats are best enjoyed chilled and kept refrigerated.
Keywords: Oreo cookie balls, Easter treats, no-bake dessert, candy coated cookies, festive desserts, Golden Oreos