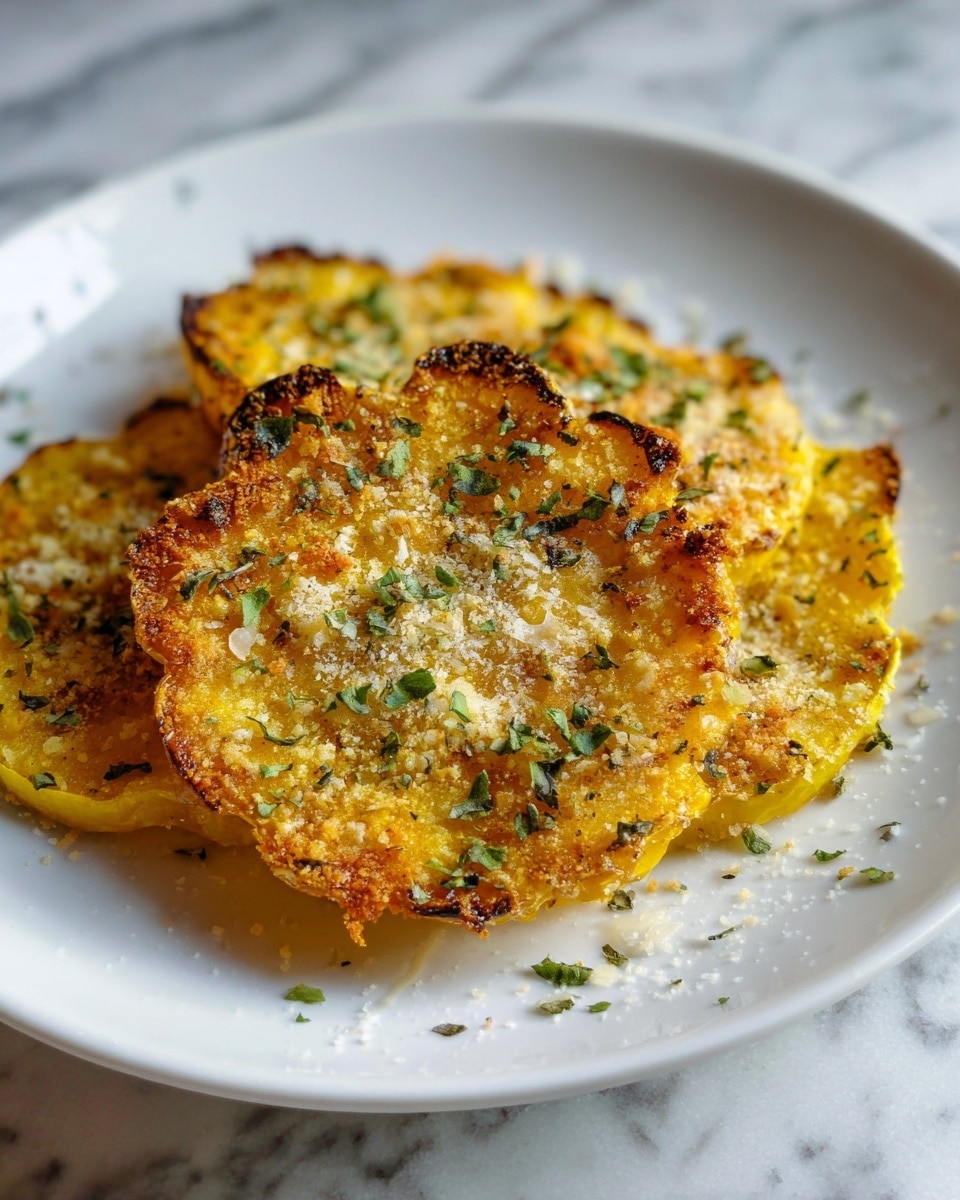
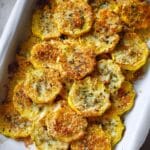
Crispy Garlic Parmesan Squash Chips Recipe
Picture this: the warm, inviting scent of garlic and Parmesan wafting through your kitchen, mingling with the subtle sweetness of golden squash chips baking to crispy perfection. Each bite crackles delightfully as the savory, crunchy coating gives way to tender, melt-in-your-mouth squash. It’s quick, easy, and downright impressive to serve—whether as a snack, appetizer, or crowd-pleasing side. I can’t wait to share this recipe with you because it’s become a beloved favorite in my family, and I know it’ll become one of yours too.
Why You’ll Love This Crispy Garlic Parmesan Squash Chips Recipe
- Ready in 30 minutes: Perfect for busy days when you want a delicious snack without spending hours in the kitchen.
- Uses simple ingredients: You probably already have most of these pantry staples, making it super accessible.
- Perfect for beginners: Easy steps that anyone can follow for crispy, restaurant-worthy results.
- Impressive presentation: These chips look gourmet with their golden, crunchy coating and sprinkle of herbs.
- Customizable: Swap spices or cheeses to fit your mood or pantry, making it your own special creation.
Why This Crispy Garlic Parmesan Squash Chips Recipe Works
This Crispy Garlic Parmesan Squash Chips Recipe achieves its perfect balance of crunch and tenderness thanks to a few key techniques. Using panko bread crumbs gives an extra crispy texture that regular crumbs just can’t match. The combination of Parmesan and a simple blend of garlic powder, onion powder, and oregano creates a savory, herbaceous crust that hugs each squash slice beautifully. Finally, baking at a high temperature with two rounds of cooking—flipping mid-way—with a light spray of oil ensures the chips come out crispy all over without drying out. These tips guarantee a success every time you make this crave-worthy snack.
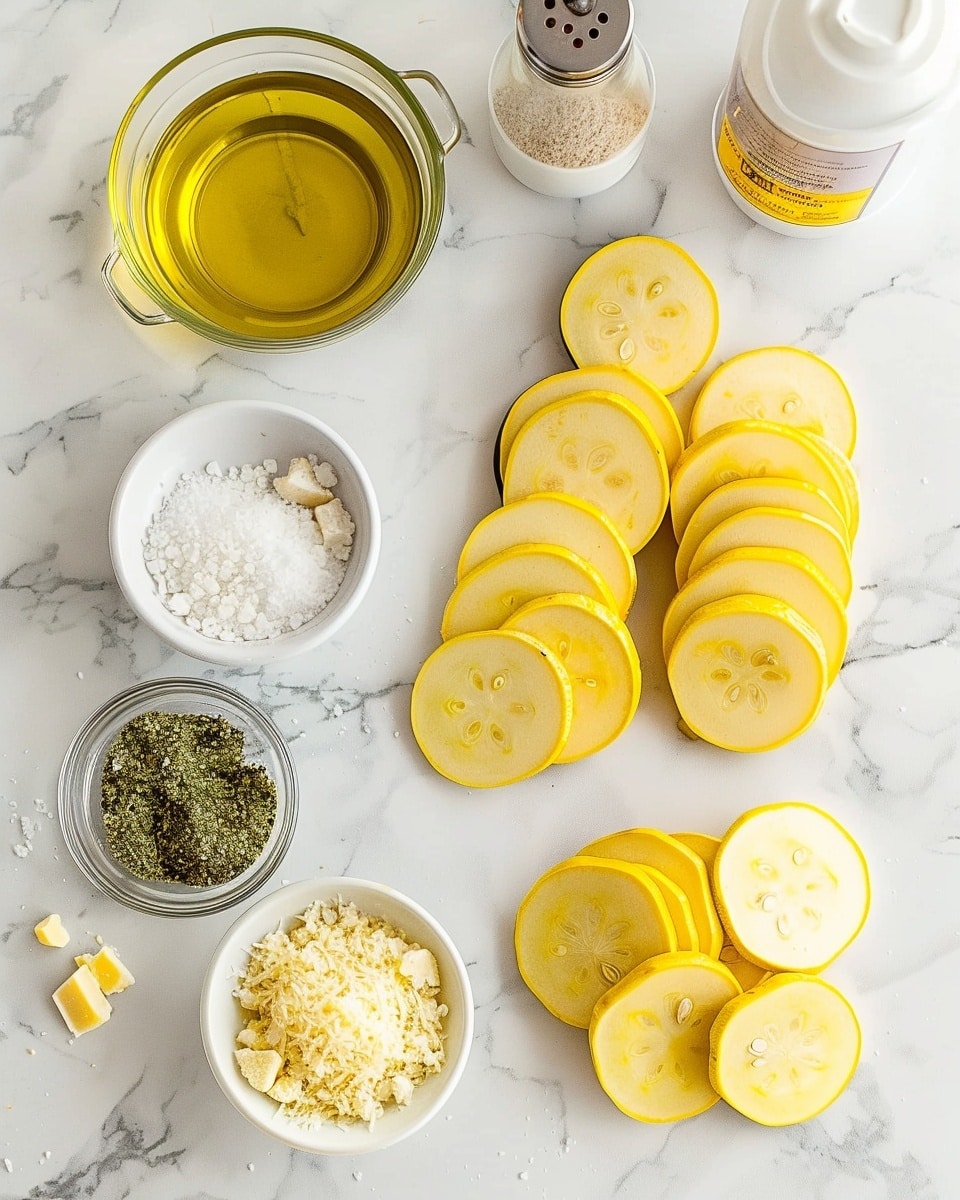
Ingredients You’ll Need
These ingredients are straightforward but essential to bring out the best flavor and texture in your squash chips. Fresh squash and quality Parmesan combined with crunchy panko create that irresistible crispiness.
- Yellow squash (4-6 small or medium): The star of the dish, sliced into perfect 1/4-inch coins.
- Olive oil (3 tbsp): Adds moisture and helps the coating adhere while enhancing flavor.
- Salt & pepper: To season and lift the natural sweetness of the squash.
- Panko-style bread crumbs (1 cup): For a light, airy crunch that’s hard to beat.
- Grated Parmesan cheese (1 cup): Imparts rich umami and helps brown the coating beautifully.
- Dried oregano (1 tsp): Adds a touch of herbaceous depth.
- Garlic powder (1 tsp): Brings the garlicky punch without overpowering.
- Onion powder (1/4 tsp): Rounds out the flavor profile with a subtle sweetness.
- Non-stick cooking spray: Helps achieve crispiness without extra oil.
Ingredient Substitutions & Tips
- Yellow squash: Try zucchini or pattypan squash if you want a slightly different texture or flavor.
- Olive oil: Avocado oil or melted butter can be used for a different richness.
- Panko crumbs: Regular bread crumbs work in a pinch, though less crispy; crushed crackers can add interesting flavor.
- Parmesan: Pecorino Romano or Asiago can offer a sharper, tangier profile.
👨🍳 Pro Tips for Perfect Results
- Tip 1: Slice the squash evenly to ensure they bake uniformly and crisp up together.
- Tip 2: Don’t overcrowd the baking sheet; give each chip space for maximum crunch.
- Tip 3: Lightly spraying the tops of the chips with non-stick spray before baking is key to crispiness without sogginess.
- Tip 4: Flip the chips halfway through baking to brown both sides beautifully.
- Tip 5: Let the chips rest for a couple of minutes after baking—they crisp up even more while resting.
How to Make Crispy Garlic Parmesan Squash Chips Recipe
Step 1: Prepare Your Baking Sheets
Line several baking sheets with parchment paper. This prevents sticking and helps with even cooking. Having multiple sheets ready lets you bake batches without delay.
💡 Pro Tip: Use rimmed baking sheets to avoid any oil drips in your oven—clean-up will be a breeze.
Step 2: Coat the Squash with Olive Oil and Seasoning
Place the sliced squash in a large bowl and drizzle with olive oil. Toss gently to coat every slice evenly. Sprinkle salt and pepper over the squash and toss once more to distribute the seasoning thoroughly.
💡 Pro Tip: Use your hands to make sure every piece is well-coated but not dripping with oil.
Step 3: Mix the Parmesan Crumb Coating
In a separate bowl, combine the panko bread crumbs, grated Parmesan cheese, dried oregano, garlic powder, and onion powder. Toss to blend all those fragrant flavors evenly.
💡 Pro Tip: Freshly grated Parmesan melts and browns better than pre-grated—try to grate it yourself if you can.
Step 4: Coat the Squash Slices with the Cheese Crumbs
Dip each squash slice one at a time into the crumb mixture, pressing gently with your fingers to make sure the coating sticks on both sides. Lay each coated chip on the prepared baking sheet, spacing them out.
💡 Pro Tip: Double-coating is optional but gives extra crunch: dip again into olive oil then crumbs.
Step 5: Spray and Bake the Chips
Lightly spray non-stick cooking spray over the tops of the coated squash chips. Bake in a preheated 450°F oven for 10 minutes, aiming for that beautiful golden color.
💡 Pro Tip: Keep an eye on the first batch to prevent burning but expect a lovely crisp to develop.
Step 6: Flip and Finish Baking
Using tongs or a fork, carefully flip each chip over. Spray the tops again lightly with cooking spray and return to the oven for another 8 to 10 minutes. Once done, remove and let them rest to crisp up further before serving.
💡 Pro Tip: Resting chips on a wire rack keeps moisture from building underneath, preserving their crisp.
Common Mistakes to Avoid
Learn from these common pitfalls:
- Overcrowding the baking sheet: This traps steam and causes soggy chips instead of crisp ones.
- Uneven slicing: Thin slices may burn while thicker ones remain undercooked or soggy.
- Skipping the second spray of cooking oil: This step is crucial for even browning and crunch.
- Not flipping the chips: Leaves one side burned and the other limp.
- Using pre-grated Parmesan: It doesn’t crisp as nicely and can result in clumping.
- Skipping resting time: They might feel soft instead of crispy if served immediately.
Delicious Variations to Try
Once you’ve mastered the classic Crispy Garlic Parmesan Squash Chips Recipe, try these fun twists!
Spicy Cajun Squash Chips
Add 1 tsp Cajun seasoning or a pinch of cayenne pepper to the crumb mix for a fiery kick that pairs beautifully with the Parmesan.
Lemon Herb Chips
Mix in chopped fresh thyme and a teaspoon of lemon zest to brighten the flavor, giving a fresh and zesty crunch.
Smoky Paprika Chips
Incorporate smoked paprika into the spice blend for a rich, smoky aroma that feels like a gourmet treat.
Cheesy Ranch Chips
Add a packet of ranch seasoning mix to the breadcrumbs along with Parmesan for a tangy, herby flavor that’s always a hit.
Parmesan Basil Chips
Fold in some dried or fresh chopped basil to the coating for a sweet, herbaceous twist that’s incredibly fresh.
How to Serve Crispy Garlic Parmesan Squash Chips Recipe
Garnishes
Sprinkle fresh chopped parsley or basil over the chips for a pop of green and freshness. A light drizzle of lemon juice can also brighten the recipe wonderfully.
Side Dishes
These squash chips pair beautifully with sandwiches, grilled chicken, or a fresh green salad. They also make a fantastic snack alongside your favorite dips like ranch, marinara, or aioli.
Creative Ways to Present
For parties, serve the chips in rustic wooden bowls or on slate platters alongside colorful dipping sauces. Stack them into little towers or arrange them fan-style for visual wow-factor.
Make Ahead and Storage
Storing Leftovers
Place cooled chips in an airtight container lined with paper towels to absorb moisture. Store at room temperature for up to 2 days for best crispness.
Freezing
While best enjoyed fresh, you can freeze unbaked, coated squash slices on a baking sheet, then transfer to a freezer bag. Bake directly from frozen, adding a few extra minutes to the cooking time.
Reheating
Reheat leftover chips in a preheated oven at 375°F for 5-7 minutes on a wire rack to bring back their delightful crunch. Avoid microwaving to prevent sogginess.
FAQs
Can I use zucchini instead of yellow squash?
Absolutely! Zucchini works wonderfully and produces a slightly different but equally delicious flavor and texture.
How do I make the chips extra crispy?
Make sure the slices are evenly thin, space them well on the baking sheet, and use non-stick cooking spray generously for the crispiest results.
Can I bake these ahead of time for a party?
Yes, you can bake and cool them, then reheat briefly in the oven just before serving to restore crispness.
Is it possible to air-fry this recipe?
Definitely! Air-fry at 400°F for about 10 minutes, flipping halfway, but keep an eye since air fryers vary.
What if I don’t have panko breadcrumbs?
Regular breadcrumbs or crushed crackers can be substituted, though the texture will be less crunchy.
Can I make this recipe gluten-free?
Yes, just swap panko for a gluten-free breadcrumb alternative, and ensure all other ingredients are gluten-free.
How should I store leftover chips?
Store them in an airtight container at room temperature with paper towels to keep them crisp for up to 2 days.
What dipping sauces go best with these chips?
Try ranch, garlic aioli, marinara, or even a spicy sriracha mayo for fantastic complementary flavors.
Final Thoughts
This Crispy Garlic Parmesan Squash Chips Recipe is more than just a snack; it’s a celebration of simple, fresh ingredients transformed by a little love and technique into something truly special. Every bite delivers that perfect crunch layered with savory, garlicky goodness that keeps you coming back for more. Whether you’re craving a quick, healthy treat or impressing friends at your next get-together, these chips fit the bill effortlessly.
Have you tried this Crispy Garlic Parmesan Squash Chips Recipe? I’d love to hear how it turned out! Leave a comment below. If you loved this recipe, please share it with friends and family. Happy cooking! 😊
PrintCrispy Garlic Parmesan Squash Chips Recipe
These Crispy Garlic Parmesan Squash Chips are a delicious and healthier alternative to traditional chips. Made with thinly sliced yellow squash coated in a savory blend of panko breadcrumbs, Parmesan cheese, and aromatic spices, then baked until golden and crispy. Perfect as a snack or appetizer, they deliver a satisfying crunch with vibrant garlic and herb flavors.
- Prep Time: 10 minutes
- Cook Time: 20 minutes
- Total Time: 30 minutes
- Yield: 8 servings 1x
- Category: Snack
- Method: Baking
- Cuisine: American
- Diet: Vegetarian
Ingredients
Squash and Coating
- 4–6 yellow squash, small or medium, sliced into 1/4” thick coins
- 3 tbsp olive oil
- Salt & pepper, to taste
- 1 cup panko style bread crumbs
- 1 cup grated Parmesan cheese
- 1 tsp dried oregano
- 1 tsp garlic powder
- 1/4 tsp onion powder
Finishing
- Non stick cooking spray
Instructions
- Prepare Baking Sheets: Line several baking sheets with parchment paper to prevent sticking and make cleanup easy.
- Coat Squash Slices: Place the sliced yellow squash in a large bowl, drizzle with olive oil, and toss to coat evenly. Season with salt and pepper to taste.
- Mix Coating: In another large bowl, combine the panko bread crumbs, grated Parmesan cheese, dried oregano, garlic powder, and onion powder. Toss to mix well.
- Apply Coating: Dip each squash slice individually into the cheese and breadcrumb mixture. Use your fingers to gently press the coating onto both sides, ensuring it adheres well.
- Arrange on Sheets: Place the coated squash slices onto the prepared baking sheets in a single layer. Fill each baking sheet before moving on to the next.
- First Bake: Lightly spray the tops of the coated squash slices with non-stick cooking spray. Bake in a preheated oven at 450°F (232°C) for 10 minutes.
- Flip Slices: Carefully remove the baking sheets from the oven and flip each slice over with a fork or tongs. Lightly spray the tops again with non-stick cooking spray.
- Second Bake: Return the baking sheets to the oven and bake for an additional 8-10 minutes until the chips are golden brown and crispy.
- Cool and Serve: Remove the chips from the oven and let them rest for 1-2 minutes for optimal crispiness before transferring to a serving plate. Repeat baking batches as necessary until all chips are cooked.
Notes
- For extra crispiness, use smaller or thinner squash slices.
- Try swapping the Parmesan cheese for a vegan alternative to make it dairy-free.
- Serve with a dipping sauce like ranch, marinara, or garlic aioli for added flavor.
- Store leftover chips in an airtight container and re-crisp in the oven before serving.
- Non-stick cooking spray helps achieve a better crunchy texture, but can be omitted if preferred.
Keywords: squash chips, garlic parmesan chips, baked squash, healthy chips, crispy vegetable chips, parmesan squash, snack recipe