Chocolate Peanut Butter Protein Ice Cream (Ninja Creami) Recipe
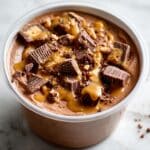
This Chocolate Peanut Butter Protein Ice Cream recipe combines rich chocolate and peanut butter flavors with protein-packed ingredients for a healthy, creamy treat made effortlessly in the Ninja Creami. Perfect for a post-workout snack or a guilt-free dessert, this homemade ice cream blends chocolate milk, almond milk, protein powder, and peanut butter cups to deliver a smooth, indulgent experience without excess sugar or fat.
- Prep Time: 5 minutes
- Cook Time: 0 minutes
- Total Time: 24 hours 5 minutes
- Yield: 1 serving 1x
- Category: Dessert
- Method: Blending
- Cuisine: American
- Diet: Low Fat
Ingredients
Scale
Liquid Ingredients
- 1 cup Fairlife chocolate milk
- 3/4 cup unsweetened almond milk
Dry Ingredients
- 1 scoop chocolate protein powder
- 2 tbsp pbfit powder (powdered peanut butter)
- 1 tbsp sugar-free chocolate jello pudding mix
- 1/4 tsp salt
Add-ins
- 8 mini peanut butter cups
Instructions
- Combine Ingredients: Add the chocolate milk, unsweetened almond milk, sugar-free chocolate jello pudding mix, chocolate protein powder, pbfit peanut butter powder, and salt to the Ninja Creami pint container up to the max fill line. Mix thoroughly using a hand-held frother until all ingredients are well incorporated.
- Freeze the Mixture: Place the pint container in your freezer and let it freeze for 24 hours until it is completely solid. This step is critical for proper processing in the Ninja Creami.
- Prepare for Processing: Remove the frozen pint from the freezer and run it under hot water for 60 seconds to loosen the ice cream from the sides. Make sure the surface is level to avoid damaging the blade. Securely install the pint into the Ninja Creami machine.
- First Spin: Press the ‘Lite Ice Cream’ button on the Ninja Creami to start the first spin. This processes the frozen ingredients into a creamy texture.
- Re-spin if Needed: If the ice cream texture is still powdery after the first spin, remove the lid and use the ‘Respin’ function to process it again. If necessary, add a small amount of liquid and respin until the desired creamy consistency is reached.
- Add Peanut Butter Cups: Create a small hole in the center of your finished ice cream and insert the mini peanut butter cups. Use the ‘Mix-in’ function on the Ninja Creami to evenly distribute them throughout the ice cream.
- Serve and Enjoy: Once mixed, your chocolate peanut butter protein ice cream is ready to serve. Enjoy this protein-packed, delicious treat immediately.
Notes
- Make sure to freeze the mixture for the full 24 hours for optimal texture and machine performance.
- If texture is too powdery after spinning, adding a tablespoon of liquid before respinning helps achieve creaminess.
- Use the ‘Lite Ice Cream’ setting for best results due to the low-fat nature of the protein and almond milk combination.
- This recipe serves one, but you can multiply the ingredients to make more servings if desired.
- Pbfit powder is powdered peanut butter, which provides peanut flavor with less fat and calories than regular peanut butter.
- Keep the pint container level and avoid overfilling to prevent damage to the Ninja Creami blade.
Keywords: chocolate peanut butter protein ice cream, protein ice cream, Ninja Creami dessert, healthy ice cream, homemade protein ice cream, low-fat ice cream, peanut butter cups dessert