Chocolate Hazelnut Pear Cake Recipe
If you’re craving a cake that strikes the perfect balance between rich and fruity, you are going to love this Chocolate Hazelnut Pear Cake Recipe. Imagine moist, cocoa-infused crumb flecked with crunchy hazelnuts and tender, juicy pears that add a lovely natural sweetness and texture. It’s a delightful combination that’s not only gluten-free but also packed with nuanced flavors like warm cardamom, which gives it an unexpected twist. Whether you’re baking for a special occasion or a cozy afternoon treat, this cake stands out as a heartwarming homemade dessert you’ll want to make again and again.
Ingredients You’ll Need
The magic of this Chocolate Hazelnut Pear Cake Recipe lies in its thoughtfully selected ingredients. Each one plays a crucial role in building layers of flavor, moisture, and texture that elevate this cake beyond ordinary. From the rich cocoa powder to the subtle cardamom spice and the natural sweetness of maple syrup, these essentials come together simply and beautifully.
- 1½ cups Bob’s Red Mill Gluten Free 1-to-1 Baking Flour: This gluten-free flour blend provides a tender and sturdy base perfect for this cake’s structure.
- ⅓ cup unsweetened cocoa powder: Adds deep cacao flavor without overpowering the fruit, giving the cake its signature chocolatey richness.
- 1 teaspoon baking powder: Helps the cake rise just right for a fluffy yet moist crumb.
- ½ teaspoon baking soda: Works alongside baking powder to lighten the texture and create a gentle crumb.
- ½ teaspoon salt: Enhances all the flavors and balances the sweetness.
- ½ teaspoon ground cardamom: Introduces a warm, aromatic spice note—feel free to increase to 1 teaspoon for a bolder flavor.
- 2 tbsp ground hazelnuts: Intensifies the nutty flavor throughout the cake for that irresistible hazelnut essence.
- ¾ cup maple syrup: A natural sweetener that adds depth and subtle caramel undertones.
- ⅔ cup cold water: Keeps the batter moist and helps blend all ingredients perfectly.
- ⅓ cup coconut oil or olive oil: Neutral oils that ensure moistness without competing with the other flavors.
- 1 tsp vanilla extract: Elevates the sweetness and brings harmony to the flavor profile.
- 1 teaspoon apple cider vinegar: Reacts with baking soda to contribute to the rise and tenderness.
- 2 small pears, peeled and cored: Half finely chopped to infuse the cake, and half thinly sliced to decorate the top.
- ½ cup chopped hazelnuts: Sprinkled on top for a satisfying crunch and visual appeal.
How to Make Chocolate Hazelnut Pear Cake Recipe
Step 1: Prepare Your Oven and Pan
Start by preheating your oven to 350°F. It’s important to get this done early so the oven is ready as soon as your batter is mixed. Then, grease a 9-inch springform pan and line it with parchment paper. I love doing both because it ensures the cake won’t stick, making it effortless to release and slice once baked.
Step 2: Mix Dry Ingredients
In a large bowl, whisk together the gluten-free flour, cocoa powder, baking powder, baking soda, salt, ground cardamom, and ground hazelnuts. Breaking up any lumps here with your whisk ensures your cake will have a smooth, even texture without any clumps of cocoa or flour.
Step 3: Combine Wet Ingredients
In a separate bowl, mix the maple syrup, cold water, oil of your choice, vanilla extract, and apple cider vinegar. Whisk these together until the mixture looks uniform. The vinegar here is a secret hero that activates the baking soda, giving your cake that perfect rise and tenderness.
Step 4: Bring It All Together
Pour the wet mixture into the dry ingredients and stir gently until just combined. Overmixing can lead to a dense cake, so stop as soon as you no longer see dry patches of flour. Gently fold in half of the finely chopped pears, reserving the other half for the topping.
Step 5: Add Pears and Hazelnuts on Top
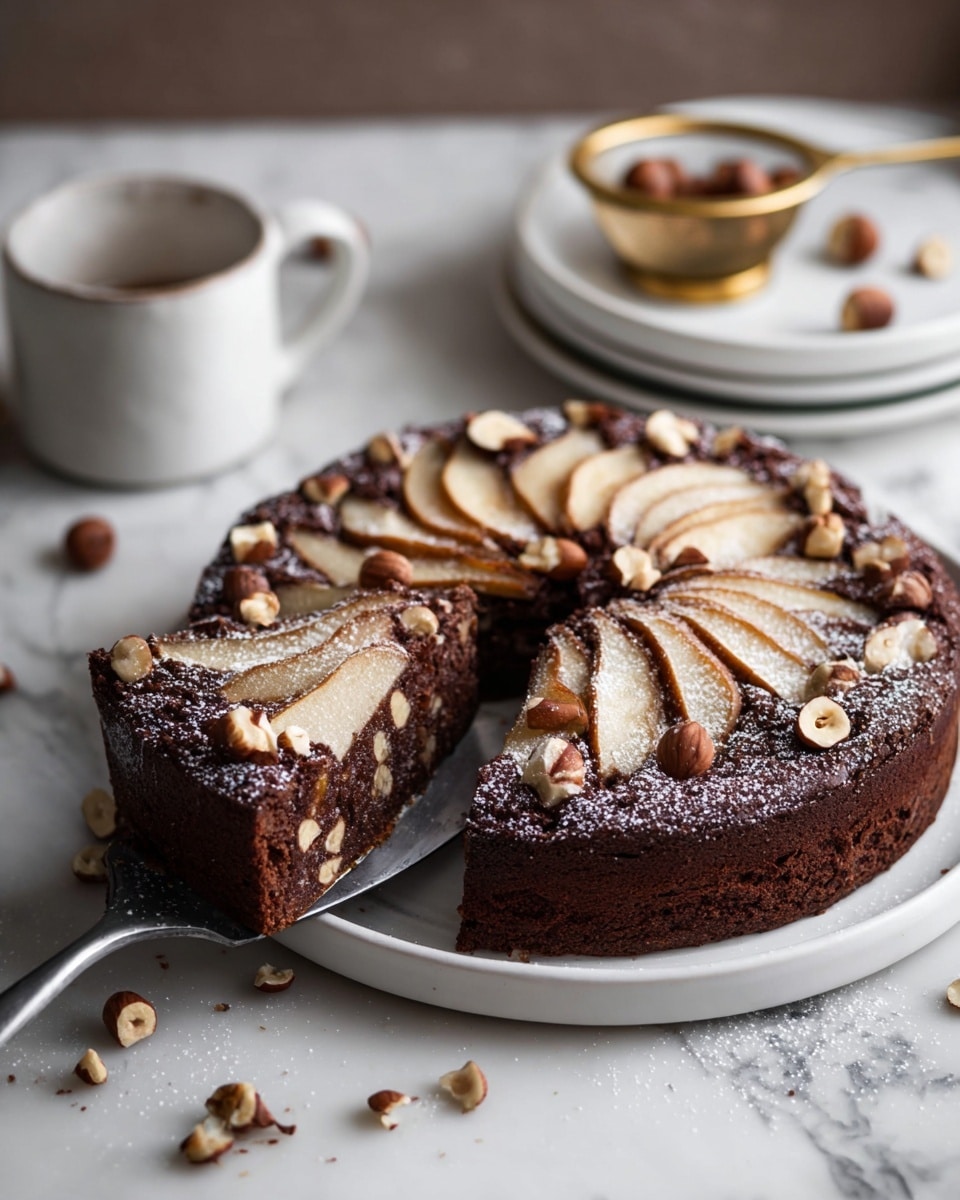
Transfer the batter to your prepared pan, spreading it evenly. Then, artfully arrange the thin pear slices on the top and sprinkle the chopped hazelnuts over them. This not only adds texture and flavor but gives your cake a gorgeous, rustic look that invites eager bites.
Step 6: Bake the Cake
Place the springform pan on a baking sheet to catch any drips, and bake for about 45 minutes. You’ll know the cake is ready when it feels set and springs back slightly when touched. Let the cake cool in the pan for 10 to 15 minutes before carefully releasing the springform and moving it to a rack to cool completely. This resting time allows the flavors to settle and makes slicing much easier.
How to Serve Chocolate Hazelnut Pear Cake Recipe
Garnishes
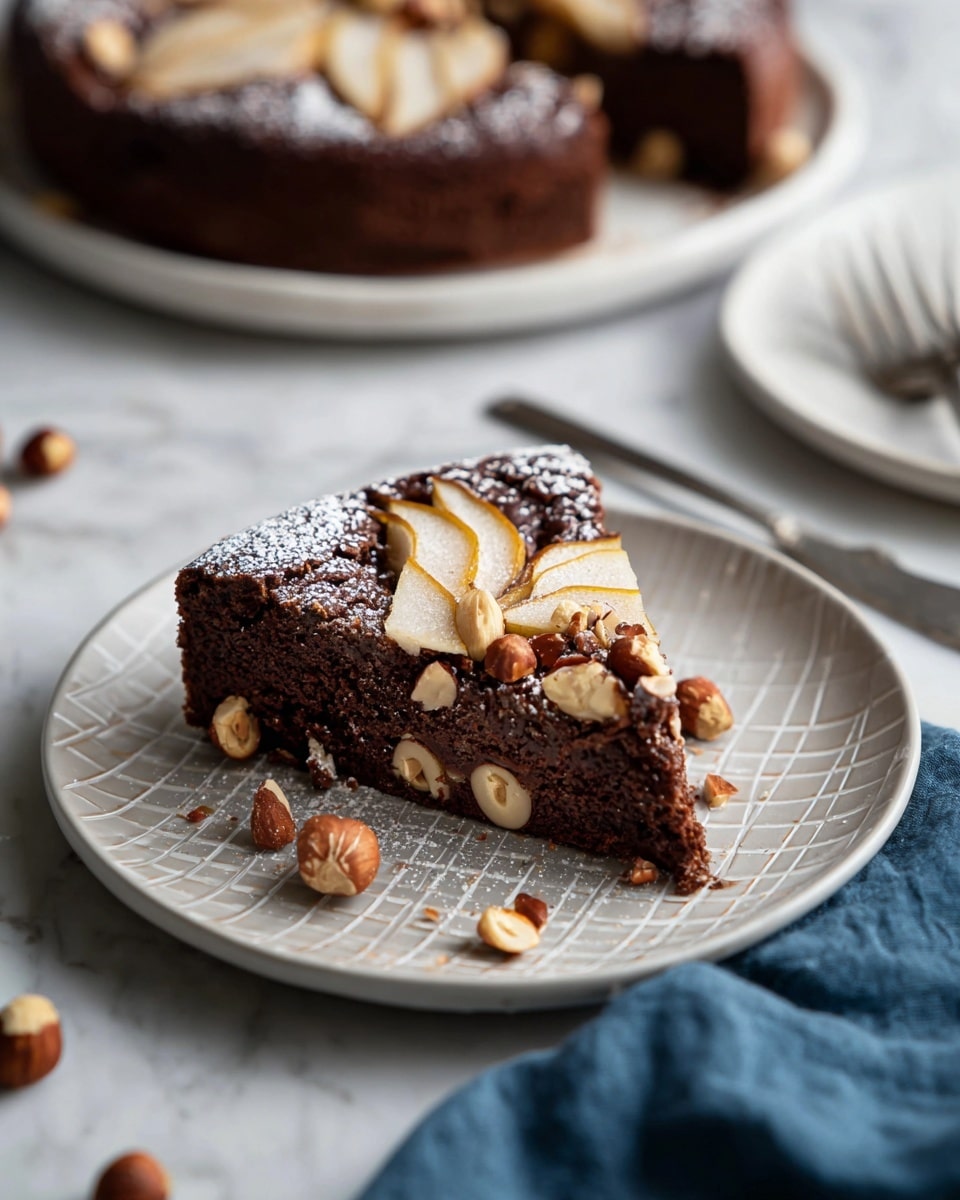
The beauty of this cake is that it’s stunning just as it is, but you can take it a step further. A light dusting of powdered sugar or a drizzle of melted dark chocolate over the top adds visual interest and a touch of extra indulgence. Fresh mint leaves or a few whole hazelnuts around the plate create an elegant finishing touch for special occasions.
Side Dishes
This cake pairs wonderfully with a scoop of vanilla or cinnamon-spiced ice cream for a creamy contrast. For a lighter accompaniment, a bowl of mixed berries or a simple dollop of whipped coconut cream complements the flavors without overwhelming them. Even a hot cup of espresso or chai tea brings out the chocolate and spice notes beautifully alongside a slice.
Creative Ways to Present
For a show-stopping dessert display, serve slices of the cake on individual wooden boards or pretty plates topped with a few pear slices fanned out beside each piece. Layering thin slices between layers as you slice can create a marvelous pear pattern inside the cake, adding a delightful surprise. Offering guests small jars of hazelnut spread on the side lets them add extra nutty sweetness as they please.
Make Ahead and Storage
Storing Leftovers
Once cooled, cover your Chocolate Hazelnut Pear Cake Recipe tightly with plastic wrap or store it in an airtight container. It will keep well at room temperature for 2 days or in the refrigerator for up to 5 days. Storing properly ensures that the cake remains moist and the flavors stay fresh.
Freezing
If you want to make this cake ahead of time or save some for later, it freezes beautifully. Slice it before freezing, wrap each slice individually in plastic wrap, then tuck them into a freezer-safe bag or container. When stored this way, the cake can last up to 3 months without losing its delightful taste or texture.
Reheating
To enjoy your cake after freezing, thaw slices overnight in the refrigerator or at room temperature for a few hours. Warm gently in a microwave for about 15 seconds or in a low-temperature oven to refresh that fresh-baked feel. Just be careful not to overheat, as this can dry out the delicate crumb.
FAQs
Can I use a different type of flour instead of gluten-free flour?
Absolutely! While this recipe is designed with gluten-free flour, you can substitute with your favorite all-purpose flour if gluten is not a concern. Just be mindful that the texture may be slightly different, perhaps a bit less crumbly.
Do the pears make the cake too moist or soggy?
Not at all. Using half the pears finely chopped inside the batter adds moisture and sweetness without making the cake soggy. The thin pear slices on top bake to a tender, slightly caramelized finish that adds texture rather than excess moisture.
What if I don’t have cardamom? Can I skip it?
If you’re not a fan of cardamom or don’t have any on hand, you can leave it out or substitute with cinnamon or nutmeg for a different warm spice note. It won’t change the cake’s essence but will give it a slightly different flavor profile.
Can I replace maple syrup with another sweetener?
Sure! Honey, agave nectar, or even brown rice syrup can work in place of maple syrup. Just remember that each sweetener brings its own distinct flavor, so your cake might taste a little different but still delicious.
Is it necessary to use a springform pan for this cake?
A springform pan is recommended because it makes removing the cake easier without damaging its delicate edges. If you don’t have one, a regular cake pan lined very well with parchment and greased will do, but be extra gentle when unmolding.
Final Thoughts
This Chocolate Hazelnut Pear Cake Recipe is one of those rare treats that feels both indulgent and wholesome at the same time. Its nutty, chocolatey, and fruity layers come together so beautifully that each slice is like a warm hug on a plate. I encourage you to try baking it soon—you might just find your new favorite cake to share with friends, family, or simply to enjoy as a delightful personal indulgence.
PrintChocolate Hazelnut Pear Cake Recipe
This Gluten-Free Chocolate Hazelnut Pear Cake is a moist, flavorful dessert combining the rich taste of cocoa and hazelnuts with the natural sweetness of pears. Perfectly spiced with ground cardamom and sweetened with maple syrup, this cake offers a delightful balance of flavors and textures, ideal for a cozy gathering or special occasion.
- Prep Time: 10 mins
- Cook Time: 50 mins
- Total Time: 1 hour
- Yield: 10–12 slices 1x
- Category: Dessert
- Method: Baking
- Cuisine: American
- Diet: Gluten Free
Ingredients
Dry Ingredients
- 1½ cups Bob’s Red Mill Gluten Free 1-to-1 Baking Flour
- ⅓ cup unsweetened cocoa powder
- 1 teaspoon baking powder
- ½ teaspoon baking soda
- ½ teaspoon salt
- ½ teaspoon ground cardamom (increase to 1 tsp for extra spice)
- 2 tbsp ground hazelnuts
Wet Ingredients
- ¾ cup maple syrup
- ⅔ cup cold water
- ⅓ cup coconut oil or olive oil (neutral oil works too)
- 1 tsp vanilla extract
- 1 teaspoon apple cider vinegar
Fruit and Nuts
- 2 small pears, peeled and cored, half finely chopped, half thinly sliced (peeling optional)
- ½ cup chopped hazelnuts
Instructions
- Preheat and Prepare Pan: Preheat your oven to 350°F (175°C). Grease or line a 9-inch springform pan with parchment paper to prevent sticking. Using both greasing and parchment ensures easy removal of the cake after baking.
- Mix Dry Ingredients: In a large bowl, whisk together gluten-free flour, cocoa powder, baking powder, baking soda, salt, ground cardamom, and ground hazelnuts. This combines the dry ingredients evenly, contributing to the cake’s structure and flavor.
- Combine Wet Ingredients: In a separate bowl, whisk maple syrup, cold water, coconut or olive oil, vanilla extract, and apple cider vinegar until well blended. The vinegar reacts with baking soda to help the cake rise and keeps it moist.
- Incorporate Wet and Dry: Pour the wet mixture into the dry ingredients and stir gently until just combined to avoid overmixing, which can make the cake dense.
- Fold in Pears: Gently fold in the finely chopped pears, ensuring they are evenly distributed throughout the batter for bursts of juicy sweetness.
- Assemble Cake Batter: Pour the batter into the prepared pan. Arrange the thinly sliced pear pieces on top, and sprinkle chopped hazelnuts over the surface for a crunchy texture and decorative finish.
- Bake: Place the cake on a baking sheet and bake in the preheated oven for 45 minutes. The cake is done when the top feels set and springy to touch, and a toothpick inserted comes out mostly clean.
- Cool: Remove the cake from the oven and allow it to cool in the pan for 10-15 minutes. Then carefully release the springform pan and transfer the cake to a cooling rack to cool completely before slicing. This prevents the cake from breaking apart.
- Serve: Slice into 10-12 servings and enjoy this delightful, moist chocolate hazelnut pear cake with your favorite beverage.
Notes
- You can use coconut oil or a neutral oil like olive oil depending on your flavor preference.
- The cardamom adds a warm spice note; adjust the amount to taste.
- Ensure pears are ripe but firm to prevent excess moisture affecting the batter consistency.
- Cooling the cake completely before slicing helps maintain the cake’s structure.
- This recipe is naturally gluten-free using a gluten-free baking blend.
- For extra richness, consider adding a handful of chocolate chips or a dusting of powdered sugar on top.
Keywords: gluten free cake, chocolate cake, pear cake, hazelnut dessert, dairy free dessert, vegan cake option, autumn dessert