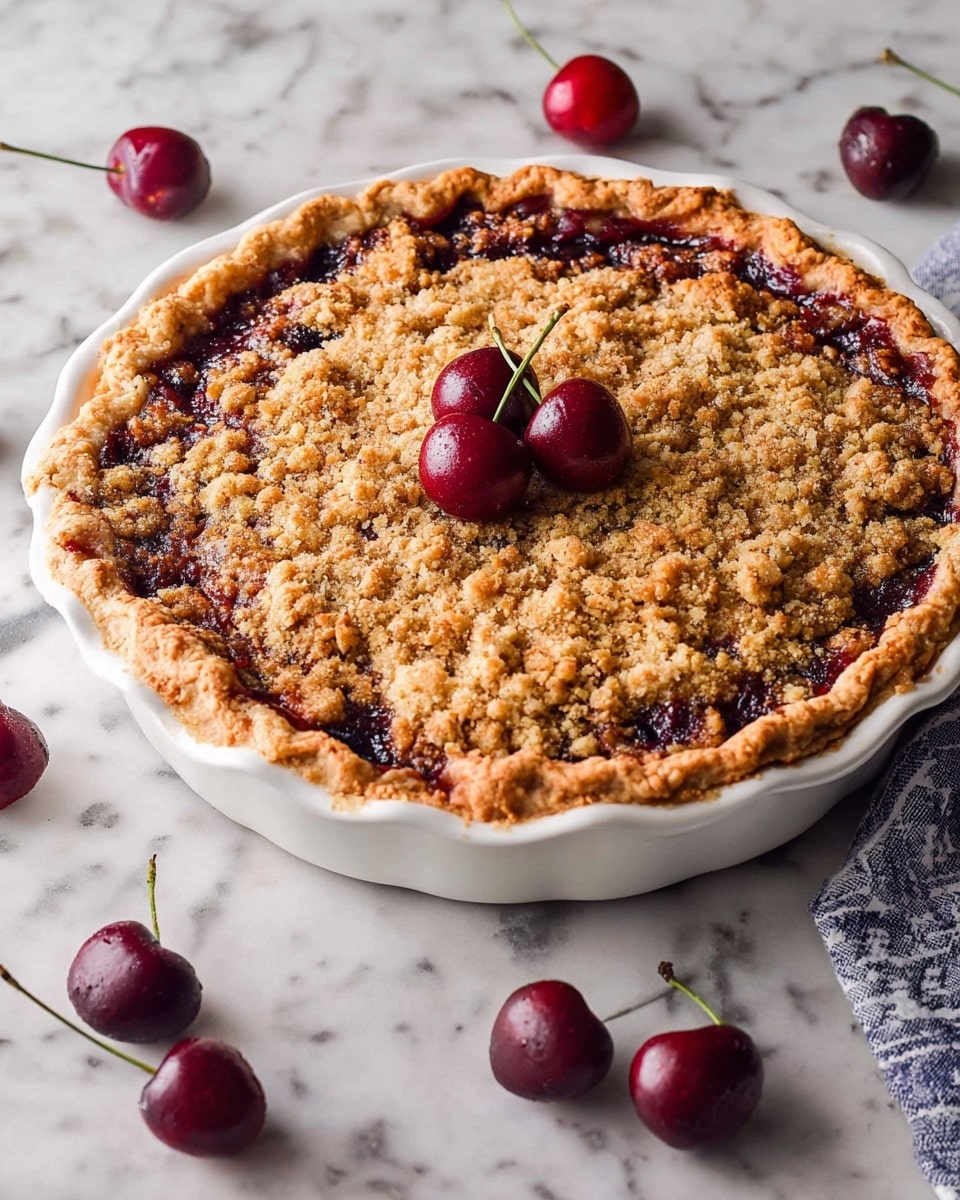
Cherry Crumb Pie Recipe
Picture this: the buttery fragrance of a golden crust wafting through your kitchen, mingling with the sweet, tangy scent of ripe, juicy cherries bubbling away under a perfectly crisp, crumbly topping. The first slice reveals a jewel-toned filling, glistening warmly and inviting you to dive in. This Cherry Crumb Pie Recipe isn’t just a dessert; it’s a heartfelt moment wrapped in sugar and spice — quick to make, remarkably impressive, and utterly irresistible.
Why You’ll Love This Cherry Crumb Pie Recipe
- Ready in just over an hour: This recipe fits beautifully into a busy day, delivering homemade goodness without hours in the kitchen.
- Uses simple ingredients: All pantry staples and fresh cherries unite for a wholesome, straightforward pie you can trust.
- Perfect for beginners: No complicated crust laminations or tricky techniques—just clear steps to a stunning result.
- Impressive presentation: The crumb topping bakes golden and crunchy, creating a stunning contrast to the jewel-like cherry filling inside.
- Customizable: Easily adjust the sweetness, swap flavor extracts, or try different berries to make it your own signature dessert.
Why This Cherry Crumb Pie Recipe Works
This recipe shines thanks to a trio of magic: the ripe cherries bursting with natural juices, perfectly thickened by just the right amount of cornstarch to hold everything together without sogginess, and the crumb topping that balances sweet and buttery with a delightfully crumbly texture. Using a chilled pie crust creates a crisp foundation that stands up to all that delightful filling. The staggered baking — starting hot to set the crust, then lowering the temperature to gently finish the pie — ensures the cherries cook perfectly tender while the crumb turns gloriously golden. Trust these techniques, and you’ll have a pie that’s both stunning and scrumptious every time.
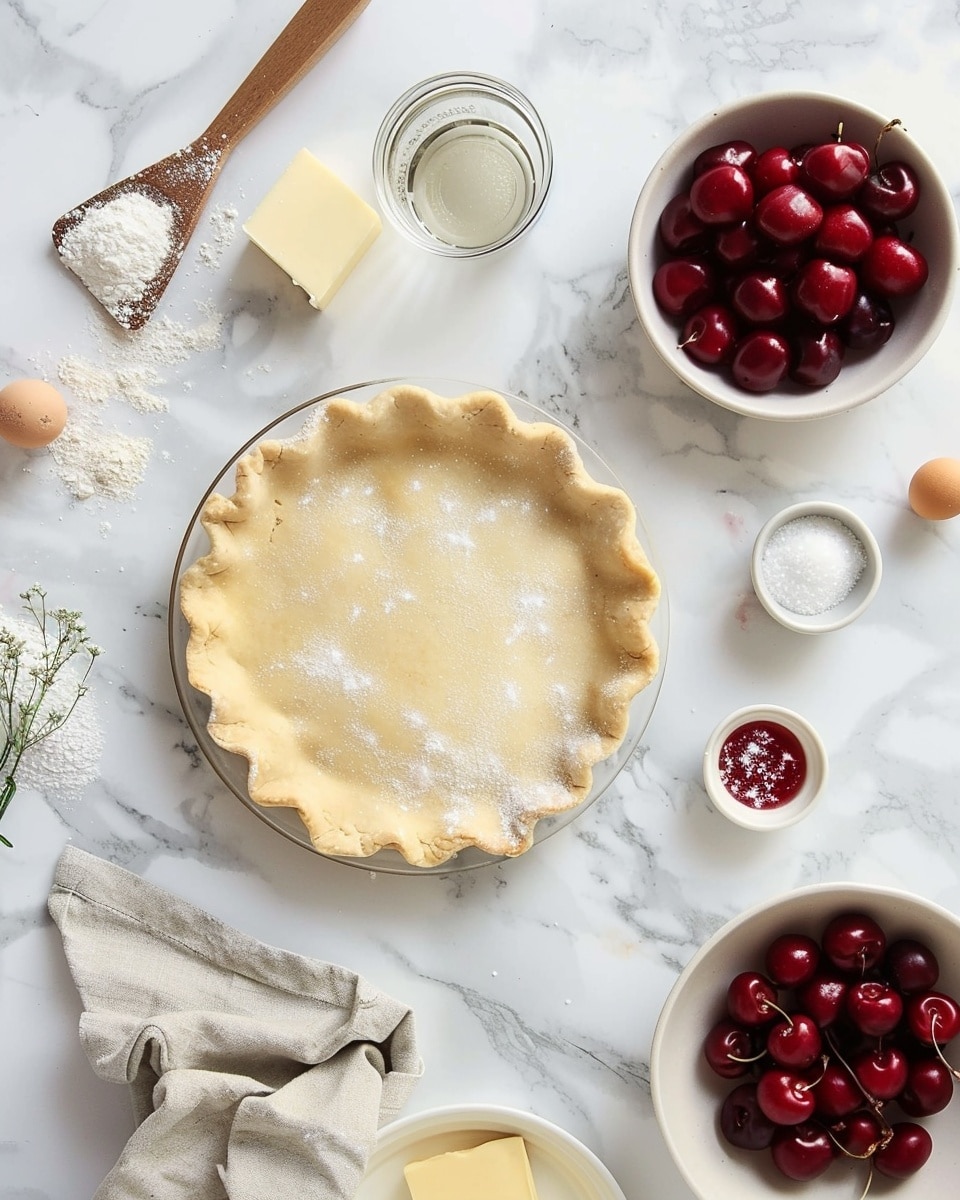
Ingredients You’ll Need
These accessible ingredients come together effortlessly to achieve an extraordinary flavor and texture combination.
- Pie crust: Choose a 9-inch pre-made or homemade crust as the buttery base.
- Pitted cherries: The star ingredient, fresh or frozen, for vibrant, juicy filling.
- Vanilla extract: Adds warmth and depth to the cherry filling.
- Almond extract: Brings a subtle nuttiness that complements the cherries perfectly.
- White granulated sugar: Sweetens the filling and crumb topping evenly.
- Corn starch: Thickens the luscious cherry filling to just the right consistency.
- All-purpose flour: The base of the crumb topping for a tender crunch.
- Light brown sugar: Infuses the crumb with a rich molasses note.
- Unsalted butter: The binding agent in the crumb, providing moistness and flavor.
- Pinch of salt: Enhances all the flavors harmoniously.
Ingredient Substitutions & Tips
- Pie crust: Use gluten-free pie crust or graham cracker crust for dietary adjustments.
- Cherries: Swap for blueberries, raspberries, or a mixed berry medley for a fresh twist.
- Almond extract: Replace with more vanilla extract if you prefer a milder, purely sweet profile.
- Unsalted butter: Use coconut oil or vegan butter for dairy-free options, though butter gives the best crumb texture.
👨🍳 Pro Tips for Perfect Results
- Use fresh or frozen cherries: If frozen, thaw and drain excess liquid well for best results.
- Chill your pie crust: A cold crust helps keep the base flaky and prevents sogginess.
- Sugar balance: Adjust sugars according to your cherries’ sweetness or tartness.
- Protect the crust edges: Use aluminum foil shields if edges brown too quickly during baking.
- Let it cool: Resist slicing your pie too soon to allow the filling to set perfectly.
How to Make Cherry Crumb Pie Recipe
Step 1: Preheat and Prepare
Start by heating your oven to a toasty 425 degrees Fahrenheit. While it warms, gather your ingredients so everything is ready to work together seamlessly.
💡 Pro Tip: Preheating the oven fully ensures your crust starts baking immediately, locking in the perfect crunch.
Step 2: Mix the Cherry Filling
In a roomy mixing bowl, combine the pitted cherries with vanilla extract, almond extract, white sugar, cornstarch, and a pinch of salt. Stir gently but thoroughly, allowing the cornstarch to coat every berry. Set this bowl aside for 5 to 10 minutes so the natural juices start to mingle with the sugar, building flavor.
💡 Pro Tip: Letting the cherries rest helps achieve that luscious filling texture without being too runny.
Step 3: Make the Crumb Topping
In another bowl, whisk the flour, white sugar, and brown sugar till evenly combined. Cut in the cold butter with your fingers, gently pinching it into the mixture until it resembles coarse, sandy crumbs — the key to that crumbly, melt-in-your-mouth topping.
💡 Pro Tip: Keep the butter cold; warm butter will blend too much and turn the topping doughy.
Step 4: Assemble the Pie
Using a slotted spoon, scoop the cherry mixture carefully into your chilled pie crust, letting most of the excess liquid drain back into the bowl. Then, generously sprinkle the crumb topping in an even layer over the cherries, covering every nook and cranny with golden promise.
💡 Pro Tip: Draining the liquid prevents a soggy crust while keeping your filling juicy.
Step 5: Bake to Perfection
Pop the pie into your hot oven and bake at 425 degrees Fahrenheit for 20 minutes. This initial heat jump starts the crust browning and filling setting. Then, lower the temperature to 375 degrees Fahrenheit and continue baking for another 35 to 40 minutes. Look for bubbling cherries and a beautifully golden crumb topping. If the crust edges brown too fast, shield them with foil to keep everything glowing, not burnt.
💡 Pro Tip: Keep an eye during the final bake to catch that perfect golden hue.
Step 6: Cool and Serve
Remove your masterpiece from the oven and allow it to cool on a rack for at least 20 to 30 minutes. The waiting is hard — but trust us, the filling will set beautifully, making every slice neat, luscious, and irresistible.
💡 Pro Tip: Serve slightly warm with a scoop of vanilla ice cream for the ultimate experience.
Common Mistakes to Avoid
Learn from these common pitfalls:
- Overfilling the crust: Too much liquid drips and weakens the base, causing sogginess.
- Skipping chilling the pie crust: Warm crust leads to a tough, chewy texture — chilling keeps it flaky.
- Not using cornstarch or enough thickener: Filling may be runny and not slice cleanly.
- Butter too soft for crumb topping: Makes crumbs clump and become a doughy mess.
- Baking at incorrect temperatures: Too low, and the crust never crisps; too high, and it burns prematurely.
- Cutting into the pie too soon: Filling won’t have set and slices will collapse.
Delicious Variations to Try
Once you’ve mastered the classic Cherry Crumb Pie Recipe, spice things up with these fun twists:
Chocolate Cherry Crumb Pie
Add 1/4 cup of cocoa powder to the crumb topping and swirl melted chocolate into the cherry filling for decadent richness.
Almond Crunch Topping
Mix sliced almonds into the crumb topping for an extra nutty flavor and delightful crunch.
Mixed Berry Crumble
Swap part of the cherries with blueberries or raspberries, making a vibrant berry medley bursting with flavor.
Citrus Zest Infusion
Add fresh lemon or orange zest to the filling to brighten the tart-sweet balance with subtle citrus notes.
Gluten-Free Cherry Crumb Pie
Use gluten-free flour blends and a gluten-free crust to make this classic treat accessible to everyone.
Vegan Cherry Crumb Pie
Replace butter with vegan margarine or coconut oil and use a plant-based crust for a compassionate dessert that doesn’t skimp on flavor.
How to Serve Cherry Crumb Pie Recipe
Garnishes
Top slices with a dusting of powdered sugar, a drizzle of warm caramel sauce, or a dollop of whipped cream scented with vanilla for a lovely finishing touch.
Side Dishes
Pair your pie with vanilla ice cream, a scoop of Greek yogurt, or a cup of rich coffee or chai latte to complement the sweet-tart flavors.
Creative Ways to Present
Serve individual portions in mini ramekins for a charming twist, or plate each slice with fresh mint leaves and edible flowers for a stunning visual appeal.
Make Ahead and Storage
Storing Leftovers
Cover your cherry crumb pie with plastic wrap or foil and refrigerate for up to 3-4 days. The flavors deepen beautifully as it rests.
Freezing
Wrap the cooled pie tightly in foil and freeze for up to 2 months. When ready, thaw overnight in the fridge before reheating.
Reheating
Warm slices gently in a 350°F oven for 10-15 minutes to refresh the crumb’s crispness and the filling’s warmth—avoid the microwave, which can make the crust soggy.
FAQs
Can I use frozen cherries instead of fresh?
Absolutely! Just thaw them and drain excess juice to avoid a watery filling while keeping the delicious cherry flavor.
What if I don’t have almond extract?
You can simply omit it or double the vanilla extract. The filling will still be tasty and aromatic.
How do I keep the crust from getting soggy?
Use a chilled crust, drain excess liquid from the filling, and bake at the recommended temperatures to help keep it crisp.
Can I make this pie ahead of time?
Yes, it can be assembled a day ahead and refrigerated before baking. Just add an extra 5 minutes to baking time if baking right from cold.
Is this recipe suitable for beginners?
Definitely! The clear steps and simple ingredients make this Cherry Crumb Pie Recipe a wonderful project for any skill level.
What is the best way to slice this pie?
Use a sharp knife and let the pie cool completely so the filling sets, allowing for clean, neat slices.
Can I add a lattice crust instead of crumb topping?
You can, although the crumb topping is what makes this recipe special. A lattice crust will give a more traditional fruit pie texture.
Do I need to use both vanilla and almond extract?
Using both adds complexity, but if you prefer, vanilla alone works wonderfully too.
Final Thoughts
This Cherry Crumb Pie Recipe is a warm hug in dessert form—a blend of bright cherries, buttery crumb, and a perfect crust that brings comfort and joy to any table. It’s one of those recipes that turns simple ingredients into a celebration of flavor and texture, perfect for sharing with loved ones or simply indulging in a quiet moment of bliss.
Have you tried this Cherry Crumb Pie Recipe? I’d love to hear how it turned out! Leave a comment below. If you loved this recipe, please share it with friends and family. Happy cooking! 🍒
PrintCherry Crumb Pie Recipe

This Cherry Crumb Pie features a buttery, flaky crust filled with juicy, tart cherries enhanced with vanilla and almond extracts. Topped with a sweet and crumbly streusel, this classic dessert bakes to golden perfection and offers a delightful combination of textures and flavors ideal for any occasion.
- Prep Time: 20 minutes
- Cook Time: 50-60 minutes
- Total Time: 1 hour 10 minutes
- Yield: 8 servings 1x
- Category: Dessert
- Method: Baking
- Cuisine: American
Ingredients
Pie Crust
- 1 9 inch pie crust (store-bought or homemade)
Cherry Filling
- 5 cups pitted cherries, whole or cut in half
- 1 tsp vanilla extract
- 1 tsp almond extract
- 2/3 cup white granulated sugar
- 1/4 cup corn starch
Crumb Topping
- 2/3 cup all purpose flour
- 1/4 cup white granulated sugar
- 1/3 cup light brown sugar
- 4 tbsp unsalted butter
- pinch of salt
Instructions
- Preheat the Oven: Preheat your oven to 425 degrees Fahrenheit to prepare for baking the pie.
- Prepare Cherry Filling: In a mixing bowl, combine cherries, vanilla extract, almond extract, white sugar, and corn starch. Stir well and let it sit for 5-10 minutes to allow the cherries to release their juices.
- Make the Crumb Topping: In another bowl, mix the flour, white granulated sugar, and brown sugar. Add the cold unsalted butter and use your hands to pinch it into the dry ingredients until the mixture becomes sandy and crumbly in texture.
- Assemble the Pie: Using a slotted spoon, transfer the cherry filling into the chilled pie crust, leaving excess liquid behind. Evenly sprinkle the crumb topping over the cherry filling.
- Bake the Pie: Place the pie in the oven and bake at 425°F for 20 minutes. Then reduce the temperature to 375°F and bake for an additional 35-40 minutes until the cherries are bubbly and the crust is golden brown. If the crust edges brown too quickly, cover them with a pie crust shield or foil.
- Cool and Serve: Remove the pie from the oven and let it cool for 20-30 minutes before slicing and serving to allow the filling to set properly.
Notes
- Use a slotted spoon to avoid transferring excess liquid to the pie crust and prevent sogginess.
- Chilling the pie crust before assembly helps maintain its flakiness during baking.
- Adjust the sugar quantity if your cherries are particularly sweet or tart to balance the flavor.
- Use foil or a pie crust shield to protect the crust edges from over-browning.
- Allow the pie to cool thoroughly to ensure the filling firms up for clean slices.
Keywords: cherry pie, crumb pie, cherry crumb pie, pie recipe, dessert pie, baked cherry pie, classic pie