Apple Crisp Cheesecake Recipe
“`html
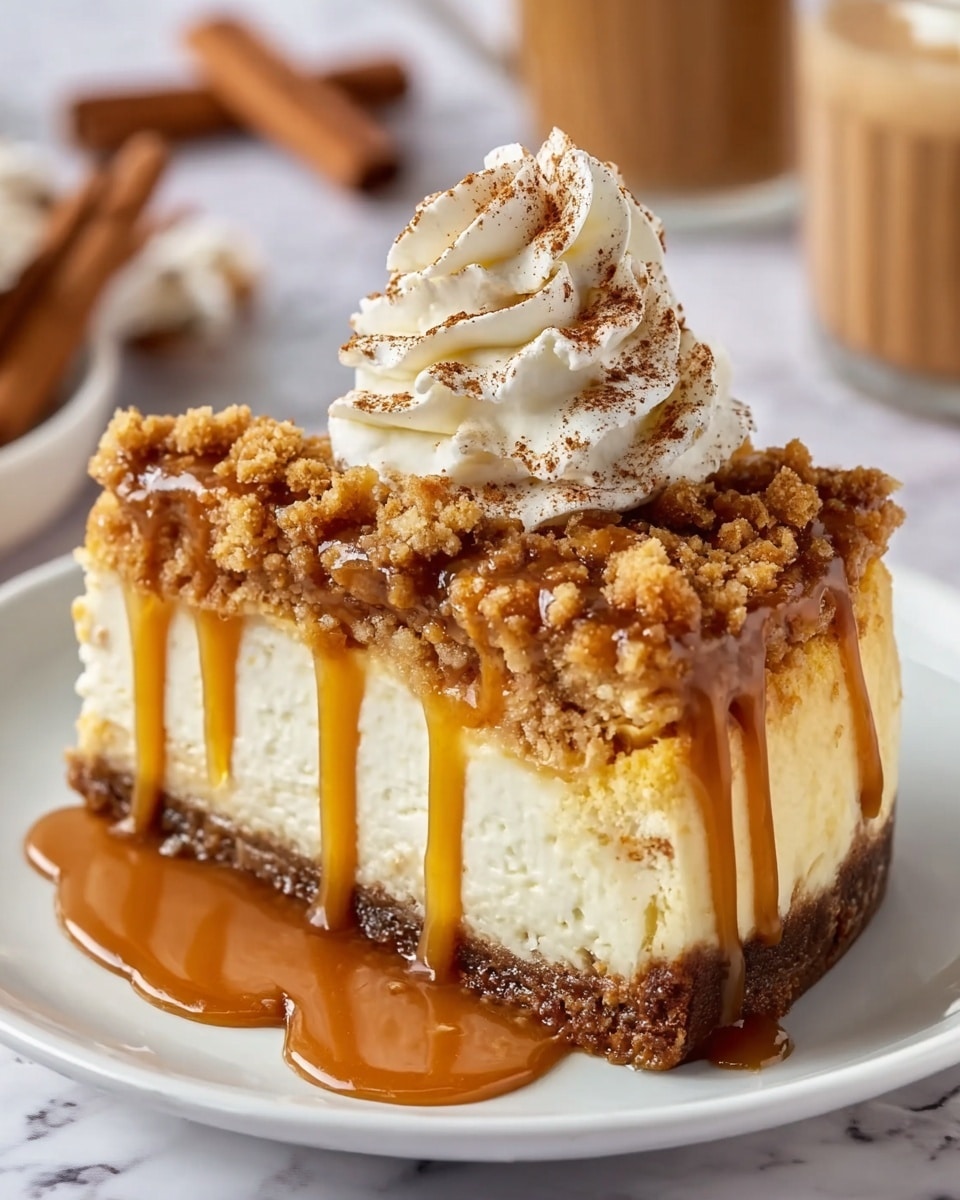
If you love the comforting flavors of fall wrapped up in an irresistible dessert, then this Apple Crisp Cheesecake Recipe is just what you need to try next. It combines the creamy, dreamy texture of cheesecake with the warm, spiced apple crisp topping that’s crispy, sweet, and lightly cinnamon-dusted. Every bite feels like a cozy hug, layered with a buttery graham cracker crust that adds just the right crunch. Whether you’re making it for a special occasion or a weekend treat, this Apple Crisp Cheesecake Recipe will quickly become one of your all-time favorites for its perfect balance of taste, texture, and charming presentation.
Ingredients You’ll Need
Carefully picked ingredients make this dessert shine with flavor and texture. Each element plays a key role: the crust gives a buttery foundation, the apples add freshness and spice, the creamy cheesecake filling brings smooth richness, and the crisp topping delivers a delightful crunch.
- Graham crumbs: Provides the sturdy, buttery base essential for a perfect cheesecake crust.
- Brown sugar: Adds rich caramel notes that deepen the apple and crust flavors.
- Cinnamon: A fragrant spice that warms both the filling and the apple topping beautifully.
- Unsalted butter: Melted and mixed to bind crumbs and crisp topping, adding luscious richness.
- Apples (Granny Smith or Gala): Crisp, tart, or sweet apples bring fresh fruitiness and balance the sweetness.
- All-purpose flour: Helps create the crumbly crisp topping texture without weighing it down.
- Quick oats: Adds heartiness and chewiness to the crisp layer for that satisfying bite.
- Full-fat cream cheese: The star ingredient in cheesecake for that smooth and decadent filling.
- Granulated sugar: Sweetens the cheesecake filling while keeping it bright and balanced.
- Cornstarch: Acts as a gentle thickener to ensure the cheesecake sets perfectly without cracks.
- Vanilla extract: Adds a subtle deep aroma that enhances the cream cheese flavor.
- Sour cream: Brings a slight tang and silkiness to the filling, adding complexity.
- Eggs: Bind and give structure to the cheesecake, creating that luscious custard texture.
- Boiling water: For the water bath that ensures even baking and a creamy finish.
- Salted caramel sauce (optional): A decadent drizzle that elevates the dessert to indulgent heights.
How to Make Apple Crisp Cheesecake Recipe
Step 1: Prepare the Crust
Start by heating your oven to 350F (180C) and wrapping your 9-inch springform pan with foil. This foil barrier prevents water from leaking in during the baking process. Next, combine graham crumbs, brown sugar, and cinnamon, then stir in melted butter until everything is evenly coated. Press this buttery mixture firmly into the bottom and sides of your pan. Bake for 8 to 10 minutes until the crust firms up and becomes lightly golden. This step forms the delicious foundation that supports your creamy cheesecake and crisp apples delightfully.
Step 2: Prepare the Spiced Apples
While the crust is baking, peel, core, and thinly slice your apples. Toss those slices with brown sugar and cinnamon to infuse them with warm, cozy flavors that complement the cheesecake perfectly. Let the apples chill in the fridge until you’re ready to use them. This chilling helps the sugar and cinnamon to meld into the fruit, resulting in a perfectly spiced apple layer atop the cheesecake filling later on.
Step 3: Make the Crisp Topping
In a bowl, mix together flour, brown sugar, cinnamon, and oats — your ingredients for that irresistible crisp topping. Stir in the melted butter until the mixture turns crumbly but holds together slightly when pinched. This topping will give your cheesecake that authentic apple crisp crunch and a little texture contrast to the creamy layers below. Set this aside for later assembly.
Step 4: Prepare the Cheesecake Filling
Using a stand mixer or handheld beaters, whip the room-temperature cream cheese and both sugars until the mixture is silky smooth. Add cornstarch and cinnamon, then mix well. Incorporate the sour cream and vanilla extract, blending them in to create layers of flavor and moisture. Finally, add eggs one at a time, beating carefully after each to avoid overmixing. This crafting of the filling is where the cheesecake gains its silky body and gentle spice notes, creating a base that melts in your mouth.
Step 5: Assemble and Bake
Pour the creamy cheesecake filling over the baked crust and evenly layer your chilled apple slices on top, leaving the juice behind for a cleaner presentation. Next, sprinkle the crisp topping generously over the apples. Place the springform pan inside a larger roasting pan, then carefully pour boiling water into the roasting pan to a depth of about one inch. This water bath technique prevents cracks and helps the cheesecake bake gently. Bake for 50 to 60 minutes until the filling is almost set but still has a slight jiggle in the center.
Step 6: Cool and Chill
Once out of the oven, let your cheesecake cool in the roasting pan at room temperature. After it cools, transfer it to the refrigerator for at least six hours, or better yet, overnight. This chilling step is essential to let the cheesecake fully set and flavors deepen, making slicing and serving a breeze with perfectly clean edges and that luscious creamy texture everyone loves.
How to Serve Apple Crisp Cheesecake Recipe
Garnishes
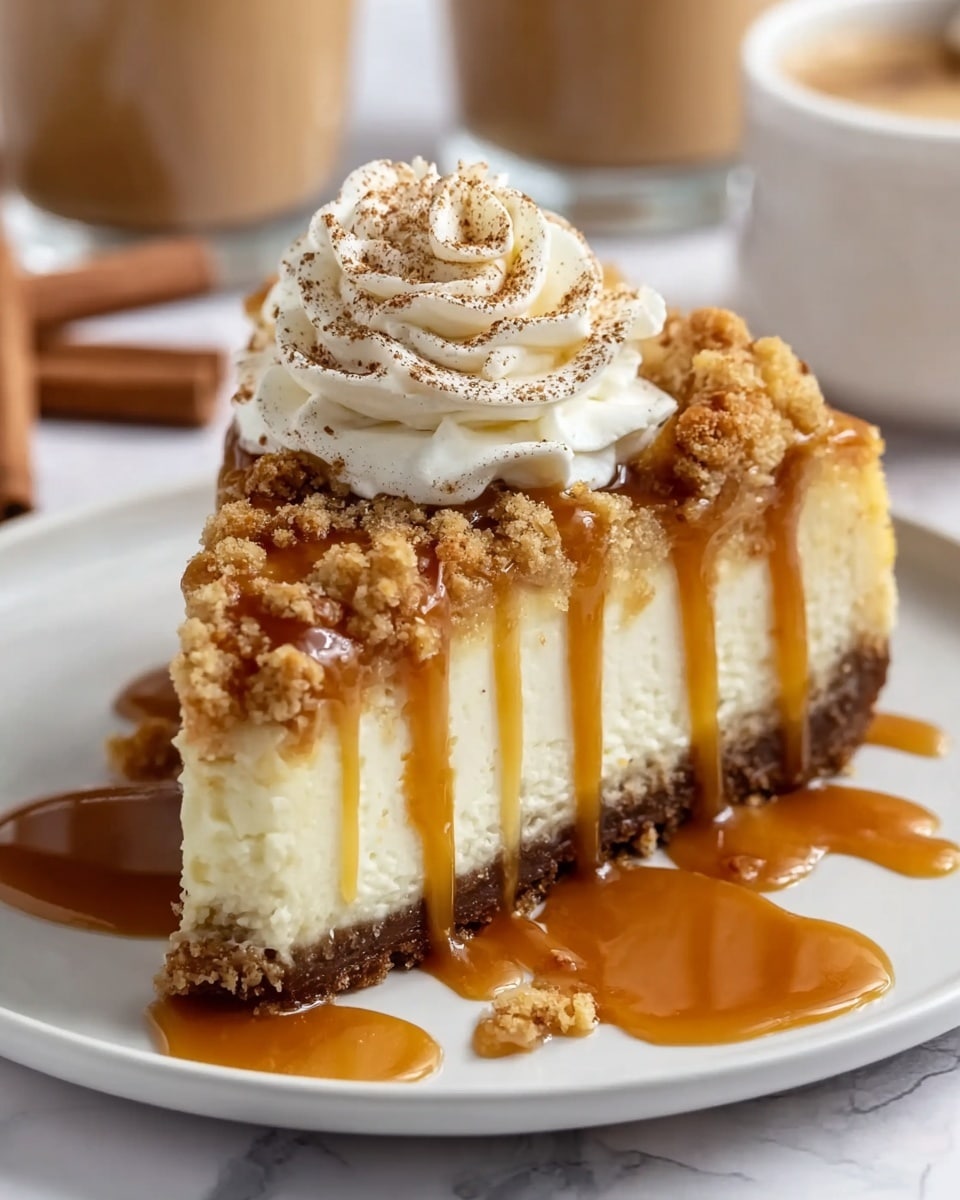
Serve your Apple Crisp Cheesecake Recipe with a drizzle of salted caramel sauce for a luxurious, sweet-salty finish that truly elevates each bite. For extra festivity, sprinkle some toasted pecans or finely chopped walnuts on top to add crunch and nutty warmth. A dollop of freshly whipped cream with a light dusting of cinnamon can make each slice feel like a slice of heaven.
Side Dishes
This cheesecake is quite the star on its own, but if you want to round out your dessert spread, consider pairing it with a cup of freshly brewed spiced apple cider or a scoop of vanilla ice cream. These sides complement the warm spices and creamy texture beautifully without overwhelming your palate.
Creative Ways to Present
For a stunning presentation, try individual servings in small jars or ramekins topped with crisp topping and apple slices for a charming, rustic look. You can also create mini apple crisp cheesecake bites by baking in a muffin tin for party-ready individual desserts. Add edible flowers or thin apple slices shaped like leaves for a charming seasonal twist that will wow guests visually as much as it delights their taste buds.
Make Ahead and Storage
Storing Leftovers
Keep your Apple Crisp Cheesecake Recipe fresh by storing leftovers tightly covered in the refrigerator. It will stay perfectly creamy and delicious for up to four days, making it a great option for entertaining or enjoying little slices of indulgence throughout the week.
Freezing
If you want to prepare this cheesecake ahead of time, freezing works wonderfully. Wrap the cooled cheesecake securely in plastic wrap, then foil, to protect it from freezer burn. It can be frozen for up to two months. When ready to enjoy, thaw it in the refrigerator overnight to preserve that creamy texture and fresh apple flavor.
Reheating
Generally, cheesecakes are best served chilled, but if you’d like a slightly warmed slice, let it sit at room temperature for about 15-20 minutes or gently warm individual portions in a microwave for 10-15 seconds. Be careful not to overheat as it can affect the texture and cause the filling to become too soft.
FAQs
Can I use a different type of apple?
Absolutely! While Granny Smith and Gala apples provide the perfect balance of tartness and sweetness, you can use Fuji, Honeycrisp, or Braeburn depending on your flavor preference. Just be sure to choose apples that hold their shape well when baked.
Do I have to use a water bath?
Using a water bath helps the cheesecake cook evenly and prevents cracking by keeping the temperature gentle and steady. While not absolutely required, skipping it can risk uneven baking and a cracked surface.
Can I make this recipe gluten-free?
Yes! To make the Apple Crisp Cheesecake Recipe gluten-free, use gluten-free graham crackers or substitute with gluten-free cookie crumbs for the crust, and gluten-free flour blends for the crisp topping. The rest of the ingredients are naturally gluten-free.
How long should I chill the cheesecake before serving?
For the best texture and flavor development, chill the cheesecake for at least six hours, though overnight is ideal. This allows it to set properly and enhances the melding of spices and creaminess.
Is this recipe suitable for a beginner baker?
Definitely! The steps are straightforward and well-explained, making it a wonderful project for those new to cheesecake baking. Following the water bath technique and chill time ensures great results even for first-timers.
Final Thoughts
There’s truly something magical about the Apple Crisp Cheesecake Recipe that brings together the best of two classic desserts into one unforgettable indulgence. The creamy cheesecake paired with warm, spiced apple crisp topping offers both comfort and elegance in every bite. I can’t wait for you to try it and see just how effortlessly it becomes a signature dessert in your kitchen. Trust me, once you do, this will be your go-to for celebrations and cozy nights in alike!
“`
PrintApple Crisp Cheesecake Recipe

This Apple Crisp Cheesecake is a delightful fusion of creamy cheesecake and the comforting flavors of apple crisp. Featuring a graham cracker crust, tender spiced apples, and a crisp oat topping, this dessert is baked in a water bath for a smooth, luscious texture. Perfect for fall or any special occasion, it’s served with optional salted caramel sauce for an extra indulgent touch.
- Prep Time: 25 minutes
- Cook Time: 60 minutes
- Total Time: 8 hours 55 minutes
- Yield: 12 servings 1x
- Category: Dessert
- Method: Baking
- Cuisine: American
Ingredients
Crust
- 3 cups graham crumbs
- 3 tablespoons brown sugar
- 1/2 teaspoon cinnamon
- 1/2 cup (112g) unsalted butter, melted
Apple Layer
- 2 large apples (Granny Smith or Gala)
- 2 tablespoons brown sugar
- 1 1/2 teaspoons cinnamon
Crisp Topping
- 1/2 cup (63g) all-purpose flour
- 1/2 cup (100g) brown sugar
- 1 teaspoon cinnamon
- 1/2 cup quick oats
- 1/4 cup (56g) unsalted butter, melted
Cheesecake Filling
- 24 oz (680g) full-fat cream cheese, room temperature
- 3/4 cup (150g) granulated sugar
- 1/4 cup (50g) brown sugar
- 1/2 teaspoon cinnamon
- 1 tablespoon cornstarch (or 2 tablespoons all-purpose flour)
- 1 teaspoon vanilla extract
- 1/2 cup (120ml) sour cream, room temperature
- 3 large eggs, room temperature
Other
- Boiling water (for the water bath)
- Salted caramel sauce (optional, for serving)
Instructions
- Prepare Oven and Pan: Preheat the oven to 350°F (180°C). Wrap the outside of a 9-inch springform pan tightly with foil to prevent water leakage. Grease the pan to prepare for the crust.
- Make the Crust: In a bowl, mix the graham crumbs, brown sugar, and cinnamon. Stir in the melted butter until well combined. Press this mixture firmly onto the bottom and up the sides of the springform pan. Bake for 8–10 minutes until set.
- Prepare Apples: Peel, core, and thinly slice the apples. Toss the slices with brown sugar and cinnamon until evenly coated. Chill the apples until ready to use.
- Make Crisp Topping: Combine flour, brown sugar, cinnamon, and quick oats in a bowl. Stir in melted butter until the mixture becomes crumbly. Set aside for later layering.
- Prepare Cheesecake Filling: In a large bowl, beat the cream cheese and sugars until smooth and creamy. Mix in cornstarch and cinnamon. Add sour cream and vanilla extract, blending well. Incorporate eggs one at a time, mixing gently to combine fully without overbeating.
- Assemble Cheesecake: Pour the cheesecake filling over the pre-baked crust in the springform pan. Arrange the apple slices in a single layer on top of the filling, avoiding excess juice. Sprinkle the crisp topping evenly over the apples.
- Bake in Water Bath: Place the springform pan inside a larger roasting pan. Pour boiling water into the roasting pan to reach about 1 inch deep surrounding the cheesecake pan. Bake for 50–60 minutes until the cheesecake is just set but still slightly jiggly in the center.
- Cool and Chill: Remove the cheesecake from the oven and cool it at room temperature while still in the water bath pan. Once cooled, refrigerate the cheesecake for at least 6 hours or overnight to allow it to fully set.
- Serve: Before serving, run a knife around the edge of the cheesecake to loosen. Release the springform pan sides and carefully remove it. Slice with a sharp knife. Optionally, drizzle salted caramel sauce on top for extra flavor.
Notes
- Using room temperature cream cheese, sour cream, and eggs helps achieve a smooth cheesecake batter.
- Wrapping the springform pan in foil is essential to prevent water from entering during the water bath baking.
- Choose tart apples like Granny Smith for a nice balance with the sweet topping.
- The water bath ensures gentle and even baking, preventing cracks in the cheesecake.
- Allowing the cheesecake to chill overnight improves texture and flavor development.
- Quick oats provide a better texture for the crisp topping compared to old-fashioned oats.
Keywords: apple crisp cheesecake, fall dessert, baked cheesecake, apple dessert, caramel cheesecake