Easy Sweet and Sour Chicken Recipe
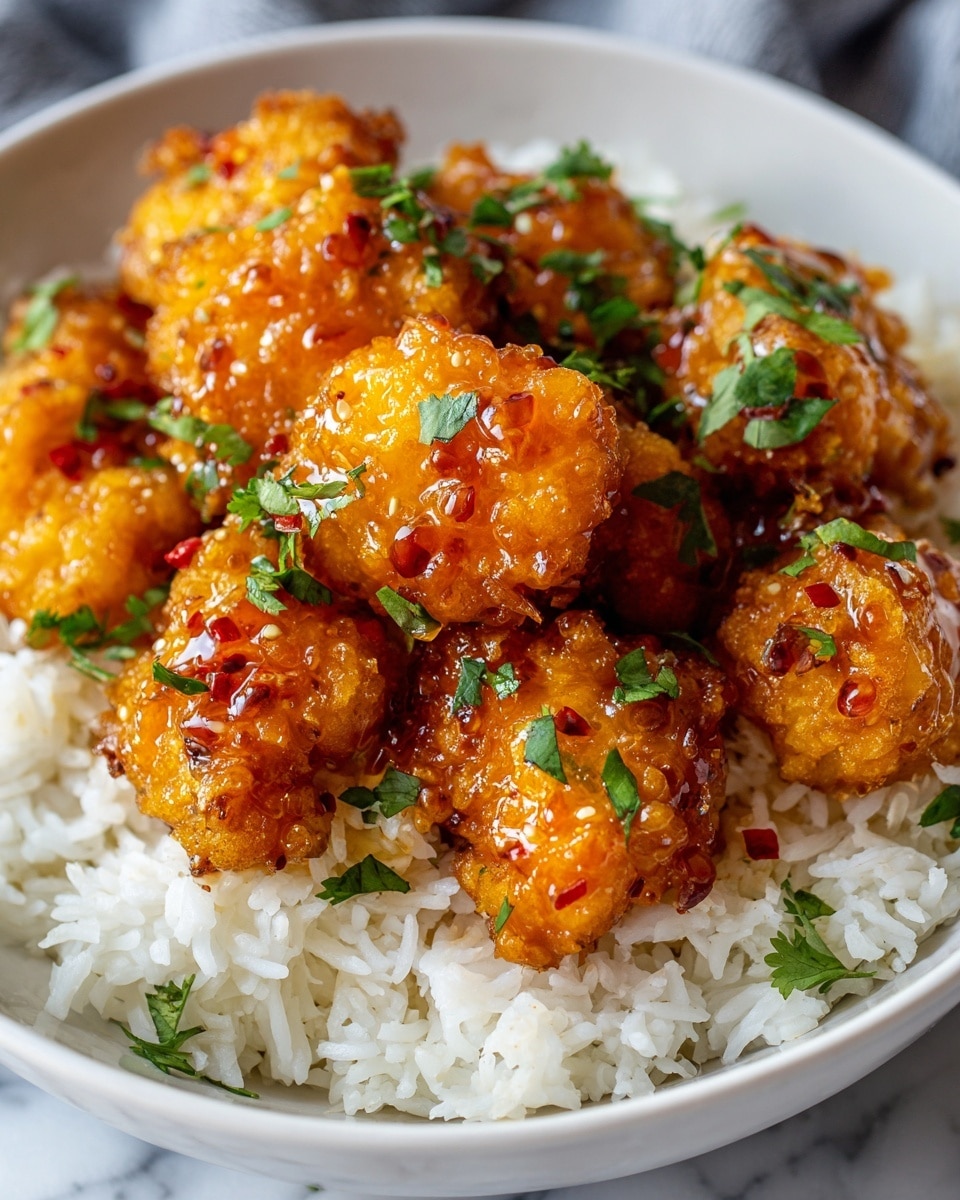
Picture this: the irresistible aroma of sizzling chicken mingling with tangy, sweet vinegar and the faint hint of garlic dancing through the air. Each golden-brown piece glistens, perfectly coated in a glossy sauce that promises a burst of flavor with every bite. This Easy Sweet and Sour Chicken Recipe is pure comfort wrapped in a 30-minute miracle, ready to brighten up your dinner table and impress anyone lucky enough to taste it.
Whether you’re craving a quick weeknight meal or want to wow your family without hours in the kitchen, this recipe ticks all the boxes. It’s simple, satisfying, and just downright delicious. Get ready to whip up a dish that’s rich in flavor, wonderfully crispy, and perfectly saucy in all the right ways.
Why You’ll Love This Easy Sweet and Sour Chicken Recipe
- Ready in 50 minutes: From start to finish, this recipe fits easily into your schedule without sacrificing flavor or fun.
- Uses simple ingredients: No need for exotic sauces or hard-to-find spices — just pantry staples that come together magically.
- Perfect for beginners: Step-by-step instructions make it easy to achieve impressive results even if you’re new to cooking.
- Impressive presentation: Your family and friends will be wowed when you serve up tender chicken coated in a vibrant, tangy sauce.
- Customizable: Adjust the sweetness or tanginess to suit your taste, or add your favorite veggies for extra color and crunch.
Why This Easy Sweet and Sour Chicken Recipe Works
This recipe shines because of its balance between crispiness and tender juiciness. Coating the chicken in cornstarch before dipping it in whisked eggs ensures a beautifully crispy crust after frying, locking in moisture and flavor. The homemade sauce blends sugar, ketchup, soy sauce, and apple cider vinegar to create that classic sweet and sour zing without overwhelming your palate. Baking the sauce-coated chicken lets every piece soak up the sauce’s layers of taste, making each bite a harmonious blend of tang, sweetness, and savor.
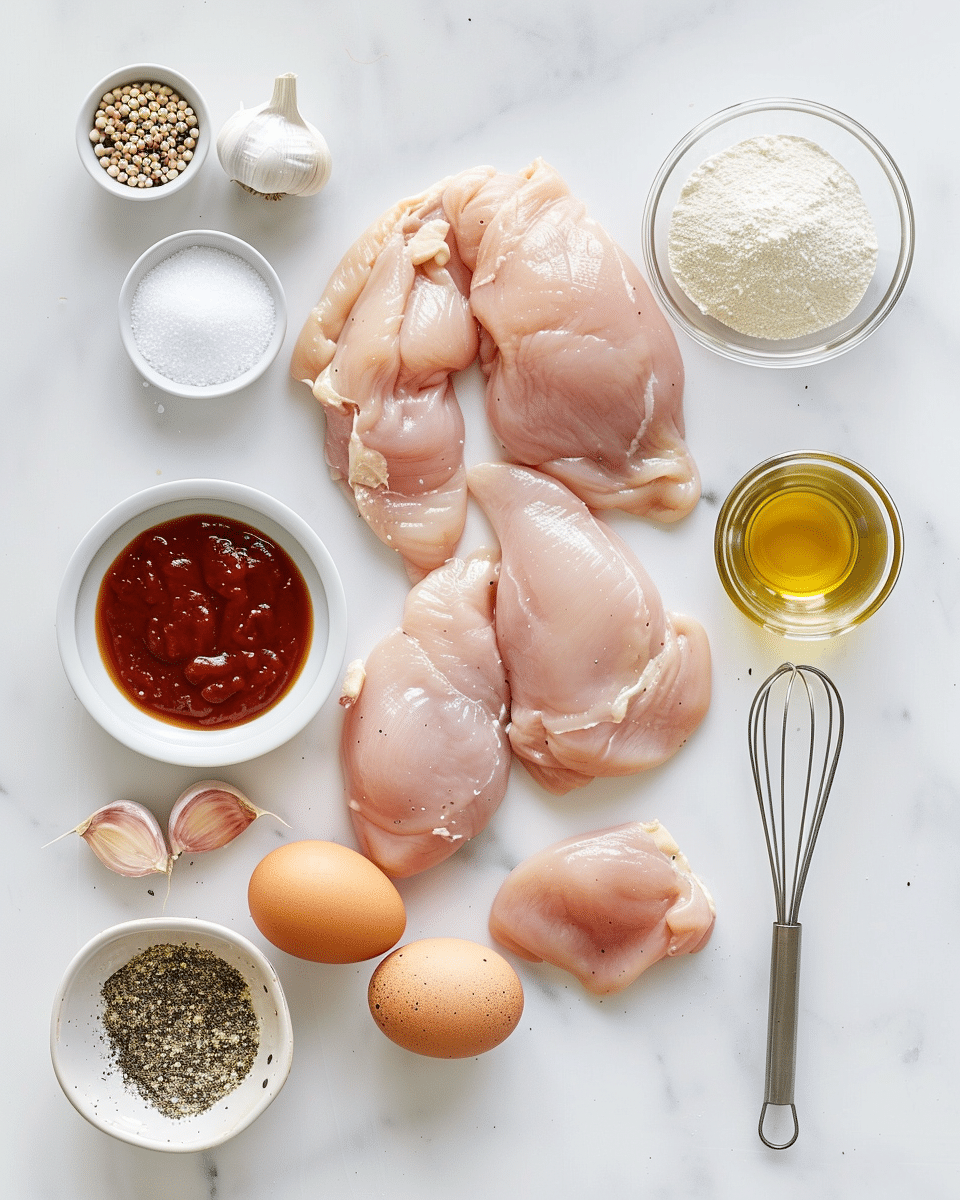
Ingredients You’ll Need
To keep things straightforward yet flavorful, this recipe leans on a handful of versatile ingredients that deliver maximum taste without fuss.
- Chicken breast (2 lbs): Cut into bite-sized pieces for quick cooking and easy eating.
- Corn starch (1 cup): Helps create a crispy outer layer that holds the sauce beautifully.
- Black pepper (1/2 tsp): Adds a gentle heat to balance the sweetness.
- Salt (1/2 tbsp): Enhances all the flavors perfectly.
- Garlic cloves (3, pressed): Gives a fragrant depth that wakes up the sauce and chicken.
- Oil (1/2 cup): For frying, ensuring the chicken crisps up nicely.
- Eggs (2): Bind the coating to the chicken, helping the crust form.
- Sugar (1/2 cup): Sweetens the sauce for that iconic sweet and sour vibrancy.
- Soy sauce (1 tbsp): Brings umami depth and saltiness to the sauce.
- Ketchup (1/3 cup): Adds tang, color, and subtle tomato sweetness.
- Apple cider vinegar (1/2 cup): Gives a bright, zesty punch to the sauce.
- Garlic parsley salt (1 tsp): A flavorful twist that lifts the sauce and chicken.
Ingredient Substitutions & Tips
- Chicken breast: Use chicken thighs for juicier, richer results.
- Corn starch: Substitute with potato starch or all-purpose flour in a pinch.
- Apple cider vinegar: White vinegar or rice vinegar work well too, just adjust quantity to taste for acidity.
- Ketchup: Substitute with tomato paste mixed with a bit of sugar to keep that balanced sweetness.
👨🍳 Pro Tips for Perfect Results
- Tip 1: Use fresh, room-temperature chicken for even cooking and better coating adherence.
- Tip 2: Don’t overcrowd the pan while frying; fry chicken in batches to keep the crust crisp.
- Tip 3: Flip the chicken every 10 minutes in the oven to evenly distribute the sauce.
- Tip 4: Taste your sauce before pouring it over the chicken — feel free to tweak the vinegar or sugar to your liking.
- Tip 5: Let the sauce rest a few minutes after baking for even better flavor absorption.
How to Make Easy Sweet and Sour Chicken Recipe
Step 1: Coat the Chicken
Begin by placing your bite-sized chicken pieces in a large bowl. Sprinkle in the cornstarch, black pepper, salt, and pressed garlic cloves. Gently stir the mixture until every piece is well coated in the fragrant, powdery coating that promises crispiness after frying.
💡 Pro Tip: Make sure each piece is evenly coated for a crunchy crust that doesn’t fall apart in the pan.
Step 2: Prepare for Frying
Preheat half a cup of oil in a large skillet over medium heat, getting it nice and hot but not smoky. Meanwhile, whisk your two eggs in a separate small bowl, getting ready to create a sticky surface on the chicken pieces.
💡 Pro Tip: Use a deep skillet to avoid splatters and to ensure even frying on all sides.
Step 3: Dredge in Egg
Dip each coated chicken piece into the whisked eggs, allowing the egg to cling to the surface before carefully placing it into the hot oil. This egg wash is what makes the crispy crunch really come alive.
💡 Pro Tip: Work quickly to dip and fry each piece to avoid the coating becoming soggy.
Step 4: Fry Until Golden
Fry the chicken pieces on each side until they turn a gorgeous golden brown, usually about 3-4 minutes per side. Remove the cooked chicken and layer it in a baking dish in a single layer, ready for the sauce to work its magic.
💡 Pro Tip: Drain the fried chicken on paper towels before placing it in the dish to keep it crisp.
Step 5: Whisk the Sauce
In a small bowl, combine the sugar, soy sauce, ketchup, apple cider vinegar, and garlic parsley salt. Whisk these ingredients vigorously until they come together into a luscious, syrupy sauce bursting with sweet and tangy goodness.
💡 Pro Tip: Taste your sauce now to adjust sweetness or acidity before pouring it over the chicken.
Step 6: Pour Sauce and Bake
Pour the sauce evenly over the fried chicken in your baking dish, making sure every piece is generously coated. Pop it into a preheated oven at 350°F and let it bake for 30 minutes, flipping the chicken every 10 minutes to ensure a sticky, shiny coating envelopes each piece.
💡 Pro Tip: Flipping is key to prevent the chicken from sticking and to build a thick glaze.
Step 7: Serve and Enjoy
Once the baking is done and you’ve admired the glistening, caramelized chicken, serve it piping hot over steamed white rice or alongside your favorite noodles. Get ready for a mouthwatering balance of crispy chicken, tangy sauce, and irresistible sweetness.
💡 Pro Tip: Garnish with chopped green onions or sesame seeds for that extra wow factor.
Common Mistakes to Avoid
Learn from these common pitfalls:
- Overcrowding the pan: Causes the chicken to steam instead of fry, resulting in soggy coating.
- Skipping the egg dip: Without it, the cornstarch won’t stick properly, and the crust won’t be crispy.
- Using cold chicken: Makes the coating slide off and leads to uneven cooking.
- Not flipping during baking: Causes uneven sauce distribution and soggy bottoms.
- Adding too much sauce at once: Can drown the chicken, making it mushy instead of glossy and sticky.
- Ignoring seasoning adjustments: Not tasting the sauce can lead to it being too sour or too sweet for your palate.
Delicious Variations to Try
Once you’ve mastered this classic, why not add your own twist?
Pineapple Sweet and Sour
Add chunks of fresh or canned pineapple to the sauce or toss them in during the last 10 minutes of baking for bursts of juicy sweetness.
Spicy Kick
Mix in red pepper flakes or a dash of sriracha to the sauce for a fiery twist that balances the sweetness beautifully.
Veggie Boost
Add thin slices of bell peppers, onions, or snap peas to the baking dish, allowing them to roast alongside the chicken for crunch and color.
Gluten-Free Version
Use gluten-free soy sauce and cornstarch to make this recipe friendly for gluten-sensitive eaters without sacrificing taste.
Honey Variation
Swap sugar with honey in the sauce for a richer, floral sweetness that caramelizes beautifully during baking.
How to Serve Easy Sweet and Sour Chicken Recipe
Garnishes
Fresh chopped green onions, toasted sesame seeds, or a sprinkle of fresh parsley add vibrant color and a burst of freshness.
Side Dishes
Steamed white rice is a classic pairing, but jasmine rice, fried rice, or even stir-fried noodles work perfectly. For a veggie side, try sautéed bok choy or steamed broccoli.
Creative Ways to Present
Serve your sweet and sour chicken in a colorful ceramic dish or individual bowls for a personal touch. Add edible flowers or thinly sliced chilies on top to create an eye-catching presentation that will make your guests’ mouths water.
Make Ahead and Storage
Storing Leftovers
Place any leftover chicken and sauce in an airtight container and refrigerate for up to 3 days. The flavors will intensify overnight, making for a delicious next-day meal.
Freezing
This dish freezes well. Store cooled chicken and sauce separately in freezer-friendly containers or bags for up to 2 months. Thaw overnight in the fridge before reheating.
Reheating
Warm leftovers in the oven at 350°F for 10-15 minutes to revive the crispy texture. Alternatively, microwave on medium power in short bursts, stirring gently to heat evenly.
FAQs
Can I use chicken thighs instead of breast?
Absolutely! Chicken thighs add extra juiciness and flavor, making the dish even more succulent.
Is cornstarch necessary?
Cornstarch is key for achieving that crispy crust, but potato starch or all-purpose flour can work as substitutes.
Can I make this recipe gluten-free?
Yes, simply use gluten-free soy sauce and ensure your cornstarch or flour are gluten-free.
How can I make the sauce less tangy?
Reduce the apple cider vinegar slightly or add more sugar to balance the acidity to your liking.
Is it better to bake or only fry the chicken?
Baking the chicken with the sauce lets the flavors meld and creates a glossy coating that frying alone can’t achieve.
Can I add vegetables to this dish?
Definitely! Bell peppers, onions, and pineapple are classic additions that complement the flavors beautifully.
How do I store leftover sauce?
Keep the sauce in an airtight container in the fridge for up to one week. Stir well before using again.
Can this recipe be doubled?
Yes! Just be sure to fry the chicken in batches to maintain that perfect crispiness.
Final Thoughts
This Easy Sweet and Sour Chicken Recipe is one of those magical dishes that feels like a warm hug on a plate. It’s the perfect harmony of crispy, tender chicken with a vibrant, tangy sauce that’s equally comforting and exciting. I hope this recipe becomes as beloved in your kitchen as it is in mine—quick enough for busy nights but special enough to share with loved ones.
Have you tried this Easy Sweet and Sour Chicken Recipe? I’d love to hear how it turned out! Leave a comment below. If you loved this recipe, please share it with friends and family. Happy cooking! 🍽️
PrintEasy Sweet and Sour Chicken Recipe

This Easy Sweet and Sour Chicken recipe features tender chicken breast pieces coated in a crispy cornstarch and egg batter, fried to golden perfection, then baked in a tangy and flavorful sweet and sour sauce. It’s a delightful balance of sweetness, tang, and savory notes, perfect to serve over steamed white rice or noodles for a satisfying meal.
- Prep Time: 15 minutes
- Cook Time: 35 minutes
- Total Time: 50 minutes
- Yield: 6 servings 1x
- Category: Main Course
- Method: Frying and Baking
- Cuisine: Chinese-American
Ingredients
Chicken and Coating
- 2 lbs chicken breast, cut into bite-sized pieces
- 1 cup cornstarch
- 1/2 tsp black pepper
- 1/2 tbsp salt
- 3 garlic cloves, pressed
- 2 eggs
- 1/2 cup oil for frying
Sweet and Sour Sauce
- 1/2 cup sugar
- 1 tbsp soy sauce
- 1/3 cup ketchup
- 1/2 cup apple cider vinegar
- 1 tsp garlic parsley salt
Instructions
- Coat the Chicken: Place the chicken pieces in a large mixing bowl. Add the cornstarch, black pepper, salt, and pressed garlic cloves. Stir everything together until each chicken piece is evenly coated with the dry ingredients.
- Prepare to Fry: Preheat the oil in a large skillet over medium heat. In a separate bowl, whisk the eggs. Dip each coated chicken piece into the egg mixture, ensuring it’s fully covered.
- Fry the Chicken: Fry the egg-coated chicken pieces in the hot oil until each side turns golden brown and crispy. Once fried, transfer the chicken pieces to a baking dish, arranging them in a single layer.
- Make the Sweet and Sour Sauce: In a small bowl, whisk together the sugar, soy sauce, ketchup, apple cider vinegar, and garlic parsley salt until the sugar dissolves and the sauce is smooth.
- Pour Sauce and Bake: Pour the prepared sauce evenly over the fried chicken in the baking dish. Bake in a preheated oven at 350°F (175°C) for 30 minutes.
- Flip and Coat: During baking, flip the chicken pieces every 10 minutes to ensure they are fully coated with the sauce and bake evenly.
- Serve: Once done, remove from the oven and serve hot, ideally over steamed white rice or alongside your favorite noodle dish.
Notes
- For crispier chicken, avoid overcrowding the skillet while frying.
- Adjust sugar and vinegar in the sauce to customize the sweetness and tanginess to your preference.
- Use fresh garlic for the best flavor in the coating.
- This dish pairs perfectly with steamed jasmine rice or fried rice.
- Leftovers can be stored in an airtight container in the refrigerator for up to 3 days.
Keywords: Sweet and sour chicken, crispy chicken, fried chicken, baked sweet and sour chicken, easy chicken recipe, Chinese-American cuisine