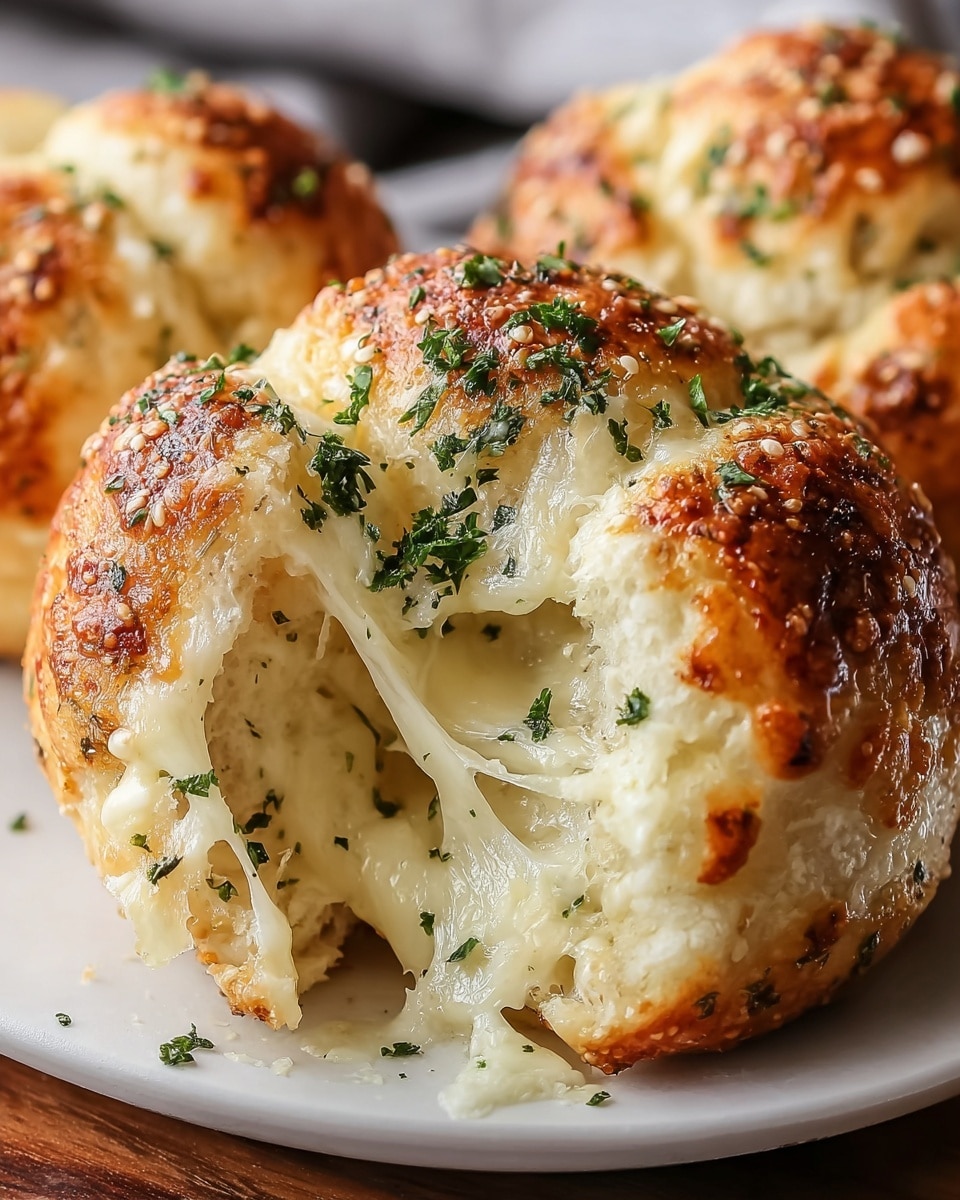
Buttery Garlic Cheese Bombs Recipe
Picture this: the warm, irresistible aroma of buttery garlic mingling with melted cheese fills your kitchen, drawing everyone closer with eager anticipation. The golden, pillowy dough surrounds a molten core of cheese, bursting with flavor the moment you take a bite. These Buttery Garlic Cheese Bombs are not just a snack; they’re a magical experience — quick to whip up, effortlessly impressive, and utterly addictive.
Why You’ll Love This Buttery Garlic Cheese Bombs Recipe
- Ready in 30 minutes: Perfect for when you’re craving something delicious without spending hours in the kitchen.
- Uses simple ingredients: Pantry staples like biscuit dough, cheese, and garlic create a gourmet-tasting treat.
- Perfect for beginners: No fancy skills required – just fold, brush, and bake for guaranteed crowd-pleasers.
- Impressive presentation: Golden, glistening balls filled with gooey cheese that wow every time.
- Customizable: Easily swap cheeses or add herbs to make this recipe uniquely yours.
Why This Buttery Garlic Cheese Bombs Recipe Works
This Buttery Garlic Cheese Bombs Recipe succeeds thanks to three secrets: the use of refrigerated biscuit dough ensures soft, fluffy pockets that puff up beautifully in the oven; sealing the dough tightly around cheese cubes traps all that irresistible gooeyness where it belongs; and finishing with a garlicky butter brush adds a glossy, savory crust that seals in flavor. Together, these steps create a mouthwatering balance of texture and taste that’s simply irresistible.
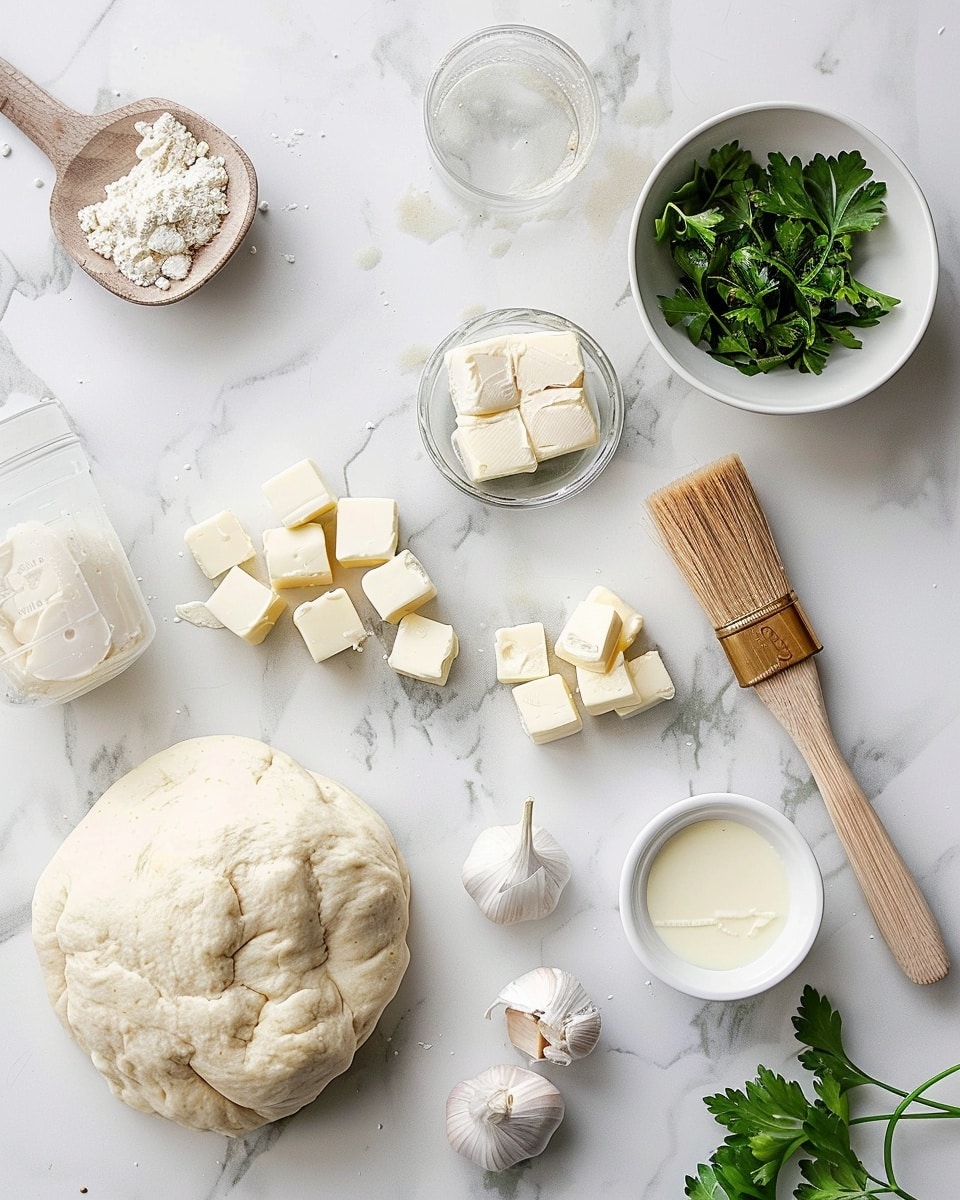
Ingredients You’ll Need
With just a handful of kitchen staples, this recipe comes alive. Each ingredient plays a vital role in delivering the perfect blend of buttery, garlicky, cheesy goodness.
- Refrigerated biscuit dough: The fluffy base that puffs up to form soft, tender shells.
- Mozzarella or cheddar cheese cubes: The molten heart of each cheese bomb, delivering rich, gooey indulgence.
- Unsalted butter: Melted and infused with garlic for that luscious, savory shine on every bite.
- Garlic cloves (minced) or garlic powder: The aromatic soul of the recipe, infusing bold flavor throughout.
- Fresh parsley (optional): Adds a fresh, herbal brightness that perfectly balances the richness.
Ingredient Substitutions & Tips
- Biscuit dough: You can use homemade biscuit dough or crescent roll dough as great alternatives.
- Cheese: Swap mozzarella or cheddar for pepper jack, gouda, or even cream cheese cubes for different flavor profiles.
- Butter: Olive oil works as a dairy-free substitute, though it will change the flavor slightly.
- Garlic: If fresh garlic isn’t available, garlic powder gives a milder, convenient alternative.
👨🍳 Pro Tips for Perfect Results
- Use cold biscuit dough: It’s easier to handle and seals better around the cheese.
- Fully seal the edges: Prevent cheese leaks by pinching dough edges tight and rolling into smooth balls.
- Brush generously: Don’t skimp on the garlic butter—it creates that crave-worthy golden crust.
- Space bombs apart: Give them room to expand so they bake evenly and don’t stick together.
- Bake until golden: Watch for a deep golden color to ensure crispiness with a gooey center.
How to Make Buttery Garlic Cheese Bombs Recipe
Step 1: Preheat the Oven
Set your oven to 375°F (190°C) and line a baking sheet with parchment paper. This prep ensures even baking and easy cleanup, making the whole process smoother and more enjoyable.
💡 Pro Tip: Preheating your oven fully before baking is key to those perfect golden bombs.
Step 2: Prepare the Biscuits
Pop open the can of biscuit dough and separate the individual biscuits. Using your fingers, gently flatten each biscuit into a small disc. This creates a perfect canvas for the cheese filling.
💡 Pro Tip: Keep the dough cold until just before shaping for easier handling.
Step 3: Add the Cheese and Seal
Place one small cube of cheese right in the center of each biscuit disc. Fold the dough around it, making sure to pinch the edges tightly so none of that heavenly melted cheese escapes. Roll each sealed piece into a smooth ball shape.
💡 Pro Tip: For maximum gooeyness, don’t skimp on the size of cheese cubes—bigger is better!
Step 4: Arrange on the Baking Sheet
Set your cheese bombs seam-side down on the baking sheet, leaving enough space between them so they puff and bake evenly without sticking together.
💡 Pro Tip: Using parchment paper will keep them from sticking and make cleanup a breeze.
Step 5: Make and Brush with Garlic Butter
Combine melted butter with minced garlic and chopped parsley in a small bowl. Brush this aromatic mixture generously over each cheese bomb, reserving a little to brush again right after baking for an extra burst of flavor.
💡 Pro Tip: Brush twice for that perfect balance of crispiness and buttery garlic flavor.
Step 6: Bake to Golden Perfection
Bake the cheese bombs in your preheated oven for 10 to 12 minutes. Keep an eye out for a golden brown, puffed-up exterior—the telltale sign of perfectly cooked cheesy goodness inside.
💡 Pro Tip: Rotate the baking sheet halfway through to ensure even coloring and crispiness.
Step 7: Finish and Serve Warm
Once out of the oven, immediately brush the remaining garlic butter on top for a shiny, flavorful finish. Serve these little delights warm to enjoy their ooey-gooey, buttery, garlicky charm at its best.
💡 Pro Tip: Don’t wait too long to serve—they’re best enjoyed right out of the oven!
Common Mistakes to Avoid
Learn from these common pitfalls:
- Not sealing edges well: Cheese will leak out and burn, making a mess.
- Overcrowding the baking sheet: Cheese bombs won’t bake evenly and might stick together.
- Skipping the garlic butter brush: You lose that rich, aromatic finish that makes these bombs unforgettable.
- Baking at too low a temperature: Results in less browning and dough that’s too soft or doughy.
- Using too little cheese: Diminishes that gooey center, which is the star of the show.
- Cooling before brushing with butter: The garlic butter won’t soak in nicely if the bombs have cooled too much.
Delicious Variations to Try
Once you’ve nailed this classic Buttery Garlic Cheese Bombs Recipe, why not experiment to keep things exciting?
Spicy Jalapeño Cheese Bombs
Add finely chopped jalapeños inside with the cheese for a fiery kick that wakes up your taste buds beautifully.
Herbed Parmesan Bombs
Mix grated Parmesan and Italian herbs into the butter for an earthy, savory twist sure to impress every guest.
Bacon and Cheddar Bombs
Stuff in crispy bacon bits with sharp cheddar for that irresistible smoky, cheesy duo.
Spinach and Feta Bombs
Fold in chopped spinach and crumbled feta cheese for a Mediterranean-inspired delight.
Sweet and Savory
Try adding a tiny dollop of fig jam with the cheese for a surprising but delicious sweet contrast.
How to Serve Buttery Garlic Cheese Bombs Recipe
Garnishes
Sprinkle freshly chopped parsley, chives, or a pinch of red pepper flakes for color and a fresh pop of flavor.
Side Dishes
These cheese bombs pair beautifully with a fresh garden salad, creamy tomato soup, or even a zesty marinara dipping sauce.
Creative Ways to Present
Serve them in a rustic basket lined with a colorful cloth napkin or arrange on a wooden board accompanied by small ramekins of dipping sauces for an eye-catching appetizer spread.
Make Ahead and Storage
Storing Leftovers
Keep any leftover Buttery Garlic Cheese Bombs in an airtight container in the refrigerator for up to 3 days.
Freezing
To freeze, arrange uncooked cheese bombs on a baking sheet and freeze until solid. Then transfer to a freezer bag for up to 2 months. Bake straight from frozen, adding a few extra minutes to the bake time.
Reheating
Reheat leftover cheese bombs in a preheated 350°F oven for 8-10 minutes to revive that freshly baked crispiness and gooey cheese.
FAQs
Can I use homemade dough instead of biscuit dough?
Absolutely! Homemade biscuit or pizza dough works wonderfully—just make sure it’s pliable enough to seal around the cheese.
What cheese melts best for this recipe?
Mozzarella and cheddar are classic favorites, but gouda, pepper jack, or fontina also melt beautifully with great flavor.
Can I make these dairy-free?
Yes! Use vegan biscuit dough and dairy-free cheese alternatives, plus olive oil instead of butter to keep them dairy-free.
How do I prevent the cheese from leaking out?
Fully pinch and seal the dough edges carefully, and roll into smooth balls to keep the cheese perfectly enclosed.
Can I add other flavors to the garlic butter?
Definitely! Experiment with herbs like rosemary, thyme, or even a touch of smoked paprika for extra depth.
Are these suitable for freezing after baking?
You can freeze baked cheese bombs, but texture is best preserved when freezing before baking and then cooking fresh.
What if I don’t have fresh parsley?
Dried parsley works in a pinch, or simply omit it if you prefer—the garlic butter alone is sensational.
How many servings does this recipe make?
This recipe yields 8 cheese bombs, perfect as an appetizer for 4-6 people, or a snack for a smaller group.
Final Thoughts
These Buttery Garlic Cheese Bombs Recipe are an absolute delight that will soon become your go-to when you want something comforting, quick, and full of flavor. The combination of soft, pillowy dough with rich, melted cheese and the irresistible garlic butter glaze makes every bite a celebration of indulgence and warmth. Whether you’re hosting a party or craving a cozy snack, these cheese bombs deliver the kind of satisfaction that stays with you long after the last bite.
Have you tried this Buttery Garlic Cheese Bombs Recipe? I’d love to hear how it turned out! Leave a comment below. If you loved this recipe, please share it with friends and family. Happy cooking! 🧄🧀🎉
PrintButtery Garlic Cheese Bombs Recipe

Buttery Garlic Cheese Bombs are a delicious baked treat featuring fluffy biscuit dough filled with melted mozzarella or cheddar cheese, then brushed with a savory garlic butter for a crispy, golden exterior and gooey cheesy center.
- Prep Time: 10 minutes
- Cook Time: 12 minutes
- Total Time: 22 minutes
- Yield: 8 cheese bombs 1x
- Category: Appetizer
- Method: Baking
- Cuisine: American
Ingredients
Biscuit Bombs
- 1 can (8-count) refrigerated biscuit dough
- 8 small cubes mozzarella or cheddar cheese
Garlic Butter
- 4 tablespoons unsalted butter, melted
- 2 cloves garlic, minced (or 1/2 teaspoon garlic powder)
- 1 tablespoon fresh parsley, finely chopped (optional)
Instructions
- Preheat the Oven: Preheat your oven to 375°F (190°C) and line a baking sheet with parchment paper to ensure easy cleanup and prevent sticking.
- Prepare the Biscuits: Open the can of biscuit dough and separate each biscuit. Slightly flatten each biscuit with your fingers into a small disc shape, preparing them to be filled.
- Add the Cheese: Place one cube of mozzarella or cheddar cheese in the center of each flattened biscuit. Fold the edges over the cheese and pinch firmly to seal the cheese inside, then roll each into a smooth ball to prevent leakage during baking.
- Arrange on the Baking Sheet: Place each sealed cheese bomb seam-side down on the parchment-lined baking sheet, spacing them evenly to allow room for expansion while baking.
- Make the Garlic Butter: In a small bowl, combine the melted butter with minced garlic and chopped parsley, mixing well to infuse the butter with garlic flavor.
- Brush with Garlic Butter: Using a pastry brush, generously coat each cheese bomb with the garlic butter mixture, reserving a small amount of butter for after baking.
- Bake: Bake in the preheated oven for 10–12 minutes, or until the cheese bombs are puffed up and golden brown on the outside, indicating a crisp crust with molten cheese inside.
- Finish and Serve: Remove the cheese bombs from the oven and immediately brush with the remaining garlic butter for an extra buttery garlic finish. Serve warm to enjoy the melty cheese and rich garlic flavor.
Notes
- Use fresh garlic instead of garlic powder for a more robust garlic flavor.
- Fresh parsley is optional but adds brightness and color.
- Ensure the biscuit edges are sealed well to prevent cheese from leaking during baking.
- Serve immediately after baking for best texture and gooey cheese.
- These cheese bombs can be customized with different types of cheese or added herbs.
Keywords: Garlic cheese bombs, cheesy biscuit balls, baked cheese bites, garlic butter cheese bombs, appetizer, snack