No-Bake Fruity Pebbles Cheesecake Recipe
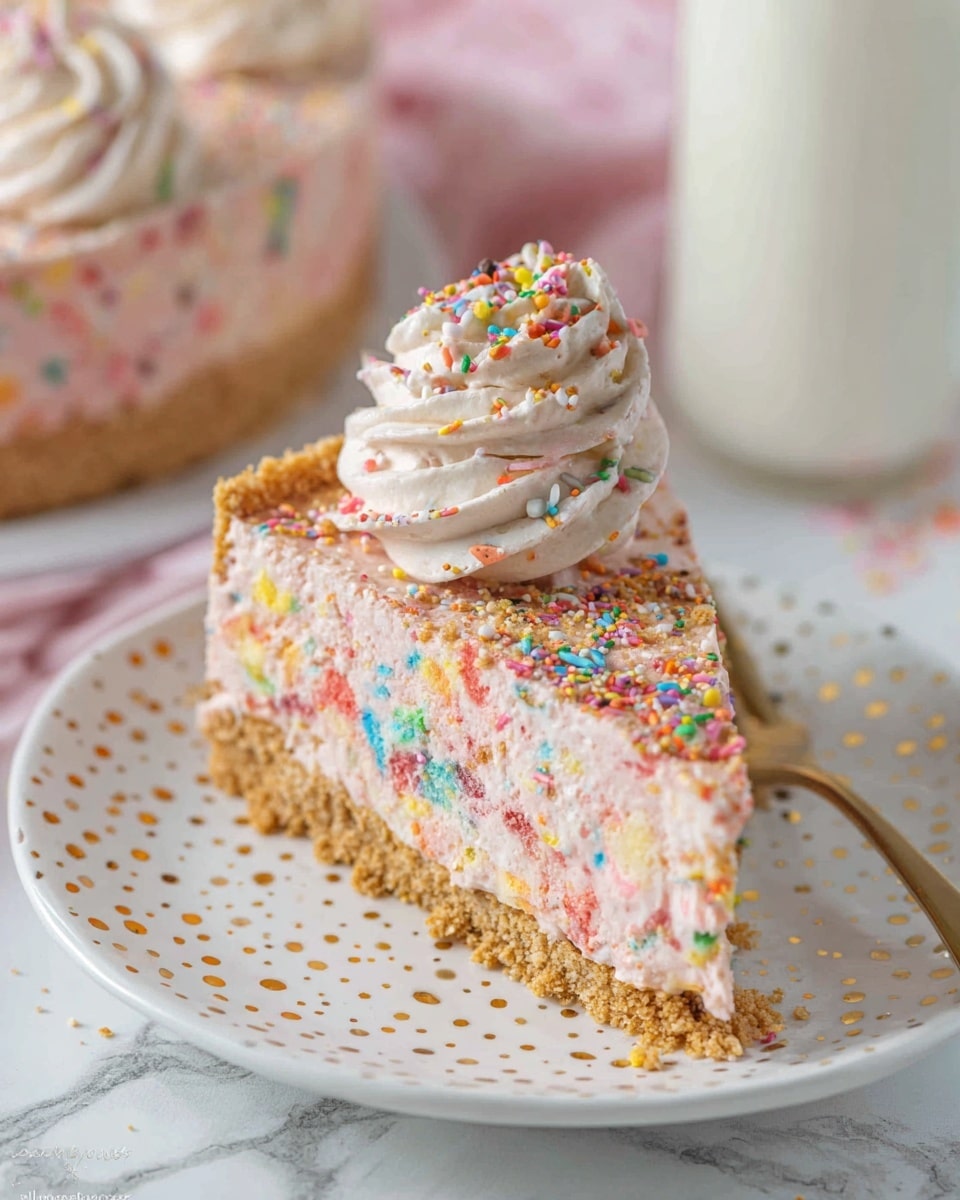
Picture this: The moment you slice into this No-Bake Fruity Pebbles Cheesecake Recipe, a burst of rainbow colors greets your eyes, followed by a wave of creamy, dreamy sweetness that dances on your tongue. The subtle crunch of Fruity Pebbles nestled lovingly within the smooth, velvety cheesecake base creates the perfect symphony of textures and flavors. It’s quick, fuss-free, and guaranteed to evoke childhood nostalgia while impressing everyone at your next gathering!
Why You’ll Love This No-Bake Fruity Pebbles Cheesecake Recipe
- Ready in just a few hours: Mostly chilling time means minimal hands-on effort, perfect for busy days.
- Simple, everyday ingredients: You probably already have most of these in your pantry or fridge!
- Perfect for beginners: No oven required, no complicated baking techniques – just pure creamy magic.
- Eye-catching and fun presentation: The vibrant Fruity Pebbles add unforgettable color and whimsy.
- Completely customizable: Swap cereals or toppings to suit your personal taste or theme.
Why This No-Bake Fruity Pebbles Cheesecake Recipe Works
This recipe is a triumph because of a few special secrets. Firstly, the crumbly crust, made from Nilla Wafers and Fruity Pebbles, creates a sturdy yet flavorful foundation that holds the cheesecake beautifully without baking. Next, whipping the heavy cream to soft then stiff peaks and folding it gently into the cream cheese mixture delivers an irresistibly light and fluffy texture. Finally, the small bursts of Fruity Pebbles inside the filling add delightful crunch and vibrant color, making every bite a playful experience. Combining chilling time with no baking means a creamy, smooth cheesecake without fuss or stress, perfect for any occasion.
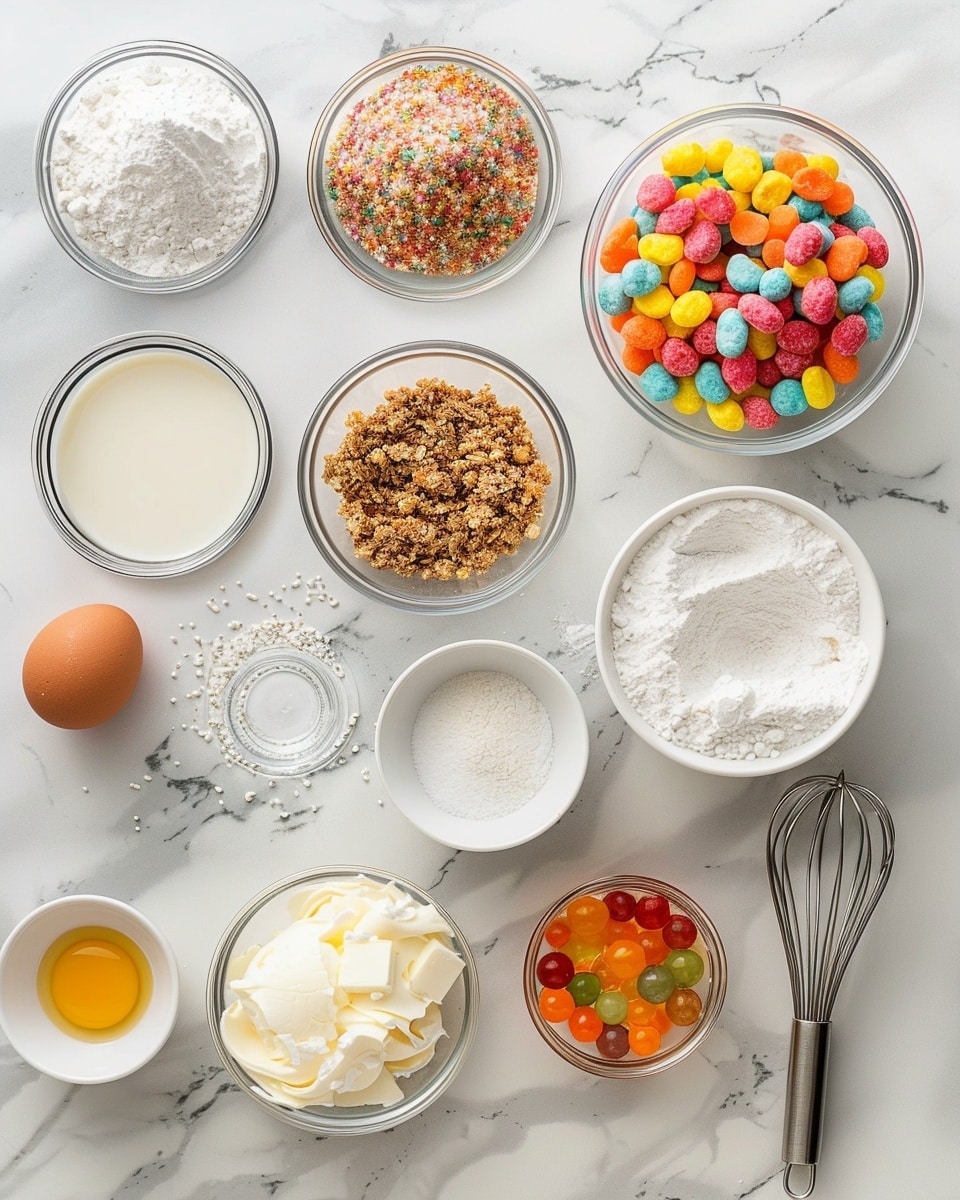
Ingredients You’ll Need
This No-Bake Fruity Pebbles Cheesecake Recipe calls for simple but essential ingredients, each playing a key role in crafting this colorful, creamy delight.
- Nilla Wafer crumbs: Provides a sweet, buttery base for the crust that complements the Fruity Pebbles.
- Fruity Pebble cereal: Adds iconic bright pops of color and crispy texture both in crust and filling.
- Unsalted butter: Binds the crust ingredients together, giving it richness and firmness.
- Heavy whipping cream: Whipped to fluffy perfection for that light, creamy cheesecake body.
- Powdered sugar: Sweetens the whipped cream gently without grittiness.
- Full-fat cream cheese: The star of the show, delivering that classic cheesecake tang and creaminess.
- Granulated sugar: Balances the tartness of the cream cheese with a clean sweetness.
Ingredient Substitutions & Tips
- Nilla Wafer crumbs: Graham cracker crumbs or digestive biscuits can be swapped in for a slightly different but tasty crust.
- Fruity Pebbles cereal: Try other colorful cereals like Trix or even a fruity granola for a twist.
- Unsalted butter: Salted butter works too; just omit any added salt elsewhere.
- Heavy whipping cream: Coconut cream is a great dairy-free alternative, though texture and flavor will vary.
👨🍳 Pro Tips for Perfect Results
- Chill your mixing bowl and whisk: This helps the heavy cream whip faster and hold its peaks better.
- Room temperature cream cheese: Ensures a smooth, lump-free filling when beating.
- Fold, don’t stir: Gently folding the whipped cream into the cream cheese preserves that fluffy, airy texture.
- Press crust firmly: Use the bottom of a glass to compact crust crumbs evenly for that perfect sturdy base.
- Patience with chilling: The longer you chill, the more firm and sliceable your cheesecake will be.
How to Make No-Bake Fruity Pebbles Cheesecake Recipe
Step 1: Prepare the Crust
Start by grinding the Nilla Wafers and Fruity Pebbles separately in a food processor until they’re fine crumbs. Mix these together in a large bowl, then pour in the melted unsalted butter. Stir until every crumb is coated in buttery goodness. Line a 9-inch springform pan with parchment paper, lightly grease the sides, then press the crumb mixture firmly into the bottom and slightly up the sides of the pan. Pop it into the fridge to chill while you prepare the filling.
💡 Pro Tip: Use the flat bottom of a glass or measuring cup to evenly press the crust into place without leaving gaps.
Step 2: Grind the Filling Cereal
Next, grind the Fruity Pebble cereal finely in the food processor. This will be the sneaky little crunch inside your creamy filling that makes every bite a delightful surprise.
💡 Pro Tip: Grinding the cereal finely prevents big crunchy chunks and integrates the color beautifully into the cheesecake.
Step 3: Whip the Cream
Chill your mixing bowl and whisk attachment in the freezer for 10-15 minutes before whipping 1 ½ cups of heavy cream. Beat it on medium-high speed until soft peaks form, then add powdered sugar and beat until stiff peaks stand tall. Set this cloud of sweetness aside for later folding.
💡 Pro Tip: Keep an eye on your cream—you want stiff peaks that hold shape but are still silky.
Step 4: Beat the Cream Cheese Mixture
In a fresh bowl, beat room temperature cream cheese until smooth and creamy. Add granulated sugar and continue beating until all lumps disappear and sweetness is well blended in. Slowly drizzle in 2 tablespoons of heavy cream and beat again, scraping the bowl sides to ensure even mixing.
💡 Pro Tip: Use room temperature cream cheese for a luscious texture—cold cream cheese will cause clumps.
Step 5: Fold Whipped Cream and Cereal
Gently fold the whipped cream into the sweetened cream cheese mixture, turning it over carefully to maintain fluffiness. Once combined, gently fold in the finely ground Fruity Pebbles cereal—these vibrant specks will infuse both flavor and color throughout the filling.
💡 Pro Tip: Folding, not stirring, keeps the mixture light and aerated, giving the cheesecake its heavenly texture.
Step 6: Assemble and Chill
Pour the luscious filling into your chilled crust, smoothing the top with a spatula. Cover tightly with plastic wrap and refrigerate for at least 4 hours so the flavors meld, and the cheesecake firms up to the perfect sliceable consistency.
💡 Pro Tip: Overnight chilling works beautifully if you want to prepare this recipe a day ahead.
Step 7: Whip the Topping and Decorate
Grind a final batch of Fruity Pebbles cereal. Chill your bowl again, whip ¾ cup heavy cream with powdered sugar and the ground cereal until stiff peaks form. Use a piping bag fitted with a large star tip to dollop the fruity, colorful whipped cream atop your cheesecake, creating delightful peaks packed with crunch and color.
💡 Pro Tip: Keep the topping chilled before decorating to maintain its shape longer.
Common Mistakes to Avoid
Learn from these common pitfalls:
- Using cold cream cheese: Leads to lumps instead of a smooth filling.
- Skipping bowl chilling: Makes whipping cream harder and less stable.
- Overmixing the whipped cream: Turns it grainy or causes it to collapse.
- Not pressing the crust firm enough: Causes a crumbly base that falls apart when sliced.
- Rushing the chill time: Prevents proper setting and makes slicing messy.
- Not grinding the cereal finely enough: Creates uneven textures and clumping inside the cheese layer.
Delicious Variations to Try
Once you’ve mastered this No-Bake Fruity Pebbles Cheesecake Recipe, why not shake things up with these fun twists?
Chocolate Fruity Pebbles Cheesecake
Sprinkle mini chocolate chips into the filling and use crushed chocolate wafers for the crust. Top with cocoa powder whipped cream for a choc-tastic flair.
Tropical Fruity Pebbles Delight
Add finely diced pineapple and mango to the cream cheese mixture, and use a hint of coconut extract to transport your taste buds to a sunny beach.
Berry Burst Cheesecake
Fold in fresh or frozen mixed berries with the whipped cream. Top with a berry compote swirl and crushed Fruity Pebbles for a tart and sweet contrast.
Peanut Butter Fruity Pebbles
Add a few tablespoons of creamy peanut butter to your cream cheese mixture to create a rich, nutty twist that pairs wonderfully with the bright cereal.
Mini Cheesecake Bites
Create individual servings by pressing crust and filling into mini tart pans or muffin tins for a fun finger-food version.
How to Serve No-Bake Fruity Pebbles Cheesecake Recipe
Garnishes
Brighten your cheesecake with extra Fruity Pebbles sprinkled on top, fresh fruit slices like strawberries or kiwi, or a drizzle of colorful fruit syrup to enhance the visual pop.
Side Dishes
This cheesecake pairs perfectly with a light, refreshing fruit salad, a dollop of vanilla bean ice cream, or even a simple cup of rich coffee or tea to balance sweetness with warmth.
Creative Ways to Present
Serve this vibrant dessert in a glass trifle dish layered with crushed Fruity Pebbles and extra whipped cream, or cut into fun shapes using cookie cutters to add a playful touch at kids’ parties.
Make Ahead and Storage
Storing Leftovers
Wrap any leftover cheesecake tightly in plastic wrap or store in an airtight container and refrigerate. It will stay fresh and creamy for up to 3 days.
Freezing
This cheesecake freezes very well. Wrap individual slices in plastic wrap and foil, then place in a freezer-safe bag. Freeze for up to 1 month. Thaw overnight in the fridge before serving.
Reheating
Since it’s a no-bake cheesecake, no reheating is needed. Serve chilled for best texture and flavor.
FAQs
Can I use low-fat cream cheese or whipped cream?
It’s best to use full-fat versions to achieve that rich, creamy texture classic to cheesecakes. Lower fat options may result in a runnier or less stable filling.
Can I use a different cereal instead of Fruity Pebbles?
Absolutely! Any colorful, crunchy cereal will work. Just choose ones without strong flavors that might overpower the cheesecake.
Do I have to use a springform pan?
A springform pan is recommended for easy removal, but you can also use a regular cake pan lined with parchment paper for lift-out.
How long should I chill the cheesecake?
At least 4 hours is needed for the filling to set well, but overnight chilling yields the best slices.
Can I make this cheesecake gluten-free?
Yes! Use gluten-free wafers and check your cereal to ensure it’s gluten-free as well for a safe swap.
What’s the best way to crush the cereal?
A food processor works best for consistent fine crumbs, but you can also place cereal in a plastic bag and crush with a rolling pin.
Is this recipe suitable for kids to help with?
Definitely! It’s fun and safe, with no baking involved. Kids will love adding the Fruity Pebbles and decorating the top.
Can I prepare this cheesecake ahead for a party?
Yes, preparing it a day in advance is ideal and will save you time on the event day.
Final Thoughts
This No-Bake Fruity Pebbles Cheesecake Recipe is a joyful celebration of color, texture, and flavor all rolled into one easy-to-make dessert. It takes the stress out of baking while elevating your dessert game with its playful charm and creamy richness. Whether you’re new to cheesecakes or a seasoned pro looking for a quick crowd-pleaser, this recipe delivers on every level.
Have you tried this No-Bake Fruity Pebbles Cheesecake Recipe? I’d love to hear how it turned out! Leave a comment below. If you loved this recipe, please share it with friends and family. Happy cooking! 🍰
PrintNo-Bake Fruity Pebbles Cheesecake Recipe
This no-bake Fruity Pebbles cheesecake combines a crunchy, colorful cereal crust with a smooth, creamy filling made from cream cheese and whipped cream, topped with vibrant Fruity Pebbles whipped cream swirls. Perfect for a fun and easy dessert that requires no baking and only refrigeration, this cheesecake offers both visual appeal and delicious fruity flavors.
- Prep Time: 30 minutes
- Total Time: 4 hours 30 minutes
- Yield: 8 servings 1x
- Category: Dessert
- Method: No-Cook
- Cuisine: American
Ingredients
Crust
- 1 cup (104g) Nilla Wafer crumbs
- 2 cups (72g) Fruity Pebble Cereal
- ½ cup (113g) unsalted butter, melted
Filling
- 1 ½ cups (360ml) heavy whipping cream
- ¾ cup (98g) powdered sugar
- 2 cups (72g) Fruity Pebbles cereal, ground
- 16 ounces (452g) full-fat cream cheese, at room temperature
- ½ cup (95g) granulated sugar
- 2 tablespoons (30ml) heavy whipping cream
Topping
- ¾ cup (117ml) heavy whipping cream
- 2 tablespoons (16g) powdered sugar
- ½ cup (18g) Fruity Pebbles cereal, ground
Instructions
- Prepare the Crust: Using a food processor or blender, grind the Nilla Wafer crumbs and 2 cups of Fruity Pebble cereal into fine crumbs. Combine both crumbs in a large bowl and pour melted butter over them, stirring to coat thoroughly. Line the bottom of a 9-inch springform pan with parchment paper and lightly grease the sides. Press the crumb mixture firmly into the bottom and up the sides of the pan. Refrigerate while preparing the filling.
- Prepare the Filling: Grind 2 cups of Fruity Pebbles cereal into fine crumbs using a food processor or blender and set aside. Chill your mixing bowl and whisk in the freezer for 10 to 15 minutes. Beat 1½ cups of heavy cream on medium-high speed until soft peaks form, then add powdered sugar and continue to beat until stiff peaks form. Set aside this whipped cream.
- Beat the Cream Cheese Base: In a separate mixing bowl, beat the room temperature cream cheese on medium-high speed until smooth and free of lumps, scraping the bowl as needed. Gradually add granulated sugar and continue beating until fully incorporated. Add 2 tablespoons of heavy cream and beat again until well combined.
- Combine Whipped Cream and Cream Cheese: Gently fold the prepared whipped cream into the cream cheese mixture by turning it over from bottom to top to maintain the airy texture. Then fold in the ground Fruity Pebbles cereal crumbs evenly. Pour this cheesecake filling into the prepared crust. Cover and refrigerate for at least 4 hours to set.
- Prepare the Topping: Grind ½ cup Fruity Pebbles cereal into fine crumbs. Chill your mixing bowl and whisk again. Beat ¾ cup heavy cream on medium-high speed until soft peaks form. Add powdered sugar and the ground Fruity Pebbles crumbs and beat until stiff peaks form. Transfer the whipped topping to a piping bag fitted with a large open star tip.
- Decorate the Cheesecake: Once the cheesecake has set, pipe the Fruity Pebbles whipped cream topping decoratively over the surface of the cheesecake. Serve chilled and enjoy the colorful, fruity, and creamy dessert.
Notes
- Ensure the cream cheese is at room temperature for a smooth filling.
- Chilling the mixing bowls and whisk before whipping cream helps achieve better volume and texture.
- Use a springform pan lined with parchment paper for easier removal of the cheesecake.
- Allow the cheesecake to chill for at least 4 hours, preferably overnight, for best results.
- You can customize the topping decorative style with your preferred piping tip.
Keywords: No-Bake Cheesecake, Fruity Pebbles, Easy Dessert, Summer Dessert, Cream Cheese Dessert, Kid-Friendly Dessert