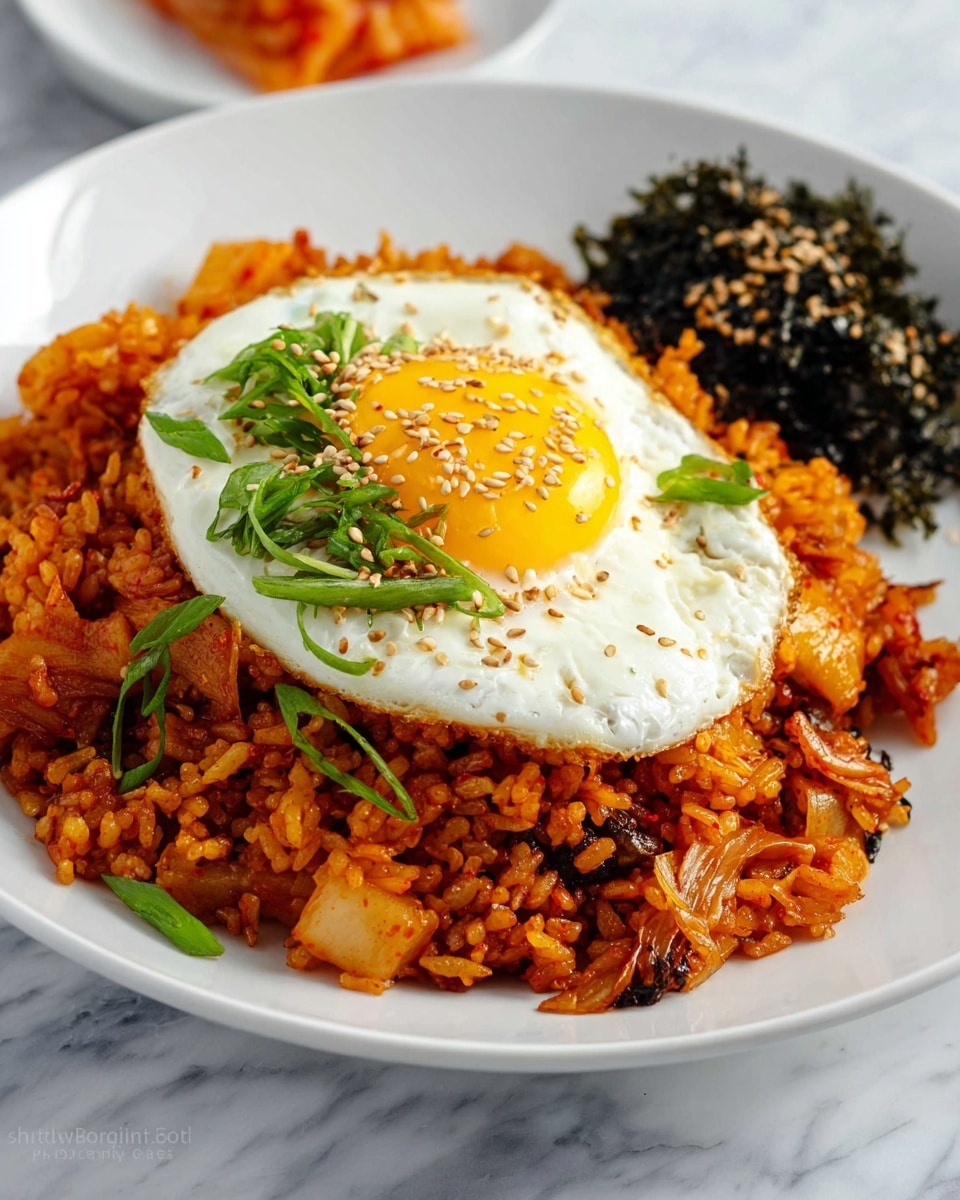
Kimchi Bokkeumbap (Kimchi Fried Rice) with Fried Egg and Nori Garnish Recipe
Picture this: the sizzling sound of a hot wok, the intoxicating aroma of spicy kimchi mingling with savory chicken, and the vibrant colors of fiery red gochujang glistening on fluffy grains of rice. You take your first bite, and the delightful blend of tangy, smoky, and umami flavors dances on your tongue, perfectly balanced by a rich, velvety fried egg and crispy nori strips on top. This Kimchi Bokkeumbap (Kimchi Fried Rice) with Fried Egg and Nori Garnish Recipe isn’t just a meal; it’s an experience that transports you straight to the heart of Korean comfort food. Quick, easy, and wildly impressive, it’s the ultimate one-pan wonder that feels like a warm hug on a plate.
Why You’ll Love This Kimchi Bokkeumbap (Kimchi Fried Rice) with Fried Egg and Nori Garnish Recipe
- Ready in 15 minutes: This recipe delivers a satisfying, mouthwatering meal faster than you’d expect, perfect for busy weeknights or last-minute cravings.
- Uses simple ingredients: With easily accessible pantry staples like kimchi, rice, and gochujang, it’s an accessible recipe that’s bold in flavor without fuss.
- Perfect for beginners: Minimal prep and straightforward steps make this kimchi bokkeumbap foolproof, even if you’re new to Korean cooking.
- Impressive presentation: The fried egg’s golden yolk and crispy nori garnish add an elegant, restaurant-worthy finish guaranteed to wow your dinner guests.
- Customizable: Swap chicken for tofu, adjust spice levels, or add your favorite veggies to tailor this dish exactly to your taste.
Why This Kimchi Bokkeumbap (Kimchi Fried Rice) with Fried Egg and Nori Garnish Recipe Works
This recipe comes together thanks to a few key secrets that ensure every bite bursts with flavor. First, squeezing out the kimchi juice and saving it for cooking infuses the rice with a subtle tang and depth. Then, stir-frying the chicken and kimchi together on high heat caramelizes their edges, creating a mouthwatering smoky essence. Finally, adding the gochujang and Korean chili powder layers in a lovely balance of spicy, sweet, and savory notes that truly define authentic kimchi bokkeumbap. The crispy nori strips and silky fried egg on top seal the deal with texture and richness.
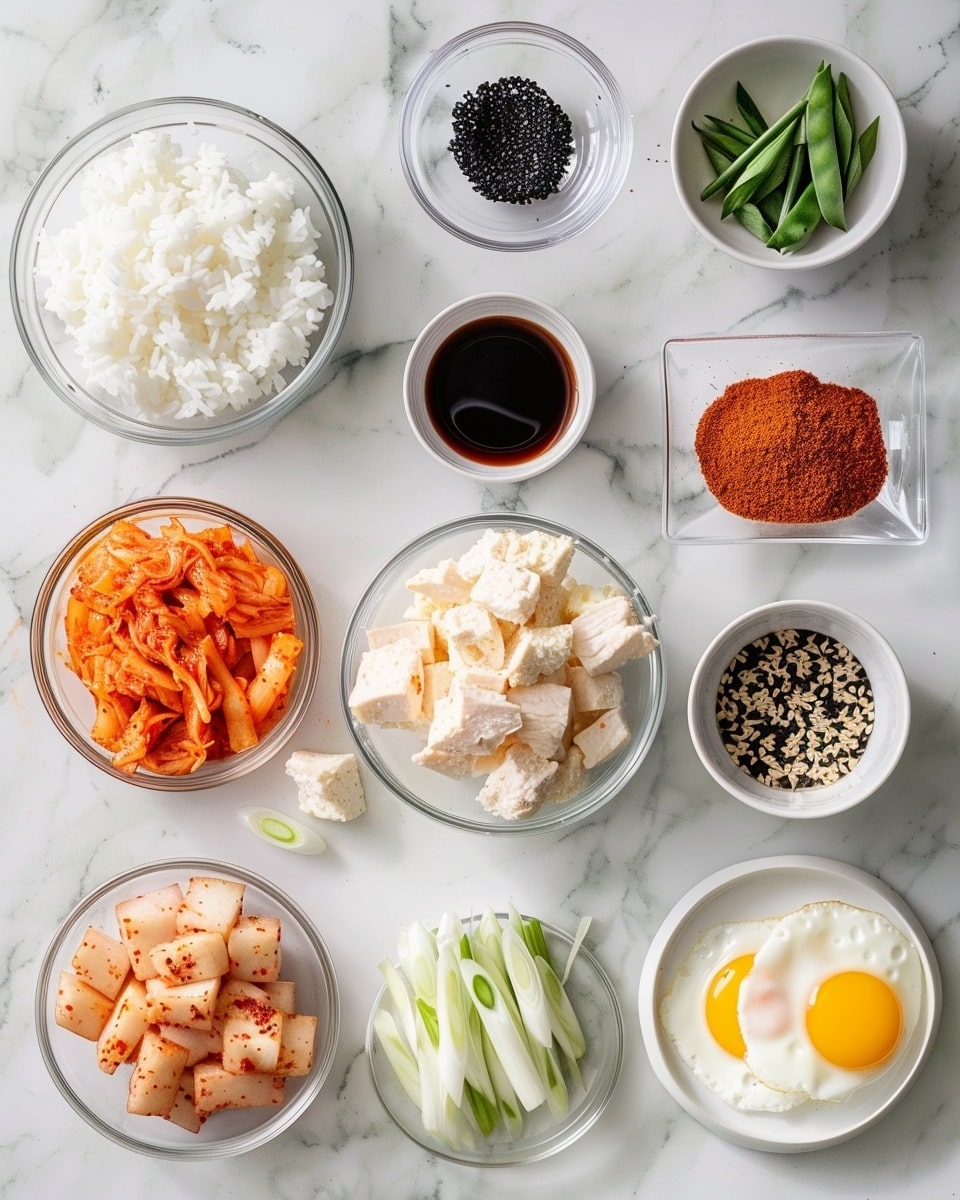
Ingredients You’ll Need
This vibrant recipe calls for simple, essential ingredients that come together beautifully to create layers of flavor and texture.
- Cooked rice: Use cold, day-old rice for the best results—it stays fluffy and fries up perfectly.
- Kimchi: Fermented cabbage brings tang, spice, and crunch to the dish.
- Chicken breast: Tender, diced chicken adds protein and absorbs all those delicious kimchi flavors.
- Onion: Adds sweetness and a mild crunch.
- Gochujang: Korean chili paste provides bold heat and subtle sweetness.
- Korean chili powder (Gochugaru): Brightens the dish with smoky, vibrant spice.
- Spring onion: Freshness and a pop of color.
- Sugar: Balances acidity and spice with a touch of sweetness.
- Salt: Essential seasoning to enhance flavors.
- Sesame oil: Adds a toasty, aromatic finish.
- Kimchi juice: The secret umami boost from pressed kimchi.
- Vegetable oil: Neutral cooking oil for stir-frying.
- Fried eggs: Sunny-side up eggs with runny yolks create luscious creaminess.
- Toasted sesame seeds: Nutty crunch topping.
- Nori strips: Crispy seaweed adds an irresistibly savory crunch.
Ingredient Substitutions & Tips
- Chicken breast: Substitute with thigh meat for juicier bites or use tofu for a vegetarian option.
- Gochujang: If unavailable, mix a spoonful of chili paste with a dash of miso and a bit of honey.
- Kimchi: Feel free to adjust the amount based on your spice tolerance or use vegan kimchi if preferred.
- Sesame oil: Toasted walnut oil or a mild olive oil can be alternatives if sesame oil isn’t on hand.
👨🍳 Pro Tips for Perfect Results
- Use day-old rice: Fresh rice is too soft and moist; slightly dried rice fries up beautifully without clumping.
- Squeeze the kimchi: Extracting kimchi juice intensifies the flavor without adding sogginess.
- High heat stir-fry: Quick, hot cooking caramelizes the ingredients for maximum taste.
- Don’t overcrowd the pan: Give your ingredients room to fry rather than steam for that perfect texture.
- Keep yolks runny: The rich egg yolk blends into the rice, making every bite dreamy and silky.
How to Make Kimchi Bokkeumbap (Kimchi Fried Rice) with Fried Egg and Nori Garnish Recipe
Step 1: Prepare Kimchi and Gather Ingredients
Start by squeezing out excess water from about 160g of kimchi. Set aside 1-2 tablespoons of that flavorful juice—it’s pure magic for stir-frying. Chop the kimchi into medium-sized pieces, dice half an onion, and cut 150g chicken breast into small cubes. Slice your spring onions thinly and have all your seasonings at the ready to keep the cooking smooth and swift.
💡 Pro Tip: Reserving the kimchi juice enhances every grain of rice with tangy, umami-rich flavor without making the rice soggy.
Step 2: Stir-Fry Onion and Chicken
Heat 2 tablespoons of vegetable oil in a large wok or skillet over medium-high heat. Toss in the diced onion and stir-fry just until it starts to soften and turn translucent—just a few seconds. Add the chicken pieces and stir constantly for 1 to 2 minutes until the meat turns opaque and starts to brown.
💡 Pro Tip: Use high heat and keep everything moving to get a nice sear on the chicken without drying it out.
Step 3: Add Kimchi and Spices
Into the pan goes the chopped kimchi, quickly stir-fried for a few seconds before adding 1 tablespoon gochujang and 1 tablespoon Korean chili powder (gochugaru). Stir well, coat everything in the vibrant chili paste, and cook briefly until the mixture smells fragrant and enticing.
💡 Pro Tip: Don’t be shy with the chili paste—this is where the bold, punchy flavor builds.
Step 4: Stir in Rice and Seasonings
Turn the heat to high and add 3 cups of cold cooked rice. Pour in the reserved kimchi juice, a teaspoon of sesame oil, 1 tablespoon sugar, and a teaspoon of salt. Mix vigorously so every grain is evenly coated and heated through, perfectly marrying spicy, sweet, and smoky flavors.
💡 Pro Tip: Breaking up the rice with the back of your spatula prevents clumps and ensures an even fry.
Step 5: Finish with Fresh Toppings and Fried Eggs
Turn off the heat and sprinkle the dish with sliced spring onions and toasted sesame seeds for crunch and color. Transfer to plates and garnish with crispy nori strips. Top each serving with a beautiful sunny-side up fried egg with a runny yolk to drizzle luxuriously over the rice.
💡 Pro Tip: The nori adds irresistible texture and umami—don’t skip it!
Common Mistakes to Avoid
Learn from these common pitfalls:
- Using freshly cooked hot rice: This leads to mushy fried rice. Always use day-old rice that has been cooled and dried in the fridge.
- Skipping the kimchi juice: The juice adds much-needed moisture and depth of flavor.
- Overcrowding the pan: Crowding causes steaming instead of frying, losing the dish’s signature texture.
- Not stirring enough: Rice tends to clump or stick—constant stirring avoids this problem.
- Overcooking the chicken: It can become dry and tough. Cook just until done and remove promptly.
- Forgetting to finish with fresh garnishes: Spring onions and nori brighten and balance the heavy, spicy flavors.
Delicious Variations to Try
Once you’ve mastered the classic Kimchi Bokkeumbap (Kimchi Fried Rice) with Fried Egg and Nori Garnish Recipe, have fun experimenting with these delightful twists:
Seafood Kimchi Fried Rice
Swap the chicken for fresh shrimp or squid for a briny, ocean-fresh take on this beloved dish. The spicy kimchi pairs beautifully with tender seafood.
Vegetarian Kimchi Bokkeumbap
Replace chicken with firm tofu or mushrooms, and add extra vegetables such as zucchini, carrot, or bell peppers for a hearty, plant-based version packed with umami.
Cheesy Kimchi Fried Rice
After stir-frying, top your rice with shredded mozzarella or cheddar cheese and cover the pan briefly until melty for a luscious, comforting fusion twist.
Korean Beef Kimchi Bokkeumbap
Use thinly sliced bulgogi beef marinated in soy, garlic, and sugar instead of chicken to add a sweet-savory depth that’s utterly irresistible.
Spicy Vegan Kimchi Fried Rice
Use vegan kimchi and tempeh or seitan for protein, along with a drizzle of vegan mayo and extra gochujang for a fiery, dairy-free feast.
How to Serve Kimchi Bokkeumbap (Kimchi Fried Rice) with Fried Egg and Nori Garnish Recipe
Garnishes
Elevate your dish with toasted sesame seeds, thinly sliced spring onions, crispy nori strips, and a perfectly fried egg. For a little extra, sprinkle some crushed seaweed flakes or a drizzle of sriracha for heat.
Side Dishes
Pair your kimchi fried rice with light Korean sides such as tangy cucumber kimchi, pickled radish, or a bowl of warm miso soup for balance and texture contrast.
Creative Ways to Present
Serve the kimchi bokkeumbap in shallow bowls with the fried egg nestled on top and sprinkle the garnishes last minute for an Instagram-worthy finish. Alternatively, serve family-style straight from the wok for cozy sharing vibes.
Make Ahead and Storage
Storing Leftovers
Allow the kimchi bokkeumbap to cool completely, then transfer to an airtight container. It keeps well in the fridge for up to 3 days. The fried egg is best made fresh but can be reheated separately if needed.
Freezing
This kimchi fried rice freezes well. Portion it into freezer-safe containers and freeze for up to 1 month. Thaw in the fridge overnight before reheating. For best texture, add fresh fried eggs after reheating.
Reheating
Reheat leftovers in a hot pan with a splash of water or oil to revive the rice’s texture. Cover the pan to warm through evenly. Re-fry the egg fresh or microwave gently if reheating pre-cooked.
FAQs
Can I use freshly cooked rice?
It’s best to use day-old, cold rice for kimchi bokkeumbap. Fresh rice tends to be too soft and moist, leading to mushy fried rice.
What if I don’t have gochujang or gochugaru?
You can substitute gochujang with a blend of chili paste and miso, adding a bit of honey for sweetness. Paprika or cayenne can replace gochugaru but adjust quantity to control heat.
Can I make this vegetarian?
Absolutely! Replace chicken with tofu, tempeh, or mushrooms and use vegan kimchi to keep it plant-based and delicious.
How spicy is this dish?
The spice level can be easily adjusted by controlling the amount of gochujang, kimchi, and chili powder you use. Start mild and increase as you like.
What type of kimchi should I buy?
Classic napa cabbage kimchi works best, but you can experiment with radish or scallion kimchi depending on your preference.
Can I omit the fried egg?
The fried egg adds richness and texture, but if you prefer, you can skip it or replace it with a soft-boiled egg or a dollop of mayonnaise.
Is sesame oil necessary?
Sesame oil adds a distinctive nutty aroma and flavor crucial to authentic taste, but you can substitute with toasted walnut or a mild olive oil if needed.
How do I make the fried egg perfect?
Use medium heat and a non-stick pan, cooking until the whites are set but the yolk remains runny. A little butter or oil helps achieve that flawless sunny-side up egg.
Final Thoughts
There’s something so deeply satisfying about scooping a forkful of Kimchi Bokkeumbap (Kimchi Fried Rice) with Fried Egg and Nori Garnish Recipe—each bite bursting with vibrant spice, soft chicken, and a delicious tang that only kimchi can bring. Simple enough for weeknight dinners yet special enough to impress anyone at your table, this dish becomes an instant favorite for good reason. The cozy warmth of the fried egg yolk mingling with the bold, savory rice feels like a love letter to Korean home cooking.
Have you tried this Kimchi Bokkeumbap (Kimchi Fried Rice) with Fried Egg and Nori Garnish Recipe? I’d love to hear how it turned out! Leave a comment below. If you loved this recipe, please share it with friends and family. Happy cooking! 😊
PrintKimchi Bokkeumbap (Kimchi Fried Rice) with Fried Egg and Nori Garnish Recipe

Kimchi Bokkeumbap is a flavorful Korean fried rice dish made with spicy kimchi, tender chicken, and seasoned with gochujang and gochugaru. This quick and easy recipe yields a savory, slightly tangy stir-fry that is perfect for a comforting meal. Topped with a sunny-side-up egg, toasted sesame seeds, and crispy seaweed strips, this dish offers layers of texture and a delicious umami kick.
- Prep Time: 5 minutes
- Cook Time: 10 minutes
- Total Time: 15 minutes
- Yield: 2 servings 1x
- Category: Main Course
- Method: Frying
- Cuisine: Korean
- Diet: Halal
Ingredients
Main Ingredients
- 3 cup Cooked Rice (About 200g or 2 servings)
- 160 g Kimchi (adjust amount as preferred)
- 150 g Chicken breast or thigh, cut into small dices
- ½ Onion, cut into small dices
- 2–3 Spring onions, thinly sliced
- 2 Fried Eggs (Sunny-side up)
Seasonings and Oils
- 1 tbsp Gochujang (Korean chili paste)
- 1 tbsp Gochugaru (Korean chili powder or paprika)
- 1 tbsp Sugar
- 1 tsp Salt (adjust to taste)
- 1 tsp Sesame oil
- 1 tbsp Kimchi juice (water squeezed from kimchi)
- 2 tbsp Vegetable oil (neutral flavor oil)
Garnishes
- Toasted sesame seeds
- Spring onions
- Seaweed strips (Crispy nori cut into thin strips)
Instructions
- Prepare Kimchi and Ingredients. Squeeze out water from the kimchi and reserve 1-2 tablespoons of kimchi juice for later use. Chop the kimchi into bite-sized pieces. Dice the chicken breast or thigh and the onion into small pieces. Slice the spring onions thinly.
- Heat the Pan and Sauté Onion and Chicken. Preheat a large wok or pan over medium-high heat and add the vegetable oil. Stir fry the diced onion briefly until fragrant, then add the chicken pieces and cook for 1-2 minutes until they are cooked through.
- Add Kimchi and Spices. Add the chopped kimchi to the pan and stir fry for a few seconds. Then add the gochugaru and gochujang. Stir thoroughly to combine the chili paste well with the chicken and kimchi, cooking briefly until fragrant.
- Incorporate Rice and Seasonings. Increase the heat to high and add the cooked rice to the pan. Pour in the reserved kimchi juice, sesame oil, sugar, and salt. Mix everything well to ensure the rice is evenly coated and heated through.
- Finish and Garnish. Continue stir-frying the mixture for another 1-2 minutes. Turn off the heat and sprinkle the sliced spring onions and toasted sesame seeds on top. Transfer the fried rice to serving plates.
- Serve with Egg and Garnishes. Top each plate with a sunny-side-up fried egg with a runny yolk. Garnish with additional toasted sesame seeds, thin nori seaweed strips, and extra spring onions for added flavor and texture.
Notes
- Cooked rice should ideally be day-old or cooled to prevent sogginess during frying.
- Adjust kimchi quantity and salt according to your taste preference and kimchi’s saltiness.
- Chicken can be substituted with tofu or shrimp for variation.
- Use neutral oil with a high smoke point like vegetable or canola oil for stir-frying.
- You can add additional vegetables such as carrots or peas for extra nutrition and color.
- Be careful not to overcook the egg; the runny yolk enhances the creaminess of the dish.
Keywords: Kimchi Bokkeumbap, Korean fried rice, kimchi fried rice, spicy fried rice, chicken kimchi rice, gochujang recipe, quick Korean meal