Keto Peanut Butter Cup Ice Cream in the Ninja Creami Recipe
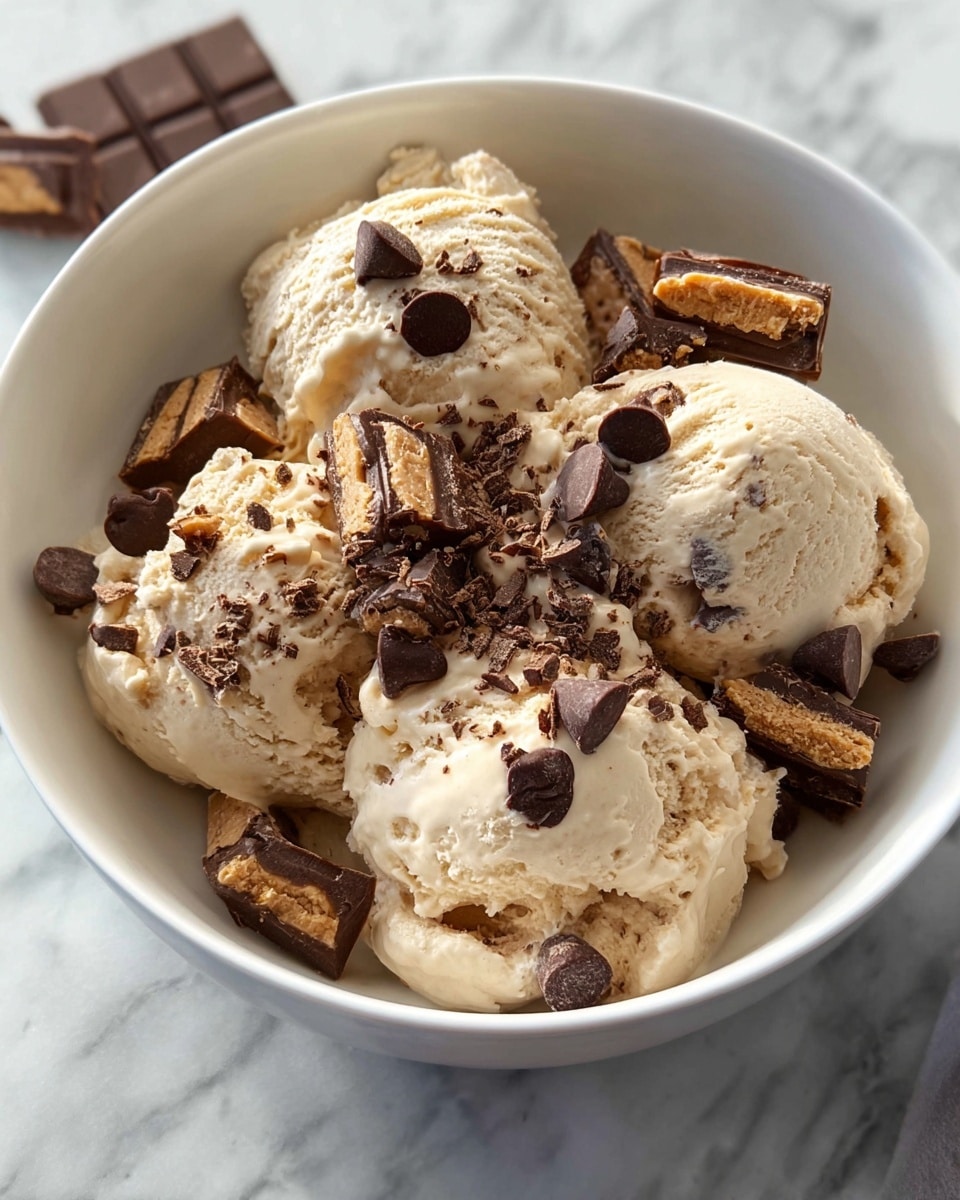
Picture this: the rich, creamy swirl of peanut butter and chocolate melting on your tongue, cool and luscious on a warm afternoon. The aroma of toasted peanuts mingling with a subtle hint of vanilla fills your kitchen, as you eagerly await the first bite of this dreamy dessert. Making Keto Peanut Butter Cup Ice Cream in the Ninja Creami Recipe is not just simple and fast, but it’s a delightful way to treat yourself without straying from your low-carb goals.
There’s a cozy satisfaction in crafting an ice cream that tastes indulgent yet remains guilt-free, packed with protein and kissed by the perfect balance of sweet and salty. Whether you’re whipping this up after a long day or impressing friends during a weekend gathering, this recipe promises rich flavor, smooth texture, and a hint of nostalgia that feels like a warm hug. Let me share this treasure with you!
Why You’ll Love This Keto Peanut Butter Cup Ice Cream in the Ninja Creami Recipe
- Ready in 30 minutes: Combine, freeze, and spin your way to creamy bliss—perfect for busy days when you crave dessert fast.
- Uses simple ingredients: Pantry staples like peanut butter protein powder and sugar-free chocolate chips come together for magic without fuss.
- Perfect for beginners: No fancy techniques or complicated steps—just blend, freeze, and use your Ninja Creami to do the heavy lifting.
- Impressive presentation: Add chocolate chips or chopped peanut butter cups for that melt-in-your-mouth, dreamy texture that will wow guests every time.
- Customizable: Easy to tweak—swap in your favorite protein powder or nuts to make it truly your own indulgence.
Why This Keto Peanut Butter Cup Ice Cream in the Ninja Creami Recipe Works
This recipe shines because of a few key secrets. Using guar gum as a natural thickener gives the ice cream that velvety, scoopable texture, eliminating icy crystals and creating a smooth mouthfeel. The blend of creamy vanilla almond milk and peanut butter protein powder packs a punch of delicious flavor while keeping carbs low and protein high, striking the perfect nutritional balance. Lastly, the Ninja Creami’s spinning process transforms the frozen blend into a luxuriously creamy treat, mimicking classic ice cream with none of the guilt.
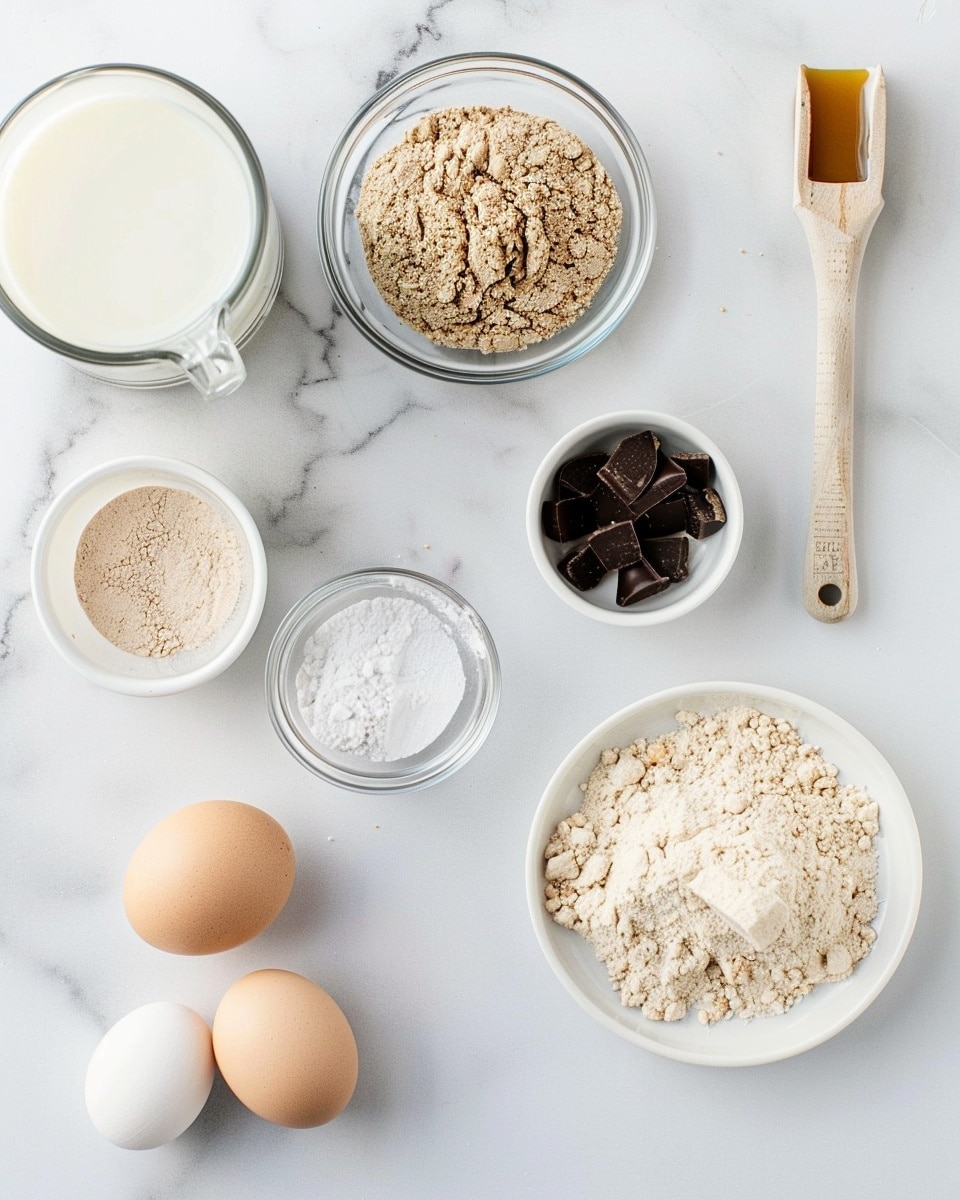
Ingredients You’ll Need
These simple ingredients come together like old friends in this recipe, each playing a vital role in creating that rich, peanut butter cup flavor and creamy texture.
- Unsweetened vanilla almond milk: The creamy, low-carb base that supports the ice cream’s smooth consistency.
- Quest Peanut Butter Protein Powder: Adds rich peanut flavor with a high-protein boost to keep you satisfied.
- PBFit Pure Peanut: Intensifies peanut flavor while keeping the mixture light and smooth.
- Swerve Confectioners: A keto-friendly sweetener that dissolves beautifully for just the right amount of sweetness.
- Guar gum: A natural thickener that ensures your ice cream stays creamy and scoopable.
- Salt: Balances sweetness and enhances all the other flavors, like magic.
- Lily’s Milk Chocolate Style Baking Chips: For that unmistakable peanut butter cup touch that brings this ice cream to life.
- Quest Peanut Butter Cups (optional): For extra indulgence and added texture, if you want to go all out.
Ingredient Substitutions & Tips
- Unsweetened vanilla almond milk: Substitute with unsweetened coconut milk for a richer flavor or cashew milk for creaminess.
- Quest Peanut Butter Protein Powder: Use any keto-friendly peanut butter protein powder or even a vanilla whey isolate powder with added natural peanut butter.
- Swerve Confectioners: Erythritol or monk fruit sweetener in powdered form works just as well.
- Guar gum: Xanthan gum can be swapped in equal measure for thickening.
👨🍳 Pro Tips for Perfect Results
- Freeze your mixture 24 hours: Patience ensures the Ninja Creami can churn the ice cream into that perfect creamy texture.
- Use fresh protein powder: Old powder can clump, affecting smoothness.
- Don’t skip the guar gum: It’s essential for silky, scoopable ice cream with no icy bits.
- Mix-in timing: Add chocolate chips at the end for delightful bursts of texture.
- Respin if needed: Sometimes the first spin results in powdery texture—simply respin for that creamy dream.
How to Make Keto Peanut Butter Cup Ice Cream in the Ninja Creami Recipe
Step 1: Blend Your Base Ingredients
Gather the unsweetened vanilla almond milk, peanut butter protein powder, PBFit Pure Peanut, Swerve Confectioners, guar gum, and salt. Place them in your blender or food processor. Pulse until everything is fully combined and the mixture is smooth and luscious. You’ll see how creamy and inviting the base looks already—almost too good not to taste.
💡 Pro Tip: Scrape down the sides of your blender to avoid any pockets of dry ingredients that could cause clumps.
Step 2: Freeze Thoroughly
Pour this dreamy peanut buttery mixture into your Ninja Creami pint container and firmly seal it with the lid. Pop it into the freezer and let it sit for at least 24 hours. This slow freeze lays the groundwork for the creamy ice cream texture the Ninja Creami will craft for you.
💡 Pro Tip: Ensure the container sits flat in the freezer to freeze evenly and avoid any icy pockets.
Step 3: Spin the Ice Cream
Take the frozen pint and remove the lid. Insert the pint into the Ninja Creami outer bowl, place the paddle into the lid, fasten it securely, and lock the outer bowl into your machine. Select the Lite Ice Cream setting and watch it work its magic, transforming the frozen block into silken ice cream that looks ready for your first scoop.
💡 Pro Tip: If the ice cream texture feels powdery or crumbly, don’t fret—just click “respin” to smooth it out completely.
Step 4: Add Your Mix-ins
Once your ice cream is creamy and soft, create a little well or indent in the center and add your Lily’s chocolate chips or break up a couple of Quest Peanut Butter Cups. Replace the lid and choose the Mix-In function on your Ninja Creami, letting it fold those chocolate pieces through for an even more decadent experience.
💡 Pro Tip: For extra fun, lightly toast the chocolate chips beforehand to bring out their nutty flavor.
Step 5: Serve and Savor
Your Keto Peanut Butter Cup Ice Cream in the Ninja Creami Recipe is now ready to enjoy! Scoop into bowls or cones and bask in the creamy, chocolatey, peanut buttery delight. The perfect low-carb indulgence is just a spoonful away.
💡 Pro Tip: Serve immediately for the best creamy texture or store as advised below for later enjoyment.
Common Mistakes to Avoid
Learn from these common pitfalls:
- Freezing less than 24 hours: Leads to icy, crumbly texture rather than creamy ice cream.
- Skipping guar gum: Your ice cream might get icy or too hard to scoop.
- Not respinning: Powdery texture can usually be fixed by respinning—don’t give up early.
- Using dark chocolate chips: Dark or semi-sweet chips alter the classic peanut butter cup taste.
- Blending unevenly: Results in clumps of protein powder, which affects smoothness.
- Storing improperly: Leaving ice cream exposed can cause freezer burn and loss of flavor.
Delicious Variations to Try
Once you’ve mastered the classic version:
Chocolate Swirl
Swirl in sugar-free chocolate syrup before freezing for those pockets of fudge that surprise with every bite.
Crunchy Nut Addition
Mix in chopped roasted peanuts or walnuts at the mix-in stage for irresistible crunch contrasting with creaminess.
Mocha Madness
Add a shot of espresso powder in the base blend for a sophisticated coffee and peanut butter cup combo.
Berry Bliss
Freeze small raspberries into the pint before spinning to cut through the richness with a burst of tart freshness.
Vanilla Almond
Swap peanut butter protein powder for vanilla almond protein and add slivered almonds for a nutty twist on classic flavor.
How to Serve Keto Peanut Butter Cup Ice Cream in the Ninja Creami Recipe
Garnishes
Sprinkle chopped peanuts, drizzle with sugar-free chocolate sauce, or top with crushed keto-friendly chocolate cookies for added flair.
Side Dishes
Pair with low-carb brownies, fresh strawberries, or whipped coconut cream to elevate your dessert experience.
Creative Ways to Present
Serve in mini waffle cones sprinkled with cocoa powder, layer in parfait glasses with whipped cream and peanut butter drizzle, or create bite-sized popsicles with this ice cream base.
Make Ahead and Storage
Storing Leftovers
Keep ice cream in an airtight Creami pint container, flatten the surface, and seal tightly. Store in your freezer to maintain freshness and texture.
Freezing
Freeze for up to two weeks for optimal flavor and creaminess. Beyond that, the texture might degrade.
Reheating
Allow ice cream to soften at room temperature for 5-10 minutes before respinning in the Ninja Creami to regain creamy texture.
FAQs
Can I use regular peanut butter instead of PBFit?
Regular peanut butter is usually too oily and can affect freezing and texture. PBFit keeps the mixture light and smooth, but you can experiment with a reduced amount if desired.
Is this recipe dairy-free?
Yes! Using almond milk and dairy-free chocolate chips keeps the recipe dairy-free and perfect for various dietary needs.
What if I don’t have guar gum?
Xanthan gum works well as an alternative, or you can try a small amount of gelatin powder, but guar gum provides the best creamy texture here.
Can I double or halve the recipe?
Absolutely! Just adjust the ingredient amounts accordingly and ensure your mixing container fits your Ninja Creami.
How long does the ice cream last?
Stored properly, it stays delicious for about 2 weeks in the freezer.
Why is my ice cream powdery after spinning?
The Ninja Creami sometimes needs a couple of spins to achieve perfect creaminess—use the respin function until smooth.
Can I add other flavors?
Definitely! Vanilla extract, cinnamon, or even a touch of saltine cracker crumbs can add interesting twists.
What’s the texture like compared to store-bought ice cream?
It’s wonderfully creamy and rich but lighter due to high protein and low sugar, making it satisfyingly different.
Final Thoughts
Making this Keto Peanut Butter Cup Ice Cream in the Ninja Creami Recipe is like capturing a little piece of dessert heaven, right in your kitchen. It feels indulgent and utterly satisfying without compromising your goals, making it the go-to treat whenever the craving strikes. Its creamy texture, balanced sweetness, and irresistible peanut butter and chocolate profile bring happiness with every bite.
Have you tried this Keto Peanut Butter Cup Ice Cream in the Ninja Creami Recipe? I’d love to hear how it turned out! Leave a comment below. If you loved this recipe, please share it with friends and family. Happy cooking! 🍨
PrintKeto Peanut Butter Cup Ice Cream in the Ninja Creami Recipe
This Keto Peanut Butter Cup Ice Cream is a deliciously creamy, low-carb dessert made in the Ninja Creami. Combining the rich flavors of peanut butter and chocolate, this high-protein ice cream is perfect for keto-friendly diets and satisfies your sweet tooth without the guilt.
- Prep Time: 10 minutes
- Cook Time: 24 hours freezing, plus 10 minutes processing
- Total Time: 24 hours 20 minutes
- Yield: 2 servings 1x
- Category: Dessert
- Method: Blending
- Cuisine: American
- Diet: Low Carb
Ingredients
Ice Cream Base
- 1 cup unsweetened vanilla almond milk
- ½ scoop Quest Peanut Butter Protein Powder (15 grams)
- 1 tablespoon PBFit Pure Peanut
- 3 tablespoons Swerve Confectioners
- ¼ scant teaspoon guar gum
- ⅛ teaspoon salt
Mix-Ins
- ½ ounce Lily’s Milk Chocolate Style Baking Chips
- 2 Quest Peanut Butter Cups (OPTIONAL: can be used instead of milk chocolate chips)
Instructions
- Blend ingredients: Combine the almond milk, protein powder, PBFit pure peanut powder, Swerve confectioners sweetener, guar gum, and salt in a blender or food processor. Pulse until the mixture is thoroughly combined and smooth in consistency.
- Freeze: Pour the blended mixture into a Ninja Creami pint container and place it in the freezer. Allow it to freeze solid for at least 24 hours to ensure proper texture.
- Turn to ice cream in the Ninja Creami: Remove the lid from the frozen pint and place the pint into the Ninja Creami outer bowl. Attach the Creami paddle to the pint lid, secure the outer bowl lid, and lock the unit into place. Select the Lite Ice Cream mode and let the machine spin until complete.
- Respin if necessary: Remove the pint and check the texture. If it’s powdery rather than creamy and smooth, return the pint to the Ninja Creami and press Respin. Repeat this process until the ice cream achieves a smooth, creamy consistency.
- Finish and serve: Once the ice cream is smooth, make a small indent in the center and add the milk chocolate style baking chips (or optional peanut butter cups if using). Return the pint to the Creami and select the Mix-In function to evenly incorporate the chips. After mixing, serve the ice cream immediately and enjoy!
Notes
- This recipe is designed for the original Ninja Creami; if you have the Ninja Creami Deluxe, use the 1.5x conversion button to adjust ingredient amounts accordingly.
- Nutrition estimates include the milk chocolate style baking chips, but not the optional peanut butter cups. Adding peanut butter cups adds approximately 85 calories, 1g net carb, and 11g protein per serving.
- Use milk chocolate style baking chips for authentic peanut butter cup flavor. Semi-sweet or dark chocolate chips will alter the taste.
- If you have leftovers, let the ice cream soften quickly at room temperature, then flatten the surface and store in the Creami pint in the freezer. To serve again, simply re-run the Creami spin or respin to restore creaminess.
Keywords: keto ice cream, peanut butter cup, low carb dessert, high protein ice cream, Ninja Creami recipe, sugar-free ice cream, low calorie dessert