No Bake Nanaimo Bar Cheesecake Recipe
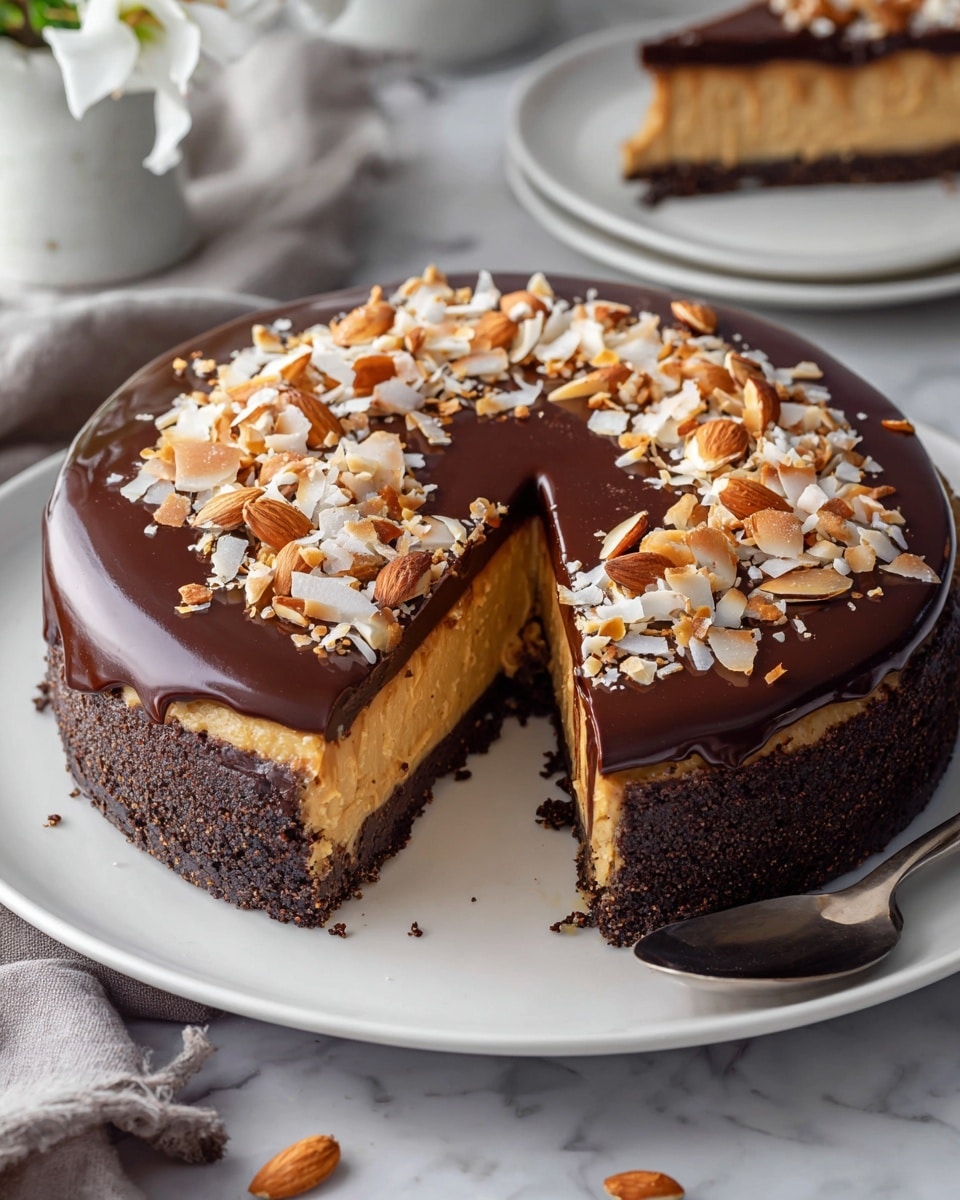
Picture this: A divine slice of creamy, luscious cheesecake melting effortlessly on your tongue, topped with a glossy layer of rich chocolate ganache and a delightfully crunchy, nutty base that whispers sweet nostalgia. The aroma of toasted coconut and buttery chocolate fills your kitchen, instantly wrapping you in a warm, cozy embrace. This No Bake Nanaimo Bar Cheesecake Recipe is like a treasured secret passed down through generations—a quick, easy, and utterly impressive dessert that will have everyone begging for more before the first bite has even cooled.
Why You’ll Love This No Bake Nanaimo Bar Cheesecake Recipe
- Ready in 30 minutes: Get a stunning dessert on your table faster than you can say “cheesecake” without ever turning on your oven.
- Uses simple ingredients: Everything you need is easy to find and often already in your pantry, making this recipe a stress-free choice.
- Perfect for beginners: No complicated baking skills required—just mix, set, and enjoy, with guaranteed results.
- Impressive presentation: Layers of creamy cheesecake, crunchy crust, and silky ganache create a visual feast that looks as amazing as it tastes.
- Customizable: Swap nuts or coco for your favorites, and play with chocolate toppings to make it your own signature treat.
Why This No Bake Nanaimo Bar Cheesecake Recipe Works
What makes this No Bake Nanaimo Bar Cheesecake Recipe truly shine is the synergy of textures and flavors locked in perfect harmony. The secret lies in the crust, where the combination of melted butter, cocoa, and toasted coconut builds a robust base that gives each bite delightful crunch and deep, nutty chocolate notes. The creamy filling is elevated by the custard powder, which adds just the right hint of richness and unique Nanaimo authenticity without relying on baking, while the whipped cream ensures a light, airy softness that feels indulgent but balanced. Finally, a silky chocolate ganache seals the deal with glossy decadence, creating a dessert experience that’s as elegant as it is comforting.
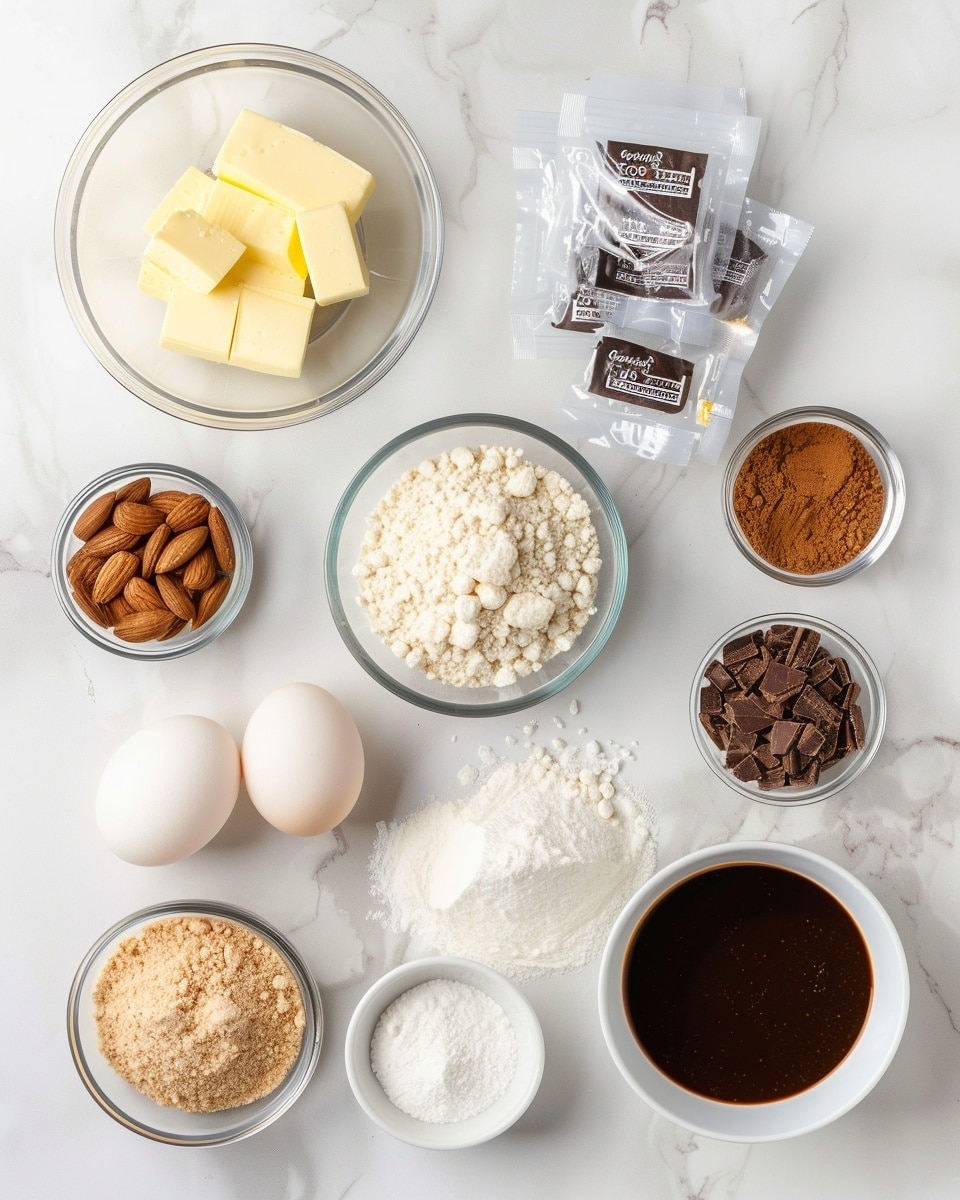
Ingredients You’ll Need
Each ingredient in this recipe plays a starring role. While simple, their blend creates a complex dessert full of luscious textures and unforgettable flavors.
- Butter: Brings richness and helps bind the crust.
- Sugar: Sweetens the crust and filling perfectly.
- Unsweetened cocoa powder: Adds that deep, chocolatey foundation to the crust.
- Egg (beaten): Cooked gently into the crust for structure without raw egg concerns.
- Graham cracker crumbs: Classic base ingredient for that beloved crunch.
- Finely chopped almonds: Provide a subtle nutty texture in the crust.
- Shredded coconut: Sweet or unsweetened, this gives a tropical flair and chewy contrast.
- Cream cheese: The creamy backbone of the cheesecake filling, luscious and smooth.
- Bird’s custard powder: A unique ingredient that thickens the filling and delivers that signature Nanaimo flavor.
- Heavy whipping cream: Whipped to airy peaks, it lightens the filling beautifully and creates softness.
- Powdered sugar: Sweetens the filling without graininess.
- Finely chopped dark chocolate: For the glossy, irresistible ganache topping.
- Heavy cream (for ganache): Creates the smooth, silky finish atop your cheesecake.
Ingredient Substitutions & Tips
- Butter: Can swap for coconut oil for a dairy-free crust with a subtle tropical note.
- Almonds: Try chopped walnuts or pecans for a different nutty flavor profile.
- Shredded coconut: Use unsweetened if you want a less sweet crust, or toasted for extra depth.
- Bird’s custard powder: If unavailable, cornstarch mixed with vanilla extract works as a thickening alternative.
👨🍳 Pro Tips for Perfect Results
- Use room temperature cream cheese: It whips up smoother and avoids lumps in your filling.
- Don’t overheat your ganache: Microwave in short bursts to keep the chocolate glossy and flawless.
- Press crust firmly: A densely packed base sets a sturdy foundation for perfect slices.
- Chill thoroughly: Overnight refrigeration lets flavors meld and ensures clean cheesecake slices.
- Whip cream to stiff peaks: This gives your filling that airy texture that feels like a cloud in every bite.
How to Make No Bake Nanaimo Bar Cheesecake Recipe
Step 1: Prepare the Nanaimo Bar Crust
Start by melting the butter in a large pan over medium heat—feel that warm, buttery scent filling your kitchen? Remove from heat then stir in the sugar and cocoa powder until glossy and combined. Slowly whisk in the beaten egg while continuing to stir; the residual heat cooks it perfectly, keeping your crust safe and silky. Stir in the graham cracker crumbs, finely chopped almonds, and shredded coconut, folding it all together for that perfect crumbly but cohesive texture. Press this mixture firmly into the bottom of a 9-inch springform pan, packing it tight for a sturdy base that’s both crunchy and tender.
💡 Pro Tip: Use the bottom of a flat glass or measuring cup to press the crust evenly and firmly into the pan.
Step 2: Whip Up the Cheesecake Filling
In a large bowl, beat the room temperature cream cheese until it’s luxuriously smooth and creamy. Add the Bird’s custard powder and powdered sugar, beating until the mixture lightens in color and becomes fluffy—this step adds a delicate sweetness and silky texture that’s signature to this cheesecake. In a separate bowl, whip the heavy cream until stiff peaks form, delightful and billowy. Gently fold the whipped cream into your cream cheese mixture in two batches; this keeps the filling light, airy, and irresistibly creamy. Spread this velvety filling evenly over your chilled crust, smoothing the surface with a spatula.
💡 Pro Tip: Folding instead of beating preserves the airiness of the whipped cream for a lighter texture.
Step 3: Create the Decadent Chocolate Ganache
Combine the finely chopped dark chocolate and heavy cream in a microwave-safe bowl. Heat in 15-20 second bursts, stirring after each, until the chocolate is melted into a smooth, glossy ganache. Patience is key here—be careful not to overheat or your chocolate may seize, ruining that silky finish. Let it cool for about 15 to 20 minutes to thicken slightly but remain pourable. Once your cheesecake filling has chilled sufficiently, pour the ganache over the top and use a spatula to spread it evenly to the edges.
💡 Pro Tip: A slightly cooled ganache gives a glossy finish that sets beautifully overnight.
Step 4: Chill and Serve
Place your masterpiece in the refrigerator for at least 8 hours or preferably overnight. This allows all those luscious layers to set perfectly so each slice holds together with pristine, elegant lines. When you’re ready to indulge, release the springform pan gently and slice with a sharp knife—oh, the moment when that ganache cracks just slightly before surrendering to the luscious layers beneath is pure dessert poetry!
💡 Pro Tip: Dip your knife in hot water and wipe dry before slicing each piece to achieve clean cuts.
Common Mistakes to Avoid
Learn from these common pitfalls:
- Using cold cream cheese: This can cause lumps in your filling; always soften it first.
- Overheating the ganache: Chocolate can seize and become grainy if heated too much.
- Not pressing the crust firmly enough: Resulting in a crumbly base that falls apart.
- Skipping the chill time: Cheesecake needs hours to set properly; impatience leads to messy slices.
- Overmixing the filling: Stir gently to keep it light and fluffy.
- Using improper chocolate: Avoid chocolate chips or baking chocolate for ganache; use finely chopped high-quality dark chocolate instead.
Delicious Variations to Try
Once you’ve mastered this classic No Bake Nanaimo Bar Cheesecake Recipe, have fun putting your own spin on it:
Peanut Butter Swirl
Swirl in some creamy peanut butter into the filling for a nutty twist that pairs beautifully with chocolate.
Berry Bliss
Layer fresh raspberries or blueberries on the crust before adding the filling for a burst of fruity freshness.
Coconut Lovers
Top with toasted coconut flakes and a drizzle of coconut cream for an extra tropical vibe.
Espresso Kick
Add a shot of espresso or instant coffee granules to the ganache for a sophisticated mocha flavor.
Mint Chocolate
Stir in peppermint extract to the ganache or sprinkle crushed candy canes on top for a festive flair.
How to Serve No Bake Nanaimo Bar Cheesecake Recipe
Garnishes
Fresh mint leaves, a dusting of cocoa powder, or toasted coconut flakes add visual interest and enhance the aroma.
Side Dishes
Serve slices with fresh berries, a dollop of whipped cream, or a hot cup of coffee or tea to balance the richness.
Creative Ways to Present
Cut into bite-sized squares for elegant party platters or serve in individual clear glasses layered with extra ganache and nuts for a chic dessert twist.
Make Ahead and Storage
Storing Leftovers
Cover the cheesecake tightly with plastic wrap or store in an airtight container and keep refrigerated for up to 3-4 days to maintain freshness.
Freezing
Wrap well with plastic and foil and freeze for up to 3 months. Thaw overnight in the refrigerator before serving to preserve texture and flavor.
Reheating
This dessert is best served chilled. Allow thawed cheesecake to come to room temperature for 15-20 minutes before serving if desired, but avoid heat to maintain the ganache’s glossy finish.
FAQs
Can I use a different type of nut in the crust?
Absolutely! Walnuts, pecans, or even hazelnuts make wonderful alternatives that add their own unique flavor and crunch.
Is it safe to use a raw egg in the crust?
The egg is gently cooked by the heat of the melted butter and pan, eliminating any food safety concerns.
What if I don’t have Bird’s custard powder?
You can substitute with cornstarch and a teaspoon of vanilla extract to achieve a similar thickening effect.
Can I make this recipe vegan?
With some tweaks—like using vegan cream cheese, coconut oil, and non-dairy cream—it’s possible to create a vegan-friendly version.
How do I keep the ganache from cracking?
Ensure you melt the chocolate gently and let the ganache cool at room temperature before spreading. Also, avoid sudden temperature changes during chilling.
Why is my cheesecake not setting?
Insufficient chilling time or improper folding of whipped cream could cause a runny filling. Always refrigerate overnight for best results.
Can I make this in smaller pans?
Yes, just adjust the crust and filling quantities proportionally and use the same chilling time.
How long can I store leftovers?
Keep refrigerated for up to 4 days or freeze for extended storage up to 3 months.
Final Thoughts
There’s something truly magical about this No Bake Nanaimo Bar Cheesecake Recipe. Its effortless prep combines with show-stopping flavor and texture contrasts that will make this your go-to dessert for birthdays, holidays, or any time you crave a sweet escape. It’s the kind of recipe that feels like a warm hug wrapped in chocolate and coconut, inviting you to savor every creamy, crunchy bite.
Have you tried this No Bake Nanaimo Bar Cheesecake Recipe? I’d love to hear how it turned out! Leave a comment below. If you loved this recipe, please share it with friends and family. Happy cooking! 😊
PrintNo Bake Nanaimo Bar Cheesecake Recipe
This No Bake Nanaimo Bar Cheesecake is a luscious, creamy dessert combining the iconic layered flavors of a Nanaimo bar with the smooth richness of cheesecake. Featuring a chocolatey crust with graham cracker, almonds, and coconut, a custard-infused cream cheese filling, and a rich dark chocolate ganache topping, this indulgent dessert requires no baking, making it perfect for effortless entertaining or a special treat.
- Prep Time: 15 minutes
- Cook Time: 15 minutes
- Total Time: 8 hours 30 minutes
- Yield: 12 servings 1x
- Category: Dessert
- Method: No-Cook
- Cuisine: Canadian
Ingredients
Crust
- ½ cup butter
- ½ cup sugar
- ¼ cup unsweetened cocoa powder
- 1 egg (beaten)
- 1 cup graham cracker crumbs
- ½ cup finely chopped almonds
- 1 cup shredded coconut (sweetened or unsweetened)
Cheesecake Filling
- 3 packages cream cheese (24 oz or 750 grams total, room temperature)
- ½ cup Bird’s custard powder
- 1 ½ cups powdered sugar
- 1 cup heavy whipping cream (35%)
Ganache
- ¾ cup finely chopped dark chocolate (1 100g bar)
- ⅓ cup heavy cream
Instructions
- Prepare Nanaimo Bar Crust. In a large pan, melt the butter over medium heat. Remove from heat and stir in sugar and cocoa powder until combined.
- Cook Egg Mixture. Gradually whisk in the beaten egg while continuously stirring; the residual heat will gently cook the egg, ensuring no raw egg remains.
- Combine Crust Ingredients. Stir in graham cracker crumbs, finely chopped almonds, and shredded coconut, mixing thoroughly to incorporate all ingredients.
- Form Crust Base. Press the crust mixture firmly and evenly into the bottom of a 9-inch springform pan to create the base layer.
- Make Cheesecake Filling. In a large bowl, beat the cream cheese until smooth and creamy, then add the custard powder and powdered sugar, beating until the mixture is light and fluffy.
- Whip Heavy Cream. In a separate bowl, whip the heavy whipping cream using an electric mixer until stiff peaks form.
- Incorporate Whipped Cream. Fold the whipped cream into the cream cheese mixture in two batches, gently beating on low speed after each addition until fully combined.
- Chill Filling. Spread the cheesecake filling evenly over the prepared crust and refrigerate while preparing the ganache.
- Prepare Ganache. In a medium microwave-safe bowl, melt the finely chopped dark chocolate and heavy cream in short 15-20 second bursts, stirring thoroughly between each interval until smooth; avoid overheating to prevent the chocolate from seizing.
- Cool Ganache. Allow the ganache to cool for 15-20 minutes at room temperature before using.
- Assemble Cheesecake. Remove the cheesecake from the refrigerator and pour the ganache evenly over the cheesecake surface, smoothing it to the edges.
- Set Cheesecake. Refrigerate the assembled cheesecake until completely set, at least 8 hours or overnight, for best results.
- Storage. Store leftovers refrigerated for 3-4 days or freeze for up to 3 months.
Notes
- Be sure to whisk the egg gradually into the warm butter mixture while stirring constantly to avoid scrambling the egg.
- The ganache must cool slightly before pouring to ensure a smooth, glossy finish.
- Use room temperature cream cheese for a smoother, lump-free filling.
- Refrigerating the cheesecake overnight improves flavor melding and firmness.
- Freezing is a great option for longer storage; thaw in the refrigerator before serving.
Keywords: Nanaimo bar cheesecake, no bake cheesecake, chocolate cheesecake, custard powder cheesecake, easy cheesecake recipe, dessert, summer dessert