Chocolate Peanut Butter Protein Ice Cream (Ninja Creami) Recipe
Picture this: the rich aroma of velvety chocolate mingled with the nutty warmth of peanut butter fills your kitchen, teasing your senses before you even take a spoonful. As you scoop into this dreamy Chocolate Peanut Butter Protein Ice Cream (Ninja Creami) Recipe, its creamy texture melts effortlessly on your tongue, delivering that perfect balance of indulgence and nourishment. It’s quick, simple, and surprisingly healthy – a treat that feels like a luxurious reward after any workout or long day.
There’s something truly magical about whipping up homemade ice cream that packs a protein punch yet tastes decadently satisfying. Whether it’s your busy weekday craving or weekend indulgence, this recipe dances on your taste buds like your favorite dessert and fuels your body at the same time. Let me share all the secrets behind making this gem with your Ninja Creami – you’re going to love every spoonful.
Why You’ll Love This Chocolate Peanut Butter Protein Ice Cream (Ninja Creami) Recipe
- Ready in 30 minutes: The prep is a breeze, and the freezing happens overnight so you wake up to a luscious treat without stress.
- Uses simple ingredients: No complicated pantry raid here – just a handful of familiar, wholesome items you probably already have.
- Perfect for beginners: Whether you’re new to the Ninja Creami or just starting homemade ice cream adventures, this recipe walks you through every easy step.
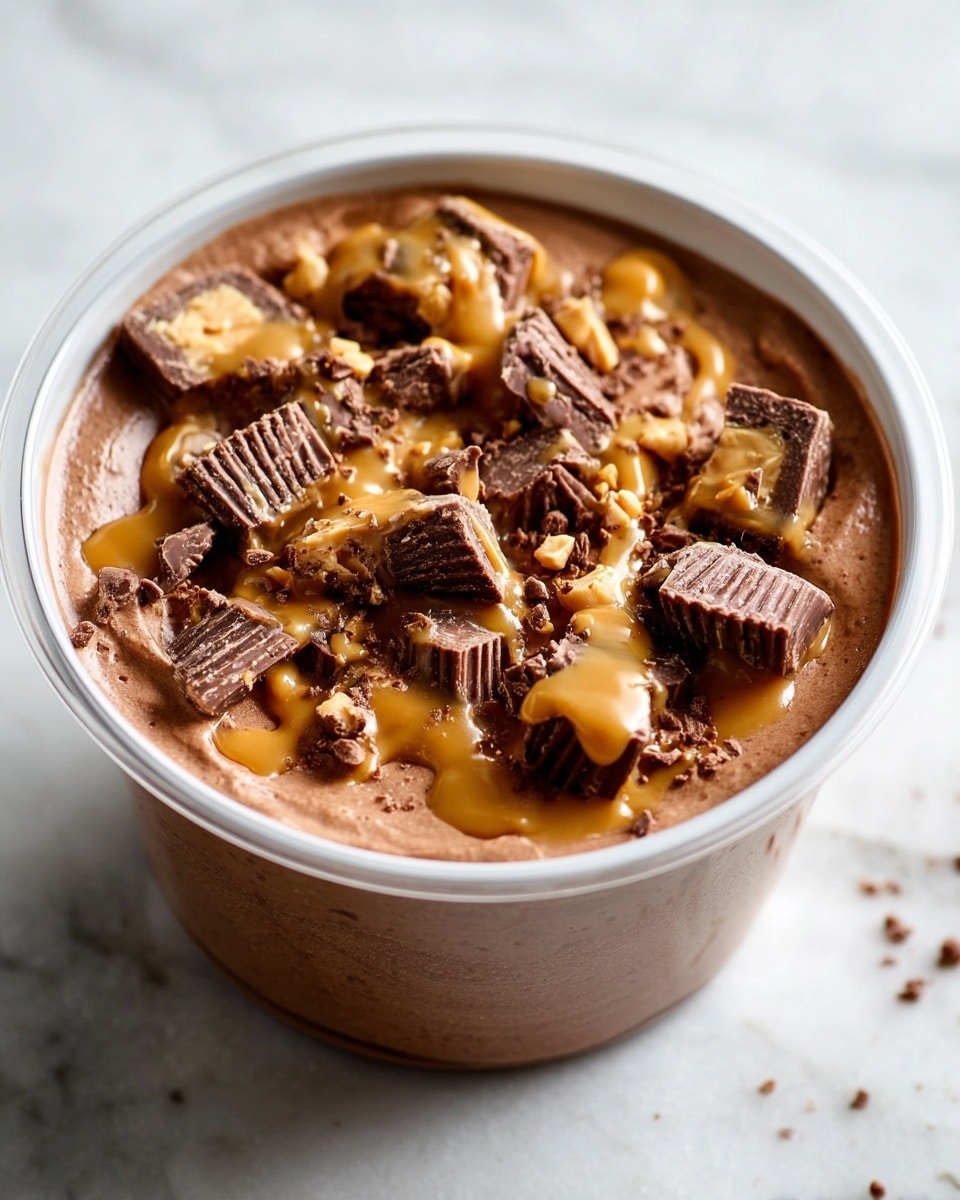
- Impressive presentation: Serve it up with those adorable mini peanut butter cups mixed in for a mouthwatering look and delightful crunch.
- Customizable: Fancy it more chocolatey or extra peanut buttery? Swap ingredients or tweak sweetness to suit your cravings perfectly.
Why This Chocolate Peanut Butter Protein Ice Cream (Ninja Creami) Recipe Works
This recipe balances creamy chocolate and nutty peanut butter flavors by combining both powdered and liquid ingredients that freeze uniformly in the Ninja Creami pint. The addition of sugar-free chocolate pudding mix serves as a secret weapon to improve texture and stability, ensuring your ice cream comes out irresistibly smooth, not icy or gritty. Freezing the mixture solid for 24 hours is key to allowing the Creami’s blades to reconstruct it into that heavenly creamy scoop we all crave. The sprinkle of salt unlocks deeper layers of flavor, making every bite pop with richness. Plus, those little peanut butter cups stirred in at the end add bursts of texture and joyful surprise.
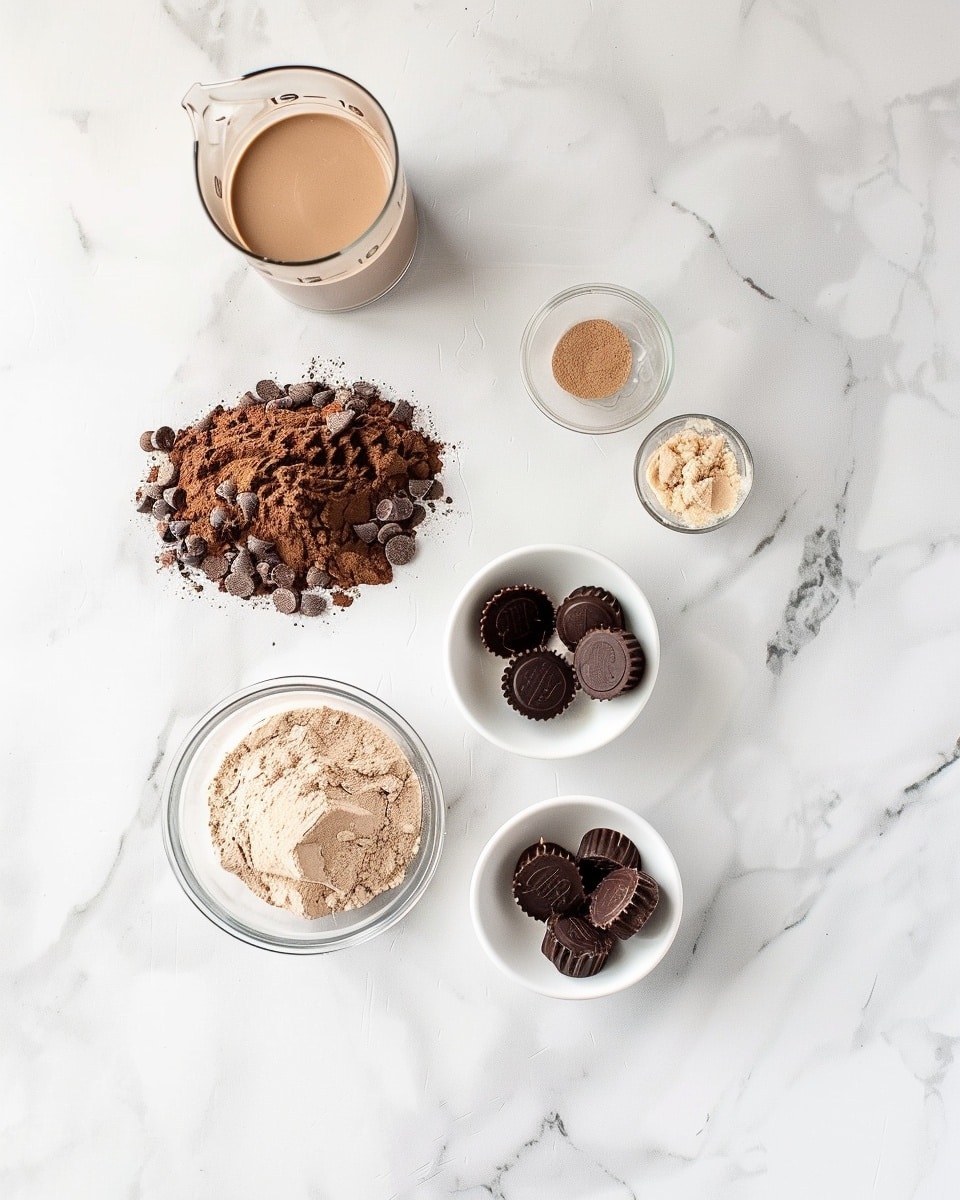
Ingredients You’ll Need
These simple yet essential ingredients come together beautifully to create a protein-rich dessert that tastes like pure bliss.
- Fairlife chocolate milk: Provides creamy chocolate flavor and protein base.
- Unsweetened almond milk: Keeps it light while maintaining smooth texture.
- Chocolate protein powder: Packs in protein with a rich cocoa punch.
- PBFit peanut butter powder: Delivers intense peanut flavor without added oil.
- Sugar-free chocolate jello pudding mix: A texture enhancer that adds creaminess and chocolate depth.
- Salt: A pinch sharpens the flavors, balancing sweetness perfectly.
- Mini peanut butter cups: The fun, chewy mix-in that makes this ice cream seriously crave-worthy.
Ingredient Substitutions & Tips
- Fairlife chocolate milk: You can substitute with any high-protein chocolate milk or use regular chocolate milk for a less protein-heavy version.
- Unsweetened almond milk: Swap with coconut milk or oat milk if you prefer a different dairy-free option.
- PBFit peanut butter powder: If unavailable, try powdered peanut butter brands like Just Great Stuff or finely ground peanut flour.
- Sugar-free chocolate pudding mix: Use a no-sugar-added instant chocolate pudding mix or omit altogether for a lighter texture (though creaminess might be slightly less).
👨🍳 Pro Tips for Perfect Results
- Use level surfaces: Before spinning, ensure the pint container is frozen flat to protect your Ninja Creami blade.
- Freeze full 24 hours: Patience is key – solid freezing improves creaminess when you spin and mix.
- Adjust liquid for texture: If the ice cream is too powdery after spinning, add a tablespoon of milk before respinning.
- Mix-ins last: Always add mix-ins like peanut butter cups on the last mix-in spin for even distribution.
- Experiment with protein flavors: Try vanilla or mocha protein powder for exciting flavor twists.
How to Make Chocolate Peanut Butter Protein Ice Cream (Ninja Creami) Recipe
Step 1: Combine Your Ingredients
In your Ninja Creami pint container, carefully pour in the chocolate milk and almond milk up to the max fill line. Add the sugar-free chocolate pudding mix, chocolate protein powder, peanut butter powder, and a pinch of salt. Use a handheld frother or whisk to blend everything thoroughly until the mixture looks smooth and consistent.
💡 Pro Tip: Take your time mixing to dissolve all powders completely, avoiding clumps that can affect texture.
Step 2: Freeze Until Solid
Place the sealed pint container upright in your freezer for a full 24 hours. This step is essential to create the firm base needed for the Ninja Creami to work its magic.
💡 Pro Tip: Make sure the container stands straight and doesn’t tip over to keep the surface even.
Step 3: Prep Your Ninja Creami
After freezing, briefly run the outside of the container under warm water for about 60 seconds. This loosens the ice cream from the sides, making it easier for the machine to spin. Remove the outer bowl lid carefully and install the pint into your Ninja Creami.
💡 Pro Tip: Double-check that your frozen pint has a smooth, level top to prevent any damage to the machine’s blade.
Step 4: Spin and Respin
Press the “Lite Ice Cream” button on your Ninja Creami to start the first spin. Once complete, check the consistency – if still powdery, hit the “Respin” button. Repeat until the ice cream achieves a creamy, smooth texture.
💡 Pro Tip: Small adjustments in respin cycles or a splash of milk can improve creaminess perfectly.
Step 5: Add the Peanut Butter Cups
Using a spoon, create a small well in the center of your ice cream and drop in your mini peanut butter cups. Close the pint lid and use the “Mix-Ins” function to blend them evenly throughout your ice cream.
💡 Pro Tip: Add your mix-ins last to retain their texture and prevent over-processing.
Step 6: Enjoy Your Creation
Once mixed, it’s ready to dig in! Scoop out your luscious Chocolate Peanut Butter Protein Ice Cream and savor that perfect combo of creamy, chocolaty, and nutty goodness.
💡 Pro Tip: Serve immediately for the best texture or store to enjoy later.
Common Mistakes to Avoid
Learn from these common pitfalls to make every batch a smooth success:
- Freezing time too short: Not freezing the pint fully leads to icy, crumbly ice cream and stress on the blade.
- Uneven freezing surface: If the mixture isn’t frozen level, the Ninja Creami blade can get damaged or cause inconsistent texture.
- Skipping the warm water run: Not loosening the sides before spinning can cause the machine to jam or tear the ice cream.
- Adding mix-ins too early: Mixing in crunchy ingredients before the final mix step can reduce their texture and flavor impact.
- Using excess liquid: Too much milk in the base can result in a watery final product lacking creaminess.
- Not blending powders well: Clumps of protein or pudding mix create unpleasant lumps and uneven flavors.
Delicious Variations to Try
Once you’ve mastered this classic Chocolate Peanut Butter Protein Ice Cream (Ninja Creami) Recipe, why not shake things up with some tasty spins?
Chocolate Banana Boost
Add half a ripe frozen banana to your mixture for natural sweetness and extra creaminess, making it feel like a chocolate peanut butter banana dream.
Espresso Swirl
Mix in a teaspoon of instant espresso powder and swirl in some dark chocolate chips for a mocha-inspired treat with an energizing kick.
Salted Caramel Drizzle
Before serving, drizzle sugar-free caramel sauce and sprinkle flaky sea salt on top for a sophisticated twist that balances sweet and salty perfectly.
Mint Chocolate Crunch
Swap peanut butter powder for peppermint protein powder and add chocolate cookie crumbles for a refreshing, crunchy delight.
Berry Peanut Butter Swirl
Fold in frozen raspberries or strawberries during the mix-in phase for a fruity contrast that brightens the rich chocolate peanut butter flavors.
How to Serve Chocolate Peanut Butter Protein Ice Cream (Ninja Creami) Recipe
Garnishes
For an extra touch, sprinkle crushed peanuts, shaved dark chocolate, or a light dusting of cocoa powder. A drizzle of natural peanut butter warmed slightly can also add richness and a beautiful sheen.
Side Dishes
Pair your ice cream with fresh fruit slices like bananas or strawberries, crunchy granola, or even a warm slice of banana bread. For something light, serve it alongside a refreshing fruit salad.
Creative Ways to Present
Scoop it into mini waffle cones or edible chocolate cups for individual servings. Layer it in parfait glasses with nuts and berries, or top with a dollop of whipped cream and a peanut butter cup for party perfection.
Make Ahead and Storage
Storing Leftovers
Store any leftover ice cream in the original Ninja Creami pint container or an airtight container in the freezer. Seal tightly to prevent freezer burn and maintain freshness.
Freezing
Refreeze leftovers if needed, but allow the ice cream to soften slightly at room temperature before using the Ninja Creami to refresh its creamy texture.
Reheating
Avoid microwaving, as this can melt your ice cream unevenly. Instead, run warm water around the pint container for a minute, then use the Creami’s respin function to restore creamy softness.
FAQs
Can I use dairy-free protein powder?
Absolutely! Plant-based protein powders like pea or rice protein work well, just expect slight variations in texture and flavor.
What if I don’t have PBFit powder?
You can substitute with natural peanut butter powder brands or a spoonful of smooth peanut butter, but the texture may be slightly richer and less powdery.
Can I make this without the pudding mix?
Yes, but the pudding mix helps keep the ice cream creamy and stable. Without it, the texture might be a bit icier.
How long does the ice cream stay fresh?
Stored properly, it keeps best for up to 1 week in the freezer to maintain optimal flavor and texture.
Can I double the recipe?
Yes! Just double all ingredients and split into two pint containers to freeze and process separately in your Ninja Creami.
My ice cream turned out too icy, what can I do?
Try adding a splash more liquid before respinning, and ensure you fully blend your base mixture before freezing to avoid ice crystals.
Are mini peanut butter cups necessary?
They’re the fun mix-in that adds texture and bursts of flavor but can be omitted or replaced with chopped nuts or chocolate chips.
Can I prepare the mixture ahead and freeze immediately?
Yes, you can prepare your ice cream base up to a day before freezing it solid for best results.
Final Thoughts
This Chocolate Peanut Butter Protein Ice Cream (Ninja Creami) Recipe has become my go-to for when I want something indulgent but nourishing. The silky smooth texture fused with the luscious combo of chocolate and peanut butter feels like a guilt-free celebration every time. I love how simple and forgiving it is, making it perfect for busy days and those spontaneous dessert cravings.
Have you tried this Chocolate Peanut Butter Protein Ice Cream (Ninja Creami) Recipe? I’d love to hear how it turned out! Leave a comment below. If you loved this recipe, please share it with friends and family. Happy cooking! 🍨
PrintChocolate Peanut Butter Protein Ice Cream (Ninja Creami) Recipe
This Chocolate Peanut Butter Protein Ice Cream recipe combines rich chocolate and peanut butter flavors with protein-packed ingredients for a healthy, creamy treat made effortlessly in the Ninja Creami. Perfect for a post-workout snack or a guilt-free dessert, this homemade ice cream blends chocolate milk, almond milk, protein powder, and peanut butter cups to deliver a smooth, indulgent experience without excess sugar or fat.
- Prep Time: 5 minutes
- Cook Time: 0 minutes
- Total Time: 24 hours 5 minutes
- Yield: 1 serving 1x
- Category: Dessert
- Method: Blending
- Cuisine: American
- Diet: Low Fat
Ingredients
Liquid Ingredients
- 1 cup Fairlife chocolate milk
- 3/4 cup unsweetened almond milk
Dry Ingredients
- 1 scoop chocolate protein powder
- 2 tbsp pbfit powder (powdered peanut butter)
- 1 tbsp sugar-free chocolate jello pudding mix
- 1/4 tsp salt
Add-ins
- 8 mini peanut butter cups
Instructions
- Combine Ingredients: Add the chocolate milk, unsweetened almond milk, sugar-free chocolate jello pudding mix, chocolate protein powder, pbfit peanut butter powder, and salt to the Ninja Creami pint container up to the max fill line. Mix thoroughly using a hand-held frother until all ingredients are well incorporated.
- Freeze the Mixture: Place the pint container in your freezer and let it freeze for 24 hours until it is completely solid. This step is critical for proper processing in the Ninja Creami.
- Prepare for Processing: Remove the frozen pint from the freezer and run it under hot water for 60 seconds to loosen the ice cream from the sides. Make sure the surface is level to avoid damaging the blade. Securely install the pint into the Ninja Creami machine.
- First Spin: Press the ‘Lite Ice Cream’ button on the Ninja Creami to start the first spin. This processes the frozen ingredients into a creamy texture.
- Re-spin if Needed: If the ice cream texture is still powdery after the first spin, remove the lid and use the ‘Respin’ function to process it again. If necessary, add a small amount of liquid and respin until the desired creamy consistency is reached.
- Add Peanut Butter Cups: Create a small hole in the center of your finished ice cream and insert the mini peanut butter cups. Use the ‘Mix-in’ function on the Ninja Creami to evenly distribute them throughout the ice cream.
- Serve and Enjoy: Once mixed, your chocolate peanut butter protein ice cream is ready to serve. Enjoy this protein-packed, delicious treat immediately.
Notes
- Make sure to freeze the mixture for the full 24 hours for optimal texture and machine performance.
- If texture is too powdery after spinning, adding a tablespoon of liquid before respinning helps achieve creaminess.
- Use the ‘Lite Ice Cream’ setting for best results due to the low-fat nature of the protein and almond milk combination.
- This recipe serves one, but you can multiply the ingredients to make more servings if desired.
- Pbfit powder is powdered peanut butter, which provides peanut flavor with less fat and calories than regular peanut butter.
- Keep the pint container level and avoid overfilling to prevent damage to the Ninja Creami blade.
Keywords: chocolate peanut butter protein ice cream, protein ice cream, Ninja Creami dessert, healthy ice cream, homemade protein ice cream, low-fat ice cream, peanut butter cups dessert