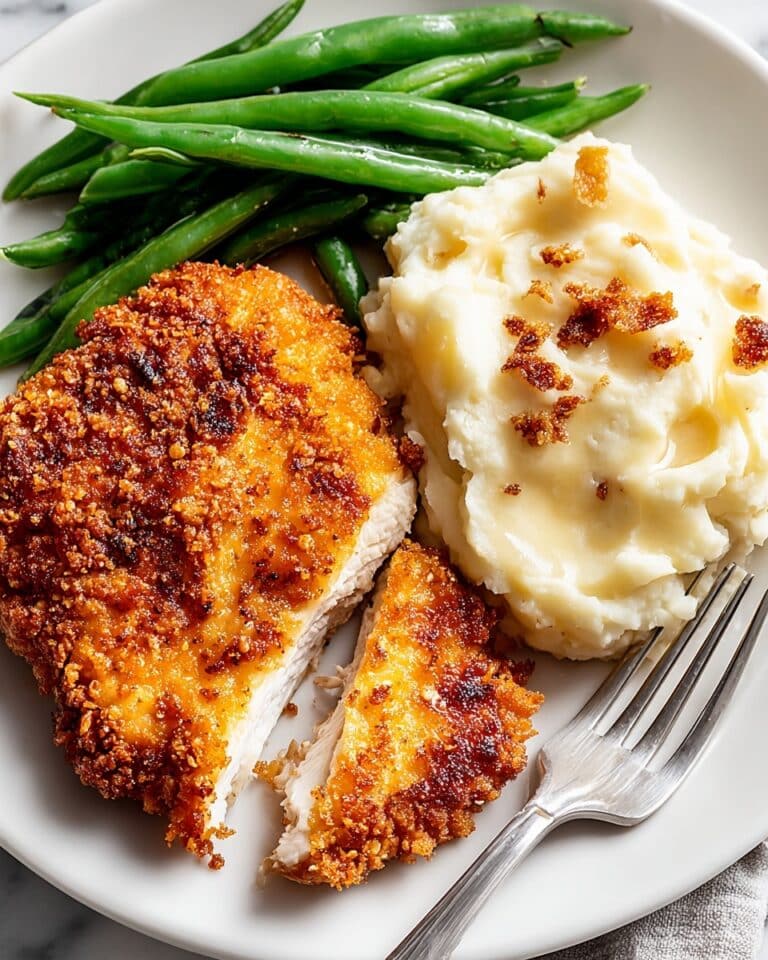
Cheesecake Factory Crusted Chicken Romano Recipe
If you’ve ever wished you could savor the restaurant magic of a beloved classic in your own home kitchen, then the Cheesecake Factory Crusted Chicken Romano Recipe is exactly what you need. This dish offers a perfect balance of crispy, cheesy, and bright flavors all wrapped around tender chicken cutlets. Imagine that golden, satisfying crust studded with savory Romano cheese and fresh lemon zest, then topped with melty mozzarella—each bite an irresistible celebration of textures and tastes that bring excitement to your dinner table. It’s comfort food elevated, easy enough for a weeknight but impressive enough for guests, making it a true go-to in your recipe repertoire.

Ingredients You’ll Need
Gathering simple yet carefully chosen ingredients is the first step to nailing this recipe. Each component plays a starring role, lending flavor, texture, or color that transforms plain chicken cutlets into a sumptuous feast.
- 2 large chicken breasts, sliced lengthwise: Thin cutlets cook quickly and evenly, ensuring juicy results.
- Salt and pepper to taste: Basic seasoning is essential to enhance every layer of flavor.
- ¼ cup (30 g) all-purpose flour: Helps the coating stick to the chicken and creates a nice base crust.
- 1 large egg: Acts as the glue that binds the crunchy crust to the chicken.
- 1 cup panko bread crumbs: Panko adds an airy, extra-crispy texture that’s truly addictive.
- ½ cup (60 g) grated Romano cheese: This sharp, salty cheese is the secret star that infuses the crust with bold flavor.
- 1 tablespoon fresh parsley, finely chopped: Adds a pop of herbaceous brightness and vibrant green color.
- 1 teaspoon lemon zest: Delivers a fresh, citrusy lift that cuts through the richness.
- 4 tablespoons (60 ml) avocado oil or olive oil: For perfectly browning the cutlets without overpowering their delicate taste.
- 1 cup mozzarella cheese, shredded: Melts beautifully atop the chicken, adding a comforting gooey finish.
How to Make Cheesecake Factory Crusted Chicken Romano Recipe
Step 1: Prepare Your Chicken Cutlets
Start by slicing your chicken breasts lengthwise into thin cutlets. If some pieces are thicker than others, give them a gentle pound to ensure even thickness. Season each cutlet on both sides with salt and pepper—this seasoning foundation is crucial for flavor that shines through the crust and cheese layers.
Step 2: Set Up Your Breading Stations
Next, create three distinct stations to bread your chicken with precision and ease: a plate with flour, a bowl with a beaten egg, and a third with a mixture of panko bread crumbs, grated Romano cheese, finely chopped parsley, and lemon zest. This setup makes the breading process smooth and ensures every cutlet gets an even coat bursting with flavor.
Step 3: Bread the Chicken
Dredge each cutlet first in the flour, shaking off any excess. Then dip it into the beaten egg, letting the liquid coat evenly. Finally, press the chicken into the panko and Romano cheese mix, making sure it’s thoroughly coated. This triple-layer breading creates that addictive crispy crust you crave.
Step 4: Cook to Golden Perfection
Pour your oil of choice into a skillet and heat it over medium heat until shimmering. Place the crusted chicken cutlets carefully in the pan and let them cook for about 4 to 5 minutes on each side. The goal is a beautiful golden crust with the chicken cooked through but juicy inside. Patience here rewards you with outstanding texture.
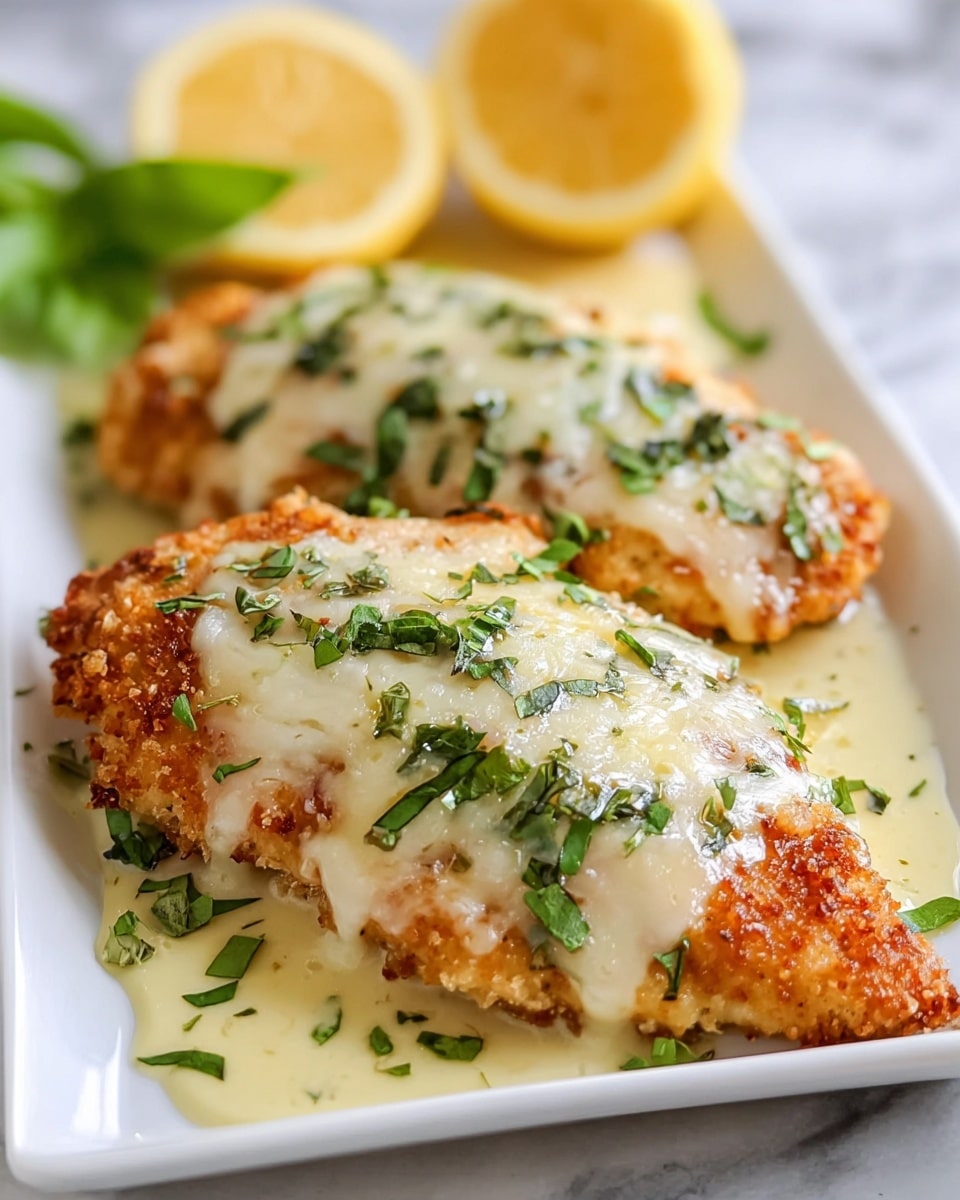
Step 5: Melt the Mozzarella Topping
Once the cutlets are cooked, sprinkle the shredded mozzarella cheese generously over each piece. Cover the skillet and let it sit for 2 to 3 minutes off the direct heat, allowing the cheese to melt into a luscious, gooey layer that melds seamlessly with the crunchy crust.
Step 6: Garnish and Serve
Remove the chicken from the heat and garnish with more fresh parsley and bright lemon wedges. These final touches bring freshness and a polished look that makes your homemade Cheesecake Factory Crusted Chicken Romano Recipe truly restaurant-worthy.
How to Serve Cheesecake Factory Crusted Chicken Romano Recipe
Garnishes
Fresh parsley and lemon wedges are classic garnishes here—they add a vibrant pop of color and aromatic freshness that brightens each bite. Don’t hesitate to sprinkle a little extra Romano cheese on top for an elegant finish.
Side Dishes
To round out the meal, pair this chicken with sides like garlic mashed potatoes, a crisp green salad, or roasted asparagus. These options complement the richness of the crust and cheese without overshadowing the star of the show.
Creative Ways to Present
For a special occasion, plate your chicken atop a bed of creamy risotto or serve it alongside a colorful medley of grilled vegetables. Drizzle a simple lemon butter sauce over everything to tie the flavors together beautifully, impressing guests with both taste and presentation.
Make Ahead and Storage
Storing Leftovers
Any leftover Cheesecake Factory Crusted Chicken Romano Recipe should be cooled to room temperature and stored in an airtight container in the refrigerator. It will stay fresh for up to 3 days, giving you a convenient and delicious meal ready to reheat.
Freezing
You can freeze cooked chicken cutlets wrapped tightly in foil or plastic wrap and placed in a freezer-safe bag. They keep well for up to 2 months. To avoid sogginess, reheat gently.
Reheating
Reheat the chicken in a low oven (around 300°F/150°C) or a toaster oven to preserve the crispiness of the crust and melt the cheese anew. Avoid microwaving if you want to maintain texture integrity.
FAQs
Can I use chicken thighs instead of breasts?
Absolutely! Boneless, skinless chicken thighs work well and can add a bit more juiciness, but adjust cooking time slightly to ensure they cook through fully.
What if I don’t have Romano cheese?
If Romano is unavailable, Parmesan can be a good substitute though with a slightly milder flavor. For best results, opt for freshly grated cheese.
Is panko necessary or can I use regular bread crumbs?
Panko is ideal for the light, crispy texture that defines this recipe. Regular bread crumbs will work but result in a denser crust.
Can this recipe be made gluten-free?
Yes! Use gluten-free flour and panko-style gluten-free bread crumbs to adapt this recipe while keeping its wonderful crispy texture intact.
How can I make this dish more lemony?
Increase the lemon zest in the crust mixture or serve extra lemon wedges on the side for guests to squeeze over their chicken for an added citrus boost.
Final Thoughts
Preparing the Cheesecake Factory Crusted Chicken Romano Recipe at home is like inviting a little bit of restaurant luxury to your dinner table. The combination of crispy, cheesy crust and tender chicken is simply irresistible, and the fresh hints of lemon and parsley bring it all to life. Whether you’re whipping it up for your family or impressing friends, this recipe delivers warm, satisfying flavors with humble ingredients and straightforward steps. Give it a try, and you might just find a new favorite to turn to again and again!
PrintCheesecake Factory Crusted Chicken Romano Recipe

Enjoy a flavorful and crispy Cheesecake Factory-style Crusted Chicken Romano, featuring tender chicken cutlets coated in a savory blend of panko bread crumbs, grated Romano cheese, fresh parsley, and lemon zest. Pan-fried to golden perfection and topped with melted mozzarella cheese, this dish is a guaranteed crowd-pleaser perfect for a quick and delicious dinner.
- Prep Time: 10 minutes
- Cook Time: 20 minutes
- Total Time: 30 minutes
- Yield: 4 servings 1x
- Category: Main Course
- Method: Frying
- Cuisine: American
Ingredients
Chicken:
- 2 large chicken breasts, sliced lengthwise into thin cutlets
- Salt and pepper to taste
Breading Stations:
- ¼ cup (30 g) all-purpose flour
- 1 large egg
- 1 cup panko bread crumbs
- ½ cup (60 g) grated Romano cheese
- 1 tablespoon fresh parsley, finely chopped
- 1 teaspoon lemon zest
Cooking and Topping:
- 4 tablespoons (60 ml) avocado oil or olive oil
- 1 cup mozzarella cheese, shredded
Instructions
- Prepare the Chicken Cutlets: Slice the chicken breasts lengthwise into thin cutlets. Use a meat mallet to pound them evenly if necessary to ensure uniform thickness. Season both sides with salt and pepper to taste.
- Set Up Breading Stations: Arrange three separate shallow dishes: one with all-purpose flour, one with the beaten egg, and one with a mixture of panko bread crumbs, grated Romano cheese, chopped parsley, and lemon zest.
- Bread the Chicken: Dredge each chicken cutlet first in the flour, shaking off excess, then dip into the beaten egg, and finally coat thoroughly with the panko-Romano-parsley-lemon mixture to ensure a crispy crust.
- Cook the Chicken: Heat avocado or olive oil in a skillet over medium heat. Fry the breaded chicken cutlets for 4 to 5 minutes on each side, or until they turn golden brown and are fully cooked through.
- Melt the Cheese: Sprinkle shredded mozzarella cheese evenly over each cooked cutlet. Cover the skillet with a lid and let the cheese melt for about 2 to 3 minutes until gooey and bubbly.
- Serve: Remove the skillet from heat, garnish the chicken with additional fresh parsley and lemon wedges if desired, and serve hot for a delightful meal.
Notes
- For extra flavor, marinate the chicken in lemon juice and garlic for 15 minutes before breading.
- You can substitute Romano cheese with Parmesan if desired.
- If you prefer a lighter version, bake the breaded cutlets at 400°F (200°C) for 20 minutes or until golden and cooked through.
- Use avocado oil for a higher smoke point and healthier fat option.
- Serve with a fresh green salad or roasted vegetables for a complete meal.
Keywords: Cheesecake Factory, crusted chicken, Romano cheese, panko, mozzarella, pan-fried chicken, crispy chicken, chicken cutlets