Edible Chocolate Pinecones Recipe
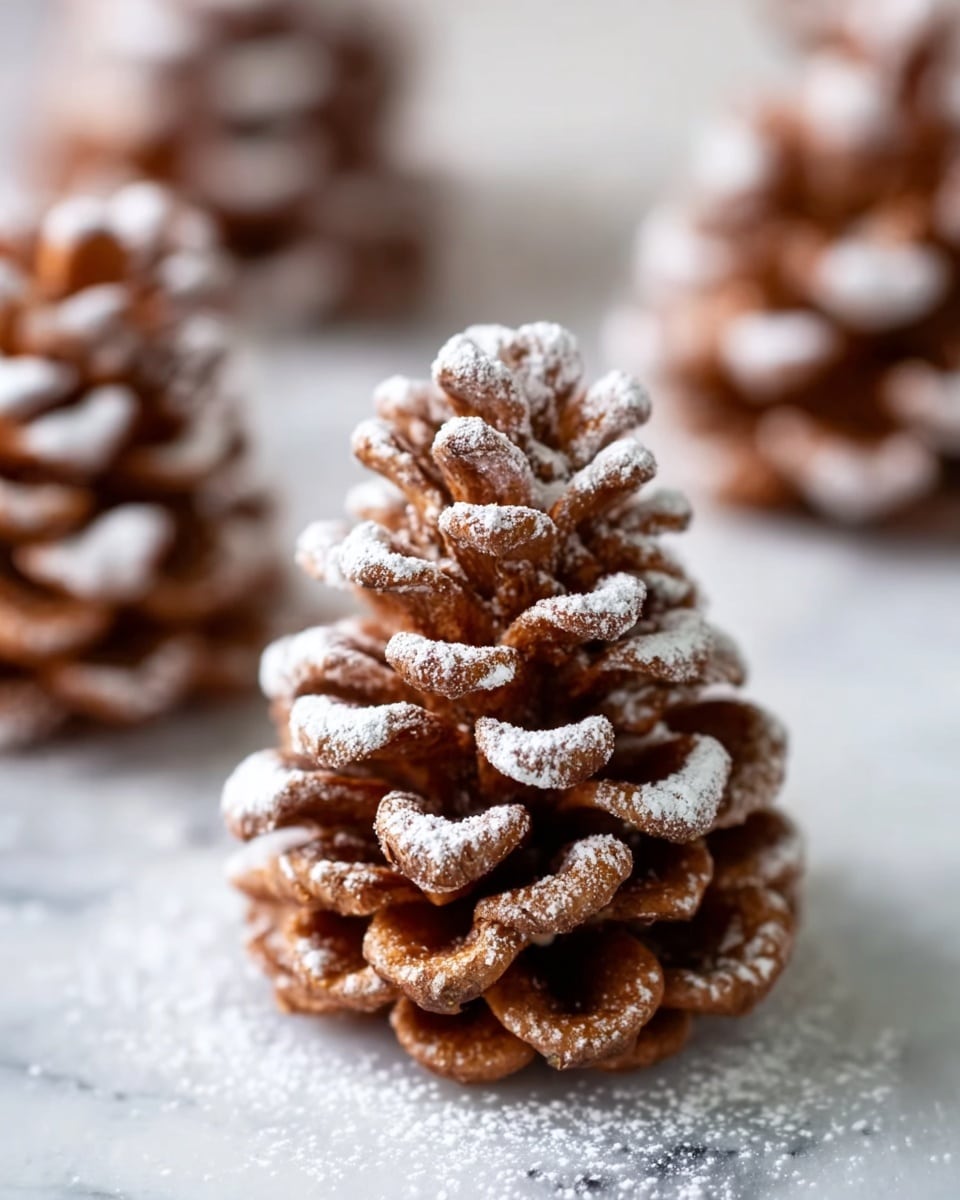
Imagine a treat that looks so delightful and festive, no one will believe you made it yourself. That’s exactly what you get with this Edible Chocolate Pinecones Recipe. Combining the rich creaminess of peanut butter and Nutella with the crunch of pretzels and Chocolate Cinnamon Toast Crunch cereal, these pinecones are a playful and delicious way to impress guests or bring warmth to a cozy gathering. They’re fun to assemble, beautiful to display, and absolutely mouthwatering to eat – a truly unique dessert that steals the show every time.
Ingredients You’ll Need
Ingredients You’ll Need
These ingredients may seem simple, but each one plays a crucial role in creating the texture, flavor, and eye-catching look of your chocolate pinecones. From the crispy cereal adding crunch to the smooth chocolate spreads bringing richness, every component is essential to this recipe’s charm.
- 3 cups Chocolate Cinnamon Toast Crunch: Adds a sweet and crunchy pinecone scale effect with a hint of cinnamon spice.
- 8 Honey Wheat Pretzel Twists: Serve as the sturdy pinecone base and provide a salty crunch.
- 2/3 cup Peanut Butter: Gives a creamy, nutty depth to the dough that holds everything together.
- 1/3 cup Nutella or Chocolate Spread: Adds luscious chocolate flavor and smooth texture.
- 4 TBSP Salted Butter (Softened): Enhances richness and helps the dough bind while balancing sweetness.
- 1 tsp Pure Vanilla Extract: Brings warmth and rounds out the flavor profile beautifully.
- 1 1/4 Cup Powdered Sugar: Sweetens and thickens the mixture to the perfect consistency for shaping.
How to Make Edible Chocolate Pinecones Recipe
Step 1: Prepare Your Workspace
Start by lining a baking tray with parchment paper. This simple step will make placing and chilling your pinecones easier, plus it ensures they don’t stick or deform while they set. Having everything ready before you assemble lets the process flow smoothly.
Step 2: Make the Chocolate Peanut Butter Dough
In a medium bowl, combine the peanut butter, Nutella, softened butter, and vanilla extract. Stir these together until completely smooth and silky. This mixture is the rich, creamy heart of your pinecones, so take your time to get it just right.
Step 3: Incorporate Powdered Sugar
Slowly add the powdered sugar a little at a time, mixing well after each addition. This gradual approach helps you control the dough’s consistency, so it turns thick enough to mold but remains pliable and not crumbly. The powdered sugar sweetness is key for balancing the slight saltiness from the butter and pretzels.
Step 4: Divide and Shape the Dough
Once your dough reaches a thick, dough-like texture, divide it evenly into 8 portions. Each portion will encase one pretzel twist, forming the pinecone shape. Wrap the dough completely around a pretzel rod, tapering to a point at the top to mimic a natural pinecone silhouette. Ensure the pretzel is fully covered for a seamless effect.
Step 5: Add Cereal Scales
Place your shaped pinecones on the prepared baking tray. Starting from the bottom, carefully press one piece of Chocolate Cinnamon Toast Crunch cereal at a time onto the dough in a spiral pattern, angling each square so it points slightly upwards, creating that layered pinecone look. As you reach the top, carefully slice a cereal square in half diagonally to fit snugly and complete the cone’s tip.
Step 6: Final Touch and Chill
For an enchanting snowy effect, dust each pinecone lightly with powdered sugar. This snowy dusting not only adds visual appeal but also a touch of extra sweetness. Refrigerate the pinecones in an airtight container to let them set properly before serving.
How to Serve Edible Chocolate Pinecones Recipe
Garnishes
Decorate with a sprinkle of extra powdered sugar or a light drizzle of melted chocolate for some gloss. Adding tiny edible silver balls or white sugar pearls creates sparkling “snowflakes” that elevate the festive vibe. Fresh mint leaves nearby can introduce a pop of green to complement the pinecone theme.
Side Dishes
Serve these pinecones alongside hot cocoa or coffee for the perfect winter pairing. They also go wonderfully with a simple fruit salad, letting the pinecones be the star without competing flavors. If you want to enhance a dessert spread, pair them with vanilla ice cream or whipped cream for added indulgence.
Creative Ways to Present
Arrange the pinecones in a rustic wooden tray or on a bed of pine needles (make sure they’re clean and edible-safe) for an authentic forest effect. Displaying them in small, clear glass jars or wrapping individually with cellophane and a ribbon makes for charming gifts. For parties, serve on cake stands surrounded by pine branches or fairy lights to set a magical tone.
Make Ahead and Storage
Storing Leftovers
Store any leftover edible pinecones in an airtight container at room temperature or in the fridge if your home is warm. Keeping them sealed prevents the cereal from losing its crunch and the dough from drying out. They’ll remain delicious and fresh for up to 3 days.
Freezing
You can freeze these pinecones if you want to prepare ahead of time. Place them in a single layer on a baking sheet to freeze solid, then transfer to a freezer-safe container or bag. They’ll keep well for up to a month. Just thaw at room temperature before serving.
Reheating
These pinecones are best enjoyed cold or at room temperature, so reheating isn’t necessary. If you prefer a slightly softened center, pop them in the microwave for 5-7 seconds, but be careful not to melt the chocolate or soften the crunch too much.
FAQs
Can I use a different cereal instead of Chocolate Cinnamon Toast Crunch?
Absolutely! While Chocolate Cinnamon Toast Crunch gives a lovely sweet cinnamon flavor and chocolatey crunch, you can experiment with other cereals like Cocoa Pebbles or even plain rice cereal for different tastes and textures. Just choose one that has a firm texture to hold shape well.
Is there a nut-free alternative for the peanut butter?
Yes, if you need to avoid nuts, try using sunflower seed butter or soy nut butter as a substitute. These options maintain the creamy texture and binding qualities necessary for the dough, while being allergy-friendly.
How do I make sure the cereal sticks well to the cone?
Make sure your dough is thick but still pliable before pressing the cereal onto it. Press each piece firmly and slightly angle it upwards in a spiral fashion. Chilling the pinecones after assembly helps set everything so the cereal stays firmly in place.
Can I make smaller or larger pinecones?
Definitely! Just adjust the amount of dough and cereal according to the pretzel rod size. Smaller pinecones make cute party favors, while larger ones serve as impressive dessert centerpieces. The key is to maintain the pinecone shape and cereal scale pattern.
How long does it take to assemble these pinecones?
Plan on about 20 minutes total to assemble all 8 pinecones once your dough is ready. The process is quite fun and intuitive, especially if you take your time arranging the cereal “scales” in a neat spiral. It’s perfect for a relaxed baking afternoon.
Final Thoughts
This Edible Chocolate Pinecones Recipe is such a joyful way to bring creativity and deliciousness together in one dessert. Whether you’re making them for the holidays or simply to brighten a get-together, these charming treats always impress with their unique look and irresistible taste. Give this recipe a try—you might just discover a new favorite that everyone will ask you to make again and again!
PrintEdible Chocolate Pinecones Recipe

These Edible Chocolate Pinecones are a delightful, no-bake holiday treat combining crunchy cereal and pretzels with a rich peanut butter and Nutella mixture to create a festive pinecone-shaped dessert. Perfect for serving at holiday parties or as a fun family project, they are visually impressive and taste deliciously chocolatey with a hint of cinnamon.
- Prep Time: 15 minutes
- Cook Time: 0 minutes
- Total Time: 15 minutes
- Yield: 8 servings 1x
- Category: Dessert
- Method: No-Cook
- Cuisine: American
Ingredients
Chocolate Pinecone Base
- 3 cups Chocolate Cinnamon Toast Crunch
- 8 Honey Wheat Pretzel Twists
Chocolate Peanut Butter Dough
- 2/3 cup Peanut Butter
- 1/3 cup Nutella or Chocolate Spread
- 4 TBSP Salted Butter (Softened)
- 1 tsp Pure Vanilla Extract
- 1 1/4 cups Powdered Sugar
Instructions
- Prepare the baking tray: Line a baking tray with parchment paper and set aside to keep your workspace clean and to enable easy transfer of the pinecones.
- Mix peanut butter mixture: In a medium bowl, combine peanut butter, Nutella, softened butter, and vanilla extract. Stir well until the mixture is completely smooth and creamy.
- Add powdered sugar gradually: Slowly add powdered sugar a little at a time, mixing thoroughly after each addition to incorporate it fully, resulting in a thick dough consistency.
- Form dough portions: Once the dough is thick and pliable, divide it into 8 equal parts for individual pinecones.
- Mold around pretzels: Take one portion and mold it fully around one pretzel twist into a cone shape, ensuring the pointy end is at the top and the pretzel is completely covered.
- Place on baking tray: Transfer the shaped cone onto the parchment-lined tray. Repeat this process for all remaining portions and pretzels.
- Attach cereal scales: Starting from the bottom, press in one Chocolate Cinnamon Toast Crunch square at a time in a spiral upwards, angling each one slightly upwards to mimic pinecone scales.
- Top details: Upon reaching the top, carefully slice a cereal square diagonally with a serrated knife to create the small top middle pieces and place them at the cone’s tip.
- Finish and decorate: Dust the finished pinecones lightly with extra powdered sugar to give them a snowy, festive look.
- Storage: Store completed pinecones in an airtight container for up to 3 days to maintain freshness.
Notes
- Ensure the butter is softened to room temperature for easier mixing.
- Use a serrated knife for clean, precise cuts on the cereal pieces.
- Handle the finished pinecones gently as they are delicate and can break.
- For a gluten-free version, substitute pretzel twists with gluten-free pretzels and ensure cereal is gluten-free as well.
- These treats do not require refrigeration but should be stored in a cool, dry place.
Keywords: Edible Chocolate Pinecones, Holiday Treats, No Bake Desserts, Peanut Butter Nutella Treats, Festive Snacks, Christmas Desserts