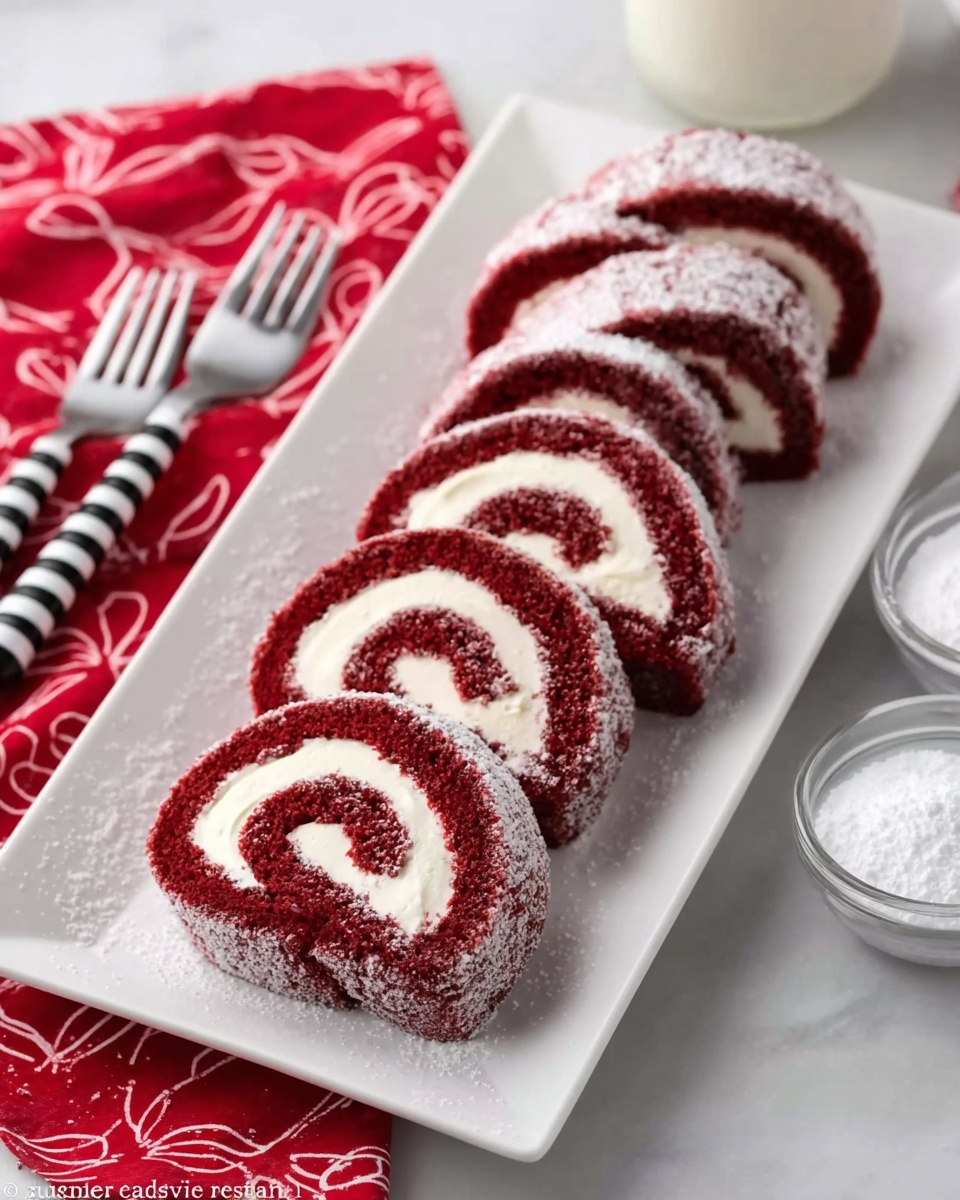
Red Velvet Cake Roll Recipe
If you’ve ever dreamed of combining the rich, velvety texture of a classic red velvet cake with the elegant charm of a rolled sponge, you’re in for a treat. This Red Velvet Cake Roll Recipe takes everything you love about traditional red velvet—moist, tender crumb, that iconic hint of cocoa, and vibrant red hue—and wraps it all up into one stunning and delicious dessert. The creamy, dreamy cream cheese filling perfectly balances the cake’s subtle cocoa notes, making every bite an irresistible slice of history and delight. Trust me, once you try this recipe, it’s going to become a go-to for celebrations, cozy gatherings, or just because.
Ingredients You’ll Need
Getting this Red Velvet Cake Roll Recipe just right means choosing simple but essential ingredients. Each one has a special role: from the cocoa’s gentle earthiness to the buttermilk’s tang that makes the crumb so tender, every element contributes to the perfect taste, texture, and that signature red color.
- ¾ cup all-purpose flour: Stirred, spooned, and leveled for lightness and structure.
- ¼ cup unsweetened cocoa powder: Adds subtle chocolate depth and richness without overpowering.
- 1 tsp baking powder: Helps the cake rise perfectly for a light, springy texture.
- ½ tsp salt: Balances sweetness and enhances flavor complexity.
- 4 large eggs: Whipped to create airiness and lend structure to the sponge.
- ¾ cup granulated sugar: Sweetens while giving tenderness to the crumb.
- 1 Tbsp oil (canola or vegetable): Keeps the cake moist without weighing it down.
- 2 Tbsp buttermilk (or milk + vinegar): Adds moisture and subtle tang for the classic velvet softness.
- 1 tsp white distilled vinegar: Activates leavening and enhances the cake’s tender crumb.
- 1 tsp vanilla extract: Deepens flavor with a warm, sweet note.
- 2 Tbsp red food coloring: The magic that gives this cake its iconic, festive red hue.
- Powdered sugar (optional): For a delicate finishing dusting.
- 8 oz brick cream cheese (cold): Creates that luscious, tangy filling that makes this roll irresistible.
- ½ cup butter (room temperature): Adds richness and smoothness to the frosting.
- 1 cup powdered sugar: Sweetens and thickens the cream cheese frosting.
- 1 tsp vanilla extract: Elevates the filling with subtle warmth and depth.
How to Make Red Velvet Cake Roll Recipe
Step 1: Prepare Your Pan and Oven
First things first, get that oven preheated to 350 degrees Fahrenheit. Line a 15×10-inch jelly roll pan with parchment paper, making sure to cover the bottom and sides with a bit of an overhang. It’s important to either grease and flour the exposed sides or use a nonstick spray with flour to avoid sticking. This prep ensures your cake will lift out smoothly when it’s time to roll.
Step 2: Mix the Dry Ingredients
Now sift together the flour, cocoa powder, baking powder, and salt into a bowl. Sifting is key here because it aerates the flour and combines everything evenly, preventing clumps and ensuring a smooth batter that’s easy to fold in.
Step 3: Whip the Eggs and Sugar
In your mixer bowl fitted with a whisk attachment, whip the eggs on medium speed for around 5 minutes until they are light, frothy, and almost tripled in volume. This step is crucial to get the sponge nice and airy. Slowly add the sugar and oil with the mixer running on medium/low speed so everything blends seamlessly.
Step 4: Add Liquids and Combine
Mix in the buttermilk, vinegar, vanilla extract, and red food coloring. You’ll notice the batter turning that vibrant red that screams celebration! Fold in your sifted dry ingredients gently until just combined—overmixing here can weigh down your batter.
Step 5: Bake the Cake
Pour the batter evenly into your prepared pan and spread it out. Bake at 350 degrees Fahrenheit for 13 to 15 minutes or until the cake springs back when touched lightly or a toothpick inserted comes out clean with maybe a few moist crumbs. Timing is everything here to keep the sponge moist but firm enough to roll.
Step 6: Roll While Warm
Immediately after baking, carefully lift the cake out of the pan using the parchment paper and place it on a wire rack. Let it rest for 3 minutes so steam can release, which prevents sogginess. Then, fold the parchment over one of the short 10-inch sides and start rolling the cake tightly while it’s still warm. This is what sets the classic roll shape without cracking.
Step 7: Make the Cream Cheese Filling
While your cake cools completely, beat the cold brick of cream cheese together with room temperature butter until smooth using an electric mixer. Add powdered sugar and vanilla extract and mix until fully combined. Chill this filling while waiting for your cake to cool to ensure it’s the perfect spreadable consistency.
Step 8: Unroll and Fill
Once the cake is cool, gently unroll it. If the cake feels sticky or warm, give it a few more minutes to rest unrolled. Spread the cream cheese filling evenly over the surface using an offset spatula—keep the spatula tip submerged in the frosting to avoid lifting crumb bits. Leave a ½-inch bare space at the end you’ll roll towards.
Step 9: Re-Roll and Chill
Carefully roll the cake back up as tightly as possible. For the best texture and flavor, wrap it well and refrigerate or freeze it for 1 to 2 hours so the filling sets nicely. You can also freeze it overnight if you want to make it ahead.
Step 10: Slice and Serve
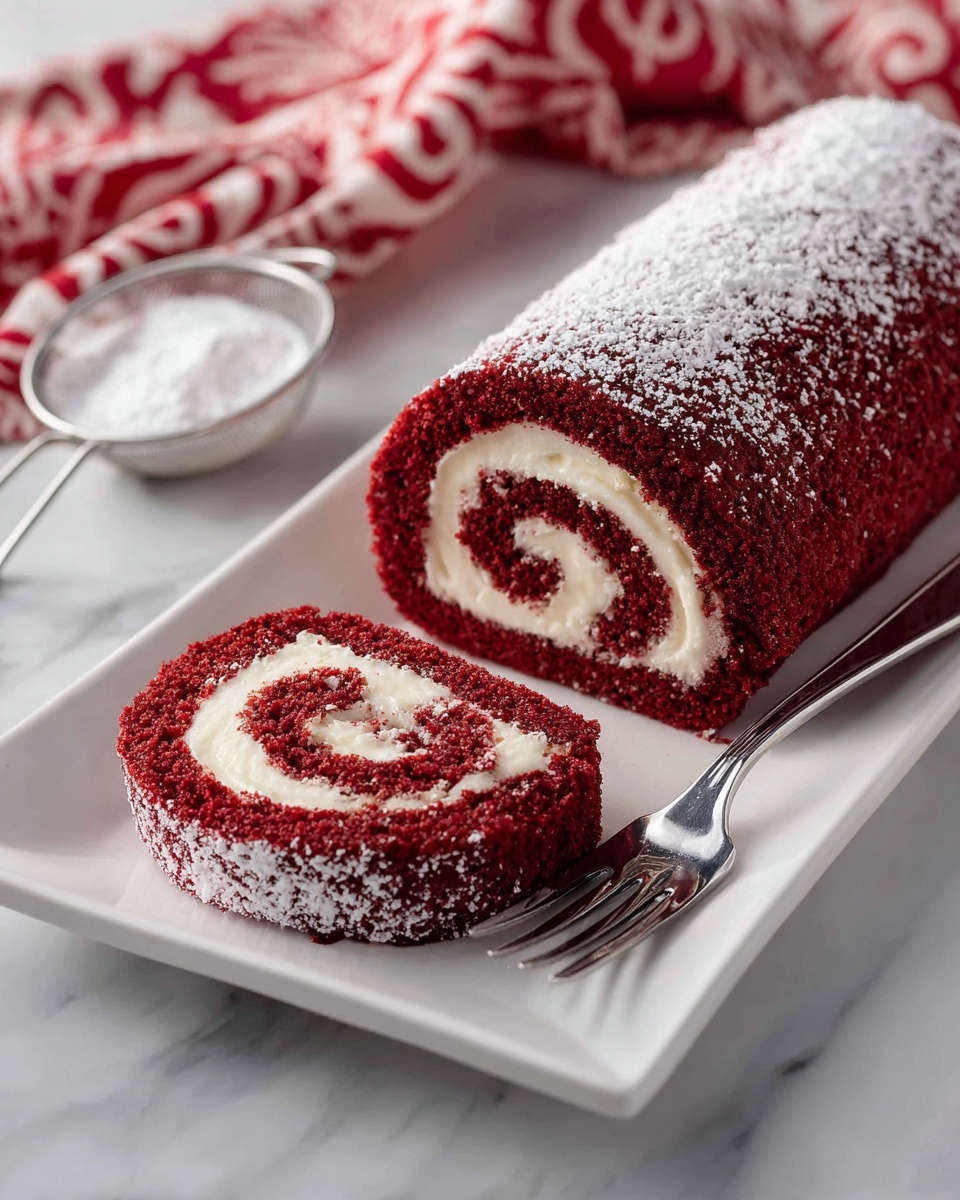
When ready to serve, unwrap the chilled cake, optionally dust the top with powdered sugar for an elegant touch, and slice into 12 even pieces using a serrated knife. For clean cuts, rinse and dry your knife between slices. There you have it—the perfect Red Velvet Cake Roll!
How to Serve Red Velvet Cake Roll Recipe
Garnishes
For an extra pop, dust the cake roll with powdered sugar or even some edible glitter if you’re feeling festive. Fresh berries like raspberries or strawberries make delightful accents that add a natural sweetness and vibrant color contrast. A sprig of mint or a drizzle of melted white chocolate can also elevate the presentation effortlessly.
Side Dishes
This cake roll pairs beautifully with light accompaniments such as vanilla bean ice cream or freshly whipped cream to balance the richness. A strong cup of coffee or a smooth hot chocolate enhances the experience by complementing the cake’s subtle cocoa flavors beautifully.
Creative Ways to Present
Try serving the Red Velvet Cake Roll Recipe as part of an elegant dessert platter layered with other bite-sized sweets, or slice it into mini-sized rolls for parties and gatherings. You can also stand the slices upright on a decorative board and scatter edible flowers around for a stunning centerpiece dessert display.
Make Ahead and Storage
Storing Leftovers
Keep any leftover cake roll tightly wrapped in plastic wrap or stored in an airtight container in the refrigerator to maintain freshness. It stays moist and delicious for up to 3 days, making it ideal for preparing in advance of special occasions.
Freezing
If you want to freeze your Red Velvet Cake Roll Recipe, wrap it well in plastic wrap and then in foil, or place it in a freezer-safe container to prevent freezer burn. It can be frozen for up to 2 months without losing quality. When you’re ready, thaw it in the refrigerator overnight for the best texture.
Reheating
This dessert is best enjoyed chilled or at room temperature, so reheating isn’t generally recommended. If you want it a bit softer, just let it sit out for 20 minutes before serving, and your cream cheese filling will be perfectly soft and creamy again.
FAQs
Can I use regular milk instead of buttermilk?
Absolutely! In this recipe, you can substitute buttermilk by mixing 2 tablespoons of milk with a ½ teaspoon of vinegar, letting it sit for 5 minutes. This mimics buttermilk’s acidity and helps keep the cake tender and fluffy.
Why do I need to roll the cake while it’s warm?
Rolling the cake when warm helps it bend without cracking by forming the spiral shape gently. If you wait too long and the cake cools completely, it might be brittle and crack when rolled.
Can I make this recipe without food coloring?
You can omit the red food coloring, but keep in mind the cake will have more of a cocoa hue and won’t have that iconic red velvet look. The flavor remains delicious, though!
What can I do if my cake cracks while rolling?
Don’t worry if your cake cracks a bit—it’s still delicious! You can cover any cracks with extra frosting after rolling, or slice the roll into pieces, then layer them with cream cheese frosting for a trifle-like dessert.
How do I achieve the perfect cream cheese filling texture?
For a silky smooth filling, ensure your butter is at room temperature and the cream cheese is cold before mixing. Beat them together thoroughly before adding powdered sugar and vanilla. This creates a light but stable frosting ideal for spreading.
Final Thoughts
This Red Velvet Cake Roll Recipe is truly a showstopper with its beautiful color, tender crumb, and luscious cream cheese filling all wrapped into one delightful roll. Whether for a holiday, birthday, or simply to brighten a weeknight dessert, it’s a recipe worth making, sharing, and savoring. So grab your mixing bowl, preheat that oven, and dive into the magic of baking this heartwarming classic!
PrintRed Velvet Cake Roll Recipe

This Red Velvet Cake Roll is a classic dessert featuring a tender, cocoa-infused red velvet sponge cake rolled around a smooth and creamy cream cheese frosting. Perfectly moist and elegantly presented, this cake roll is ideal for special occasions or whenever you want a delightful treat. The cake is baked in a jelly roll pan, carefully rolled while warm to maintain flexibility, then filled and chilled for a clean, beautiful slice every time.
- Prep Time: 20 minutes
- Cook Time: 15 minutes
- Total Time: 2 hours 30 minutes
- Yield: 12 servings 1x
- Category: Dessert
- Method: Baking
- Cuisine: American
- Diet: Vegetarian
Ingredients
Cake
- ¾ cup all-purpose flour (stir, spoon & level)
- ¼ cup unsweetened cocoa powder
- 1 tsp baking powder
- ½ tsp salt
- 4 large eggs
- ¾ cup granulated sugar
- 1 Tbsp oil (canola or vegetable)
- 2 Tbsp buttermilk (or 2 Tbsp milk plus ½ tsp vinegar, let sit 5 minutes before using)
- 1 tsp white distilled vinegar
- 1 tsp vanilla extract
- 2 Tbsp red food coloring (one 1 oz bottle)
Frosting
- 8 oz brick cream cheese (cold)
- ½ cup butter (1 stick, room temperature)
- 1 cup powdered sugar
- 1 tsp vanilla extract
- Powdered sugar for dusting (optional)
Instructions
- Prepare the Pan: Preheat your oven to 350°F (177°C). Line a 15×10-inch jelly roll pan with parchment paper, making sure it covers the bottom and sides with an extra inch or two overhanging. Grease and flour the exposed sides, or use a nonstick spray with flour like Baker’s Joy to prevent sticking.
- Sift Dry Ingredients: In a medium bowl, sift together the all-purpose flour, unsweetened cocoa powder, baking powder, and salt. Set this mixture aside for later use.
- Whip the Eggs: Using the whisk attachment on a stand mixer, beat the eggs on medium speed for about 5 minutes until they become light, frothy, and have increased in volume.
- Add Sugar and Oil: With the mixer running on medium to low speed, gradually add the granulated sugar and the oil. Continue mixing until fully incorporated.
- Combine Wet Ingredients: Add the buttermilk, white distilled vinegar, vanilla extract, and red food coloring to the egg mixture. Mix to combine evenly.
- Incorporate Dry Ingredients: Gently add the sifted flour mixture to the wet ingredients. Mix just until combined to avoid overmixing, then pour the batter evenly into the prepared jelly roll pan. Smooth the top evenly with a spatula.
- Bake the Cake: Bake in the preheated oven for 13 to 15 minutes, or until the cake springs back when lightly pressed or a toothpick inserted in the center comes out clean or with a few moist crumbs.
- Cool and Roll the Cake: Remove the cake from oven and immediately lift it out of the pan by the parchment paper. Place it on a wire rack and allow it to rest for 3 minutes to release steam. While the cake is still warm, use the parchment paper to gently fold one shorter side and tightly roll the cake into a log. Let it cool completely on the wire rack in the rolled position.
- Make the Filling: While the cake cools, beat together the cold cream cheese and room temperature butter using an electric hand mixer until smooth. Add powdered sugar and vanilla extract. Beat again until the frosting is creamy and well combined. Chill the filling in the refrigerator until ready to use.
- Fill the Cake: Carefully unroll the cooled cake. If it feels warm or sticky, let it rest unrolled for 5 minutes. Then, spread the cream cheese frosting evenly over the cake, leaving a ½-inch border at one edge free of frosting. Keep the spatula tip in the frosting as you spread to avoid lifting crumbs into the icing.
- Re-roll and Chill: Roll the cake tightly again without parchment paper. Wrap the roll in plastic wrap and refrigerate or freeze for 1 to 2 hours to let the filling set firmly. You may also freeze overnight if desired.
- Serve: Once chilled, unwrap the cake roll. Optionally dust the top with powdered sugar. Using a serrated knife, cut the roll into 12 even slices, rinsing and drying the knife between cuts for clean slices. Serve chilled and enjoy!
Notes
- Ensure to roll the cake while it is warm to prevent cracking.
- If you don’t have buttermilk, use milk with vinegar as a substitute.
- Use a serrated knife and clean it between cuts for neat slices.
- Red food coloring is key for the classic red velvet color; adjust amount to preference.
- For best taste and texture, chill the cake roll before slicing.
Keywords: Red Velvet Cake Roll, Cream Cheese Frosting, Jelly Roll Cake, Holiday Dessert, Classic Red Velvet